Modern television receivers are capable of broadcasting digital channels without connecting additional devices, but not all users have advanced TV models, so they are forced to use external equipment, the main element of which is a digital tuner.
The procedure for connecting it is not particularly complicated, but there are some nuances, about which information is given below.
What is the difference between digital television and analogue?
Almost the entire world already uses digital broadcasting (DV).
Unfortunately, our country is still an outsider and the gradual transition from analogue to digital television began quite recently. These two broadcast standards are fundamentally different from each other. A digital signal is a set of digital codes.
Thanks to this, the data reaches the user equipment without distortion, while the analog signal is subject to interference and is affected by the distance of stations. As a result, it can be stated that digital data transmission is ideal.
The set of codes is received by a special receiver, which decrypts them and broadcasts them to the TV. Such a unit is already built into modern TVs by the manufacturer, but in the case of outdated television receivers, it is necessary to connect additional equipment - a “receiver” or, as it is popularly called, a “set-top box”.
There is a large selection of devices on the market today, but the essence of the process of connecting them is the same for all models.
After connecting the set-top box, even to an outdated TV, the user will be able to enjoy the quality of digital television and watch their favorite shows and movies in high definition.
How to find out if a JVC TV supports DVB-T2?
In order to determine whether a JVC brand TV supports the digital broadcasting standard, look at the TV passport, it should indicate the presence of a DVB-T2 tuner and other characteristics. If you do not have the documents saved, you can look up the information on the Internet by indicating the full model of the TV on the RTRS website. You can also call the manufacturer’s hotline and ask them about the characteristics of your TV model.
The following are two different ways to search for channels, one for simple models, the other for Smart TVs running on Android OS
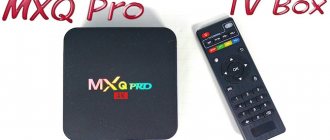
Required Equipment
To view DV you definitely need a receiver. First, it is recommended to study the instructions for the TV, since many TVs, for example, from and Philips, are already equipped with the necessary equipment.
This is indicated in the user manual and in this case there will be no need to incur additional financial expenses for the purchase of the set-top box.
If the TV is not equipped with such a unit, then based on the user’s personal needs, you need to buy a receiver with a suitable set of functions.
For example, if a TV owner prefers to use flash drives to watch movies recorded on them, then it is better to ensure that the set-top box has a USB connector.
The components included with the device include everything necessary to quickly put it into operation.
Typically this list includes the following:
- Instructions;
- “RCA” wire or as people used to call it: “Tulip” or “HDMI” cable;
- The tuner itself, that is, the set-top box;
- Cardboard box with a picture of the device and its brief characteristics;
- DU;
- Batteries for remote control;
- Power unit;
- Warranty documents.
Sometimes the list of components of individual budget models may lack a cable or other important element, without which it becomes impossible to connect the equipment.
In this case, you need to separately purchase the missing components and only then proceed to connect the device to the TV.
What you need to connect digital on an old TV
To receive digital television you will need the following set of equipment:
- Old TV. The later the model comes out, the easier it is to “make friends” with an external tuner.
- Console. It is she who converts the digital signal into sound and image.
- A regular antenna capable of receiving DVB-T2 TV broadcasts. (find out in 3 minutes which one is better to choose).
- Cables: antenna (with a characteristic impedance of about 75 Ohms) and an adapter through which old TVs (such as Goldstar, Vityaz, Rubin, etc.) are connected to the receiver (more on this below).
- RF modulator. It will be needed where not only picture tubes are used (the use of a CRT does not in any way interfere with the “digital” one), but an old Soviet-designed lamp, the connection diagram of which, in principle, does not provide for operation through a “tulip” or the use of other low-frequency inputs.
Connecting and setting up the set-top box
In order to protect yourself and not damage expensive digital equipment, connecting all devices with wires must be done in a state disconnected from electricity.
For connection, it is recommended to use more modern interfaces, if available.
For example, if “HDMI” is present, then give preference to the connection through this particular connector. This will have a positive effect on the quality of signal reproduction.
If there is no digital input, you will have to use an analog interface, but it is better to give preference to RCA (tulip).
If the console does not have a suitable output
The digital tuner and TV may have jacks for AV reception and transmission, but they are in no way the same. What to do in this case?
- change TV receiver or set-top box;
- use adapters.
Here are just a few scenarios for using these adapters:
- If your new set-top box only supports HDMI output, use an RCA converter. Some quality loss is inevitable (HD channels won't show up, for example), but the signal is properly split in the old three ways into video and audio for left and right speakers. The price of the problem is about 500 rubles.
- If you're using a plasma or LCD TV (Sony, Onida, and others from the late 90s to early 2000s), you can install an older VGA video connector. For such cases, HDMI-VGA adapters exist and are actively sold. However, one thing to keep in mind when using them is that you will also need a separate cable (usually a 3.5mm jack) to stream audio to your TV.
- There may also be problems with SCART and S-Video compatibility. In this case, an adapter is also used. Most models also support triple RCA cinch outputs. Instead of a conclusion
Although older TVs do not have an internal digital tuner, they can still be used if a set-top box is connected. There are many connection options, as well as adapters for all types of interfaces, so you can easily choose the one that is needed in a particular case.
After the nationwide transition from analogue to digital broadcasting, owners of old TVs were faced with a problem: what to do next? CRT “boxes” clearly do not perceive “digital”. The receiver needs to be connected, but the methods are not always obvious.
Let's figure out how to properly connect a digital set-top box to an old TV and what needs to be done to avoid pitfalls.
Setting up the AV receiver
The setup process is simple. It can be presented step by step in the form of the following stages of action:
- Turn on TV and receiver;
- Activate AV mode on the TV;
- Enter the receiver menu;
- Launch “Autosearch”;
- Wait for the process to complete;
- Save the list of detected channels;
- Ready. You can start watching.
AV/TV mode
To set up in this mode, you need to enter “AV/TV” using the TV remote control.
After this, the settings will be displayed on the screen, where the following columns are present:
- AV;
- HDMI;
- SCARD;
as well as others.
You need to specify the column corresponding to the physical connection of the devices, for example, if the set-top box is connected to the TV via a tulip, then click “AV”.
Specify “HDMI when connecting with an HDMI cable.” When using a “comb” - SCARD.
Some TVs, after entering the “AV” menu, automatically switch to “AV1”, ..., “AV5”, etc.
In this case, you need to experimentally find the menu by simply searching through them and make the settings.
If the console does not have a suitable output
The digital tuner and TV may have jacks for AV reception and transmission, but they are in no way the same. What to do in this case?
- change TV receiver or set-top box;
- use adapters.
Here are just a few scenarios for using these adapters:
- If your new set-top box only supports HDMI output, use an RCA converter. Some quality loss is inevitable (HD channels won't show up, for example), but the signal is properly split in the old three ways into video and audio for left and right speakers. The price of the problem is about 500 rubles.
- If you're using a plasma or LCD TV (Sony, Onida, and others from the late 90s to early 2000s), you can install an older VGA video connector. For such cases, HDMI-VGA adapters exist and are actively sold. However, one thing to keep in mind when using them is that you will also need a separate cable (usually a 3.5mm jack) to stream audio to your TV.
- There may also be problems with SCART and S-Video compatibility. In this case, an adapter is also used. Most models also support triple RCA cinch outputs.
Types of connections
Depending on what connectors the TV and set-top box are equipped with, the connection methods also differ.
The receiver can be connected to the TV via:
- “Tulip” - RCA wires;
- "HDMI";
- Coaxial cord (antenna).
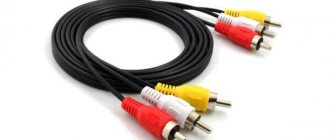
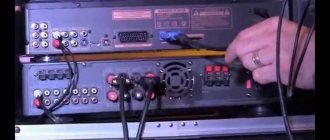
RCA cable
This is the most common and widely used method of connecting a set-top box to a TV.
Although the video broadcast resolution is not as high as with the “HDMI” option, the difference is practically not noticeable to the naked human eye on a TV with small screens.
Due to the fact that each connector and plug of the Tulip connection is painted in a bright individual color, it is very difficult to make a mistake during the connection procedure.
The meanings of the color designations are as follows:
- Yellow for video signal;
- Red for audio output;
- White for audio input.
The user is only required to insert a plug of a certain color into a connector of exactly the same color. Then install the cable coming from the antenna into the “RF IN” connector.
If the TV does not have color “RCA” connectors, then the use of “Combs” is allowed.
It is labeled “SCART” on the back of the TV. You will need to use a cable with the appropriate plugs, as shown in the figure below.
HDMI connector
If the equipment has this type of connectors, then the quality of the image and sound will be significantly higher. In this case, you will need to make a connection via an HDMI cable.
It allows you to provide video resolutions reaching 1080p, and audio quality – 192 kHz.
Antenna cable
When the TV does not have more modern interfaces other than the antenna input, the set-top box can be connected to the TV via the “RF-OUT” connector.
For this purpose, it is necessary to use a special cord, as shown in the photo below.
Unfortunately, this connection method will lag far behind in broadcast quality, but consumer requirements for an outdated or old TV are initially low.
Possible connection methods
The method of connecting a digital television receiver to an old TV directly depends on the connectors that are present on each device. The greatest difficulty arises when you need to connect a lamp device or there is a mismatch of connectors between the set-top box and the TV, even if the latter is modern.
3RCA
The external one consists of three ordinary wires connected to each other, with plugs of different colors at the end of each. Cables and connectors are painted in identical colors to avoid confusion and to indicate the purpose of each connector. So, the yellow color indicates the transmission of a video signal, the white and red plugs indicate that the left and right audio channels are transmitted.
Due to the design of the plugs, which outwardly resemble tulips, the cord began to be called “tulips”. Sometimes you can hear the name “bells”.
The quality is inferior to the more modern HDMI. Tulips transmit an analog signal.
Additional Information. Better image transmission will be carried out by the same tulips, only with an increased number of connections (plugs and ports on the equipment). The cable is structurally the same, but with five tulips. If previously the video channel was transmitted only by the yellow tulip, then the component cable (as well as the interface) is divided into several video channels (red, blue and green). It is through separation that a higher quality picture is ensured. The audio is still broadcast by red and white tulips.
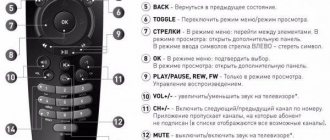
Instructions for connecting and setting up channels:
- All equipment is turned off by at least a control panel.
- To connect a TV set-top box with tulips, you need to insert the plugs of both ends of the cord into the receiver and the TV. All equipment is first turned off by at least a control panel. Carefully ensure that the colors match when connecting. Although it is difficult to mix up tulips, such situations still happen.
If the old TV has two tulips and not three, then you need to plug yellow and white into the connector. Red is left free. The sound will be reproduced in mono format without separation into right and left sounds. - Turn on the TV and then the tuner.
- Switch your TV to a different display mode. You must select AV mode. On very old models of television receivers, a button on the remote control with the same name “AV” may be responsible for switching the mode. Click on it until you see the console loading screen or its menu if it has already loaded. On modern models, the “SOURCE” button is responsible for selecting the display source. Often indicated by an icon of a plug with a wire. Press the button and select the desired one from the available modes.
New models can not only indicate the name of the mode, but also immediately show the connected equipment in the list. In this case, switching to a set-top box is even easier, since it will immediately be clear that this is necessary equipment.
- When you turn on the set-top box for the first time after purchase, if the receiver has not previously undergone initial setup, the device will prompt you to perform a basic configuration. Depending on the receiver manufacturer and model, the list of parameters may vary slightly. As a rule, you need to select the country, language, television broadcast standard, image resolution, and screen aspect ratio. When all the parameters are set, the next step (after pressing the “OK” button on the remote control) is that the set-top box can begin automatically searching for channels. If there are no problems with connecting all nodes, then the tuner will scan all TV channel numbers (the corresponding signal frequency ranges) and find channels broadcast by nearby TV towers. Channels will be added in lists of 10 channels (in Russia, multiplexes broadcast 10 channels each). In total, two multiplexes (packages) are broadcast, that is, you will be able to catch 20 free over-the-air channels. The exception is Moscow, where a third multiplex was launched as an experiment. Also, historically, 30 channels are available from Ukraine, in parts of Crimea and Simferopol. In Ukraine, you will be able to watch 32 channels, which are transmitted by 4 multiplexes with 8 TV programs each.
- When the channels are found and the search is completed, be sure to confirm saving the channels or agree to complete the setup. If the set-top box does not offer to do anything, then you can proceed to viewing.
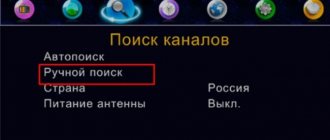
- The setup algorithm is slightly different if the set-top box is not turned on for the first time, and the initial setup has already been completed. Then you need to press the “Home” or “Menu” button on the tuner remote control. In the main menu, find “Search” in the list of sections. Make sure that the broadcast standard is “DVB-T2”. Next, perform automatic or manual tuning of TV channels by selecting one of the items.
Always do an auto search first, but you can first go to the manual search menu to look at the signal strength scale. It will show the strength of the received signal and allow you to adjust the antenna in real time to raise the level as high as possible. - A few words about the antenna power supply. If the antenna has a built-in or external amplifier, then it needs power. The amplifier can be powered in two ways - either through an external power supply or through a set-top box. To get rid of the external unit, you can remove it and activate the “Antenna Power” function in the “Search” menu. In this case, the voltage will flow through the antenna feeder, which connects the antenna to the attachment.
If automatic tuning does not produce results, or for some reason you want to use the manual search method, then go to the item of the same name in the tuner menu.
Then follow the link to open the map of digital terrestrial television (karta.rtrs.rf). Enter your address into the search bar, down to the house number. If the house number is not found automatically, then find it on the map. Next, left-click on the house. A pop-up block will appear with information about two repeaters that operate in the current area.
According to available data, you need to select the closest television broadcaster. The signal from it will arrive at the maximum level. Then record the data about the TV tower (write it down on a piece of paper, remember it, or simply open it through your phone in parallel with the setup).
To configure, you need the given TV channel numbers of both multiplexes. Each number corresponds to a specific frequency value. You can also tune in through the frequency, but it is much easier to enter the television channel number (TVC). The frequency will be automatically set to the one that matches the channel number. Additionally, it is recommended to verify the data by looking at the information about the TV tower on the map.
When the data is received, in the “Search” section, go to the “Manual Search” subsection.
Use the remote control to set the TVC number of the first multiplex. Start your search and save your changes when finished.
Then similarly search for the second multiplex.
Don’t forget to look at the signal scale after entering the TVC. If necessary, “play” with the antenna.
SCART
The “centipede” connector is built into equipment that is sold on the European market. Depending on the signal type, it is possible to transmit both digital and analog signals.
At the present time, SCART is rarely found in modern technology in the CIS market.
To connect the receiver via SCART, follow the algorithm below. It is no different from tulips:
- turn off the digital decoder and TV;
- insert both ends of the SCART cable into the corresponding connectors on the receiver and television device;
- turn on both devices and switch the TV to the “AV” signal source mode;
- set up TV channels on the set-top box, as described in the previous paragraph using tulips as an example. The setup instructions are no different. How the equipment is connected to each other does not change the setup algorithm in any way.
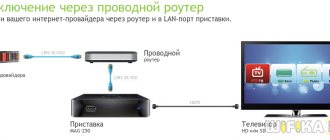
Connection with antenna cable
This connection is necessary when using a TV that is not equipped with any connectors other than an antenna. The latter is used to connect an antenna to watch analog programs.
Such devices may still be relevant. For example, you need to connect terrestrial T2 television to a dacha that is rarely visited, but you need to periodically turn on the TV for background use. Then, instead of a new TV receiver, you can purchase a set-top box, install an antenna, and organize the correct connection and configuration. This is much cheaper than buying a new TV panel.
The main problem is that the set-top boxes currently produced are designed to connect to more or less modern devices via tulips and HDMI.
Connection to old equipment via the antenna cable input can be organized in two ways:
- The set-top box must have on the rear panel not only an input jack for the antenna, but also an additional output jack.
Moreover, it must be high-frequency. Then the output acts as a modulator. And the connection itself to a very old TV is made with a coaxial cable. Often this output is used to connect another set-top box, which in turn connects to a second TV. But the output does not modulate the signal in any way, so in many cases such a prefix will not work. You need to find out about the characteristics of the set-top box, in particular the presence of an RF connector, in the store from the seller or look in the characteristics of the device. - An additional device in the form of an RF modulator will be required. First, the block is connected to the existing attachment through tulips. Then a cable is inserted into the antenna socket of the modulator, which is already connected and leads from the TV.
Setting up channels
Having completed the equipment connection procedure, you can turn it on and begin configuration.
If the user has a package of paid services from the provider, the number of channels will depend on contractual obligations, but even the number of free programs reaches two dozen.
A provider, for example, Rostelecom, provides a special card that is inserted into a module that decrypts encrypted signals.
To configure channels, you need to press the key on the remote control labeled “Input”, “AV/TV”, “Source”, etc. Next, specify the connection method.
In the menu that appears, click “Autosearch”.
Wait for the process to complete and save the detected list of channels.
If desired, programs can be grouped and arranged in a user-friendly sequence. They are now available to view.
Installing channels on JVC Smart TV
Modern JVC Smart TV models are mainly produced on the most popular Android TV operating system.
Therefore, below are instructions for setting up channels on a modern TV with Smart TV.
- To search for digital channels, you must immediately switch to the DTV format by pressing the corresponding button on the remote control. If there is no such button, then click Input and select DTV.
- Next, press the Menu button and go to the CHANNEL item.
- Antenna type Cable is, respectively, cable. Broadcast or Antenna is EDTV.
- Click on Auto-configuration.
- You can use Manual DTV tuning if you know the multiplex parameters.
- DTV search type, if you need local channels, then select ATV.
- When you select Terrestrial TV, the search will begin.
- If you are setting up cable, then you need to select Full search, in this case the TV will scan the entire frequency plan and save all the TV and radio channels found.
- But you can also select the network, then you will need to enter the details of your telecom operator, Modulation, Symbol. speed and network name using the colored buttons on the remote control.
Wait for the scan to finish; this may take several minutes. After this, if you wish, you can edit the found programs.
To Soviet TVs
You need to do the following:
- Carefully remove the insulating layer from a wire one and a half centimeters long, as shown in the picture below (position 1);
- Next, bend the shielding braid (position 2);
- Cut off the protective layer of the central wire one centimeter long (position 4);
- Install the connector by rotating to the right (position 5);
- As a result, a bare wire two millimeters long should appear (position 6).
Use a prepared coaxial cable to connect the TV and set-top box.
This method will make any vintage TV smarter, for example, the Ruby CRT or even the Horizon tube.
How to connect two or more TVs to a set-top box?
Using the antenna jack, you can connect several “blue screens” to one receiver at once. For these purposes, special splitters are commercially available.
The only drawback of the method is that all connected TVs will function synchronously, that is, they simultaneously broadcast the same channel (after all, there is only one set-top box).
There is an option to connect, for example, two TVs to one receiver, using unused interfaces, for example, connect one TV via RCA, and the second using HDMI.
If there are no free connectors left, then you can buy an “RF modulator”.
This compact device is capable of providing each connected TV with a separate decoded signal. The main disadvantage of the device is its high price, which is sometimes higher than the cost of the set-top box.
What you need to connect digital on an old TV
To receive digital television you will need the following set of equipment:
- Old TV. The later the model comes out, the easier it is to “make friends” with an external tuner.
- Console. It is she who converts the digital signal into sound and image.
- A regular antenna capable of receiving DVB-T2 TV broadcasts. (find out in 3 minutes which one is better to choose).
- Cables: antenna (with a characteristic impedance of about 75 Ohms) and an adapter through which old TVs (such as Goldstar, Vityaz, Rubin, etc.) are connected to the receiver (more on this below).
- RF modulator. It will be needed where not only picture tubes are used (the use of a CRT does not in any way interfere with the “digital” one), but an old Soviet-designed lamp, the connection diagram of which, in principle, does not provide for operation through a “tulip” or the use of other low-frequency inputs.
Solving the main difficulties
The most common problem that users encounter at home is when the TV cannot recognize the set-top box.
It is recommended to check the following:
- The performance of the receiver by testing its serviceability and functionality on another TV or by contacting a specialist;
- The correctness of all cable connections, as well as the absence of cable defects (they should not have abrasions, cuts, kinks or compressed areas);
- In the TV menu, correctly indicate the signal source.
Sometimes, after a certain period of operation, access to some channels disappears, and interference may also occur during broadcasting.
Such problems are caused by lost settings.
It is recommended to update the equipment software and then use the “Auto Search” function or search and configure channels manually. If this does not help, then it is likely that repair work is being carried out by your telecom service provider, which can be clarified by calling your provider's support line.
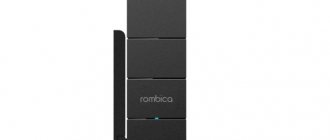
A little about digital set-top boxes
A digital TV decoder is a rectangular or square shaped device to which an antenna is attached. The set-top box, in turn, connects to the TV via a cable. Thus, the set-top box (tuner, decoder) acts as an intermediary along the signal path from the antenna to the TV. Converts a digital signal into a regular one, already recognized by the TV.
A set-top box is a small device that converts the digital signal from the antenna so that the TV can recognize it
The price of the device is low - a high-quality model can be bought for 1000 rubles. When purchasing, pay attention to the characteristics of the device - there should be a DVB-T2 mark.