MTS is constantly increasing the number of base stations, which has allowed it to create a modern telecommunications network. Today, the MTS coverage area is recognized as the most extensive, which guarantees the availability of mobile communications even in the most remote regions of the Russian Federation.
MTS cellular communications support several generations of networks, ranging from 2G to 4G. Thanks to this, subscribers can be confident in high-quality communications, both in their home region and beyond, as well as high Internet speed.
Office Pro Kit
RF-Link repeater, Internal antenna, External antenna, Cable, Connectors
from 73655 rub.
More details
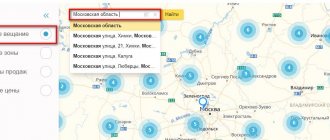
The coverage area is designed to help you choose the best quality operator in your region. The map is current and updated automatically.
Yota operator is a virtual operator of Megafon and operates at its base stations. Therefore, Yota’s coverage map completely coincides with Megafon’s coverage.
The Beeline coverage map is displayed conditionally, because The coverage map is stored in a format different from Yandex maps.
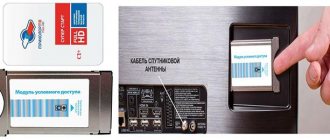
Installation and configuration of the MTS satellite antenna
Note! Throughout Russia, with the exception of the Moscow and Leningrad regions, the “Installation as a gift” offer is valid. According to the terms of the promotion, in case of purchasing an annual “Extended Plus” subscription, MTS gives a 100% discount on equipment installation. The subscription cost is 4 thousand rubles.
You can install and configure the plate yourself.
Antenna assembly
After purchasing the necessary equipment, we proceed to assembling the antenna. The corresponding instructions are attached:
- All nuts, except those responsible for fastening to the holder, are carefully tightened.
- We connect the converter to the plate.
- We assemble the bracket separately. Not attaching yet.
Choosing a location for installing an MTS satellite dish
The MTS antenna picks up a signal from the ABS-2A satellite. Accordingly, it should be directed in his direction. There are several ways to determine the location of the satellites and choose the optimal direction and location for the antenna. The first option is to use the service of the company’s official website:
- We go to the MTS website and select the appropriate tab (https://moskva.mts.ru/personal/podderzhka/sputnikovoe-tv/ya-uzhe-vash-klient/nastroyki/samostoyatelnaya-nastroyka-oborudovaniya).
- Enter your home address in the empty field.
- Next, information about the desired direction will appear on the site - indicated by an arrow.
- The tracker can be moved manually and around the house. This will help you decide on the most suitable place for the plate.
- MTS will also calculate the optimal angle of inclination of the antenna and rotation of the converter.
The antenna installation address will help you decide where to direct the MTS dish depending on the subscriber’s place of residence. The
second option is to use a third-party profile application SatFinder, which is recommended by MTS. The utility can be downloaded for free on both iOS (https://apps.apple.com/ru/app/satfinder/id397993104) and Android (https://play.google.com/store/search?q=satfinder&c=apps ). The main task is similar - to determine the location, rotation and tilt of the plate, and the angle of rotation of the converter. To work with SatFinder, perform the following steps:
- Download and install the application.
- From the proposed list, select the desired satellite - ABS-2A.
- Click on the magnifying glass.
- We bring the phone to the intended place for installing the satellite dish.
- We receive all the necessary information.
You can use other applications to select the location of the plate. Satellite Director, Dishpointer Pro or Multifeed software will be useful.
The third option is to use a special device. In this case, the Satfinder dvs-sf 500 device is suitable. The necessary information is entered into it. After which all the necessary data will also be determined.
Trees, other buildings, or power poles blocking the antenna will degrade the signal quality. Therefore, a satellite dish is installed only where there are no visible obstacles.
Self-installation and subsequent configuration of a satellite dish from MTS:
Mounting a satellite MTS dish
After choosing the optimal location, we proceed to installation of the device.
- We make holes and attach the holder support.
- According to the instructions, we attach the bracket and the converter rod to the plate.
- We install the assembled structure on the support. We take into account the recommended rotation and tilt angle.
- We insert the converter into the rod. We turn the front side towards the antenna.
- Next, we attach the F-connector to the cable.
- We stretch the antenna cable into the room and screw it to the console. The cable length should be kept to a minimum. The connector used is LNB IN.
- Using an HDMI cable, we connect the set-top box to the TV.
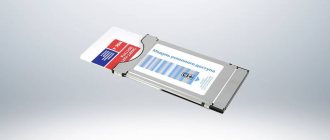
- If you are using a cam module, connect the antenna cable to the TV via the connector:
cam module
Installation and connection of the satellite dish are completed.
Setting up your HD set-top box
- Without connecting the set-top box to the network, insert the MTS smart card.
- Next, plug it into the outlet.
- Using an HDMI or AV cable, we connect the device to the TV.
- If after connection the green button does not light up, turn on the set-top box using the remote control.
- Turn on the TV and proceed to setting up the signal, which is described below.
Signal check
After all the steps taken, we proceed to setting up the signal:
- Go to the TV menu.
- Here we indicate the signal source. Depending on the TV model and connection type, select the video input, analog or HDMI.
- We are waiting for the system to launch and the MTS satellite television settings menu to appear.
- Using the remote control of the set-top box, go to Device Settings.
- We return to the plate and slightly loosen the holder fixing bolts.
- We slightly change the position of the antenna, wait 5 seconds, and check the signal level.
- We determine the position of the dish for the best signal.
- We securely fix the antenna.
At this stage, we complete the signal setup and move on to setting up the channels.
Setting up the dish to receive channels
To configure channels, you need to expand the MTS satellite television settings menu again:
- Go to the Search section.
- Next – Channel setup.
- Here it is recommended to select Auto channel search. You can also select manually.
- We are waiting for the search to complete.
- On the remote control of the set-top box, press the OK button. This will complete all settings.
Next, the equipment needs to be activated. You can do this in several ways:
- Use the hotline;
- Send an SMS message to a special number;
- On the official website of the dealer;
- Through your personal account, if the setup is done by a master.
After successful activation, you can start watching your favorite TV shows or movies.
Setting up the cam module
For those who use not a set-top box, but a cam module, the instructions are as follows:
- After connecting the antenna wire to the TV, install the module in the CI port of the TV.
- Install the smart card into the module. In this case, we direct the side with the chip towards the TV image.
- We connect the TV to the network. If everything was done correctly earlier, data about the presence of a cam module will be displayed on the screen.
- Expand the TV settings and activate the DVB-S signal reception mode
- Next, according to the instructions from the TV, we enter the requested data.
We complete the settings and proceed to activating the equipment, which is described above.
Setting up an MTS set-top box
- Before connecting to the network, insert a SIM card into the console.
- Next, turn on the device. In case of setting up unauthorized equipment, search for a 3G signal. We wait for the completion of initialization.
- Let's start authorizing the MTS set-top box.
- Create a user profile. Here you can set a password or age restrictions.
- Let's move on to scanning possible channels.
We complete the setup process.
Using the coverage area of cellular operators
This coverage area is convenient for a preliminary analysis of the possibility of connecting to 3G/4G Internet. Data is provided by cellular operators and is generated through virtual calculations rather than measurements. Therefore, you need to understand that there is a fairly large error here.
If you are 2-3 kilometers from the edge of the 3G/4G coverage area, then to install an antenna to strengthen the cellular signal, it is strongly recommended to hang the antenna on a mast 4-6 meters high.
The towers of cellular operators MTS and other operators can be determined quite accurately - they are located in the center of the coverage area of small areas. Or install the “Cell Towers” program on Android and when launched, the program will immediately indicate the exact location of the nearest cell operator tower.
Tele2 is a subsidiary of Rostelecom , i.e.
Where Tele2 coverage is available, Rostelecom SIM cards will also work there.
Instruments and equipment for installing and connecting a satellite MTS antenna
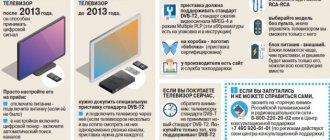
Note! When choosing equipment, it is important to consider the region of residence and the characteristics of the TV.
Antenna
When choosing an antenna, pay attention to the diameter. For most regions, the optimal diameter of a satellite dish is 0.6 meters. Antennas with a diameter of 0.9 meters are recommended to be installed in regions with weaker signals, for example, in the Kaliningrad region, Primorsky Territory, the Republic of Sakha, Yakutia and Karelia.
You can also keep the antenna from your previous provider. When setting it up, it is enough to redirect it to another satellite and change the converter to a linear one.
Converter
The converter is mounted on the antenna. Responsible for receiving the signal, its further conversion, and transmission via cable to TV. The number of inputs on the converter must correspond to the number of connected TVs. The device is included in the standard equipment package from MTS.
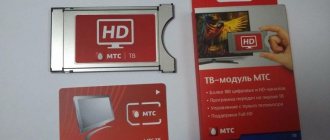
Cam module or set-top box
Here we pay attention to the characteristics of the existing TV. The kit with a cam module is suitable for TVs that have a built-in DVB-S2 receiver and support the HEVC format. For other TVs, we purchase a set-top box from MTS. The number of cam modules or set-top boxes must correspond to the number of TVs.
You will also need a bracket, a coaxial cable for connection, a 2 °F connector and other little things. All this is included in the branded basic installation equipment package.
MTS installation equipment kit
Possible problems and their solutions
When setting up a satellite dish and television from MTS on their own, some users encounter problems or errors. Let's look at the most common ones:
- "No signal" . This error can occur if the cable is faulty or is poorly connected. It may also be a consequence of bad weather conditions and technical work on the part of the providers. To solve this problem, you need to eliminate all possible causes of the problem.
- "No channels" . If the user encounters such a problem when connecting for the first time, then it is worth checking that the smart card is installed correctly. Another possible reason is the end of your subscription to services.
- Problem with E code . In this case, to decipher the error, you should contact the provider’s hotline or find information on the official website. The appearance of a different letter may indicate a problem with the TV.
- Resonance of picture and sound . Resetting all device settings to factory settings will help here.
- Not all channels are displayed . It is recommended to open the settings and update the channel list. You can use auto search.
Installing and configuring a satellite dish is a labor-intensive process. But if you follow all the recommendations and instructions, you can completely cope with the task yourself.
Service zone
As can be seen from the map, the MTS satellite TV signal has reliable reception throughout almost the entire territory of Russia.
In areas of poor reception, you can also watch MTS satellite television if you use an antenna (“dish”) with a larger diameter than the standard one (the large MTS kit includes an antenna with a diameter of 60 cm).
Reception of the ABS-2A satellite signal in the regions of the Russian Federation
Confident signal:
Altai region Amur region Astrakhan region Belgorod region Bryansk region Vladimir region Volgograd region Vologda region Voronezh region Moscow Jewish Autonomous Okrug Transbaikal region Ivanovo region Irkutsk region Kabardino-Balkarian Republic Kaluga region Karachay-Cherkess Republic Kemerovo region Kirov region Kostroma region Krasnodar region Kurgan region Kursk region Leningrad region Lipetsk region Moscow and Moscow region Nizhny Novgorod region Novgorod region Novosibirsk region Omsk region Orenburg region Oryol region Penza region Perm region Primorsky region Pskov region Republic of Adygea (Adygea) Republic of Altai Republic of Bashkortostan Republic of Buryatia Republic of Dagestan Republic of Ingushetia Republic of Kalmykia Republic of Karelia Republic of Crimea Republic of Mari El Republic of Mordovia Republic of North Ossetia Republic of Tatarstan Republic of Tyva Republic of Khakassia Rostov Region Ryazan Region Samara Region St. Petersburg Saratov Region Sakhalin Region Sverdlovsk Region Sevastopol Smolensk Region Stavropol Territory Tambov Region Tver Region Tomsk Region Tula Region Tyumen Region Udmurt Republic Ulyanovsk Region Khabarovsk Territory Khanty-Mansiysk JSC Chelyabinsk Region Chechen Republic Chuvash Republic Yaroslavl Region
how to determine the direction to the base station yourself
Understanding where the base station of a cellular operator is located is perhaps the main question for anyone who has encountered the problem of a poor mobile signal and has set about fixing it, be it a professional installer of cellular amplification systems or someone who has decided to fix the problem on their own. In this section we will try to help you solve the problem of determining the location of base stations using special maps, compasses, programs and applications. We hope this material will help you achieve your goal.
How to connect MTS TV and save money at the same time
Initially, you will need to assemble the antenna according to the instructions. Just don't overtighten the nuts. After this, attach the antenna to the wall. It is necessary to decide on the installation location in advance. Next comes the antenna setup. You should select the converter rotation, tilt and rotation of the product. Using the application, find satellites ABS 2 - 75 E.
The signal will need to be checked using a set-top box. It connects to the antenna via a cable. Here you can find the “Antenna Settings” item. Information will appear telling you what the received signal strength is. It is advisable to have someone look at the reception level and someone to rotate the antenna until the best position is found. That's all, now all you have to do is attach the antenna. You have now connected digital TV to your TV.
How can you save money? To do this, you just need to subscribe to the package for a longer period. For example, not for a month, but for a year. This way you can save more than 10%. In addition, it is advisable to already have a satellite dish from any operator, and not rent it from MTS.
Settings Features
MTS stands out for the variety of devices offered for mass use. There may be:
- classic receiver with SMART card;
- CAM module for modern TVs, where you need to install an activated SIM card;
- version of the set-top box with interactive functionality.
Setting up MTS satellite TV with your own hands will depend on the above parameter. SMART SIM cards are required for the system to identify a specific subscriber. Without the correct installation of this chip, television operation will be unavailable. Follow the direction indicated on the instructions.
The further process will not cause difficulties, as it is performed using the “Settings Wizard”. Here you can find channels in automatic mode. Information about manual search can be found in a separate article.
MTS towers on the map
As such, a map of radio towers and stations is not of great importance to subscribers. This is due to the fact that the coverage radius of each tower depends on the frequencies used by the operator and its location:
- points using the 450 MHz frequency are capable of covering up to 20 km;
- coverage of 800 MHz points – up to 13.5 km;
- 1800 MHz – up to 7 km;
- 2600 – 3,2.
It is important to emphasize that most Russian operators, including MTS, use universal radio towers that operate in several bands at once. This allows you to avoid difficulties with connecting to 3g and 4g and provide clients with reliable, stable communications.
Another factor influencing the location of towers is the number of subscribers in a populated area. The larger the city and the greater the number of connected users, the more often the radio towers are located. In this case, their number directly affects the operator’s ability to maintain the network.
Determining the direction to the satellite: applications, devices and setup wizard using the map
In order for satellite TV to work, the antenna must be pointed exactly at the satellite.
MTS satellite: ABS-2A at 75° East.
To accurately point the antenna towards the satellite, installers use a special device. However, if you want to set up satellite TV yourself, you don’t have to buy such an expensive device. It is enough to download a special program for a smartphone or tablet, which determines your position relative to the satellites using GPS and indicates the direction to them. You can also rotate the antenna and converter at specified angles, which can be calculated by a special program.
In this article we will look at methods that can be used to determine the direction to the satellite when setting it up yourself.
What are the features of MTS satellite TV
Subscribers planning to connect to this service can count on the following features:
- Availability throughout the Russian Federation (with the exception of some regions). You will be able to watch TV freely, both in the apartment and far outside the city.
- Fast and easy connection. If you use the services of specialists, the subscriber will not have to spend personal time and effort to assemble and configure the equipment.
- You will get TV channels divided into categories. Finding the right channel is simplified as much as possible. Sports, children's, educational and many other groups of channels will be available for viewing at any time. It's very easy to search and find the TV shows you need.
- No advertising, which is a definite advantage.
- Multifunctional attachment. It is a compact small device that supports HD quality channels. The set-top box is equipped with a built-in 3G modem, which allows you to remotely control the functionality.
- A Wi-Fi access point makes it possible not to use additional devices, because all the necessary telecommunication functions are provided in one case.
- The service package already includes one GB of high-speed mobile Internet so that the subscriber can use and manage the Smart TV option.
- There is an option that allows you to record the broadcast. Returning the broadcast allows you to watch your favorite TV show at any time.
- A large number of additional interactive services: TV programs, news and more.
- TV Guide option. You will always be aware of broadcast movies and TV shows.