One of the main advantages of satellite television over terrestrial television is the ability to use a number of useful services. In addition to providing a high-quality signal, digital television operators Tricolor TV regularly improve the software of their equipment. This procedure not only improves the functionality of the receiver, but also expands its operating parameters.
The last software upgrade took place in June 2021. You can get information about the work on the official website of Tricolor TV. It also provides precise information on how to update the Tricolor TV receiver, depending on its model.
Updating Tricolor TV in 2021 - on your own
Over time, users of Tricolor digital television begin to notice problems with the receiver. This may be freezing of channels, the absence of some of them, sometimes the device simply does not turn on, etc.
Problems of this nature most often arise due to outdated software.
And to eliminate them, you don’t need to call a technician, since you can do the update yourself.
How to update the software of the Tricolor TV module? Initially, to determine the reasons for the incorrect operation of the receiver, you need to make sure that the problem is related to an outdated software version. To do this, you need to select the “Status” section in the menu and view the current software version. This can be done in the user’s personal account.
And if your version does not match the latest available update, then the best solution would be to perform the procedure as soon as possible.
After it, all the developers' innovations will become available.
On the specialized digital television channel Tricolor TV, software updates are provided to all users. The software can be changed using the remote control on the screen of your own TV. This method is the most convenient and does not cause much trouble.
Software update instructions
Any company values its customers and takes care of their comfort by expanding or improving its services. Likewise, Tricolor TV is constantly working to improve its service. For high-quality and uninterrupted operation of your receiver, you must regularly monitor the release of new software. So, even 2016 GS receivers need to be updated to the latest firmware version 2017. Of course, no one wants to take their device to a service center.
Do not forget that if you miss one update, you will have to take the receiver to a service center, since it will be impossible to carry out the procedure yourself.
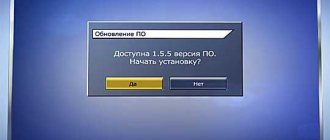
Software update message
So how can you update the Tricolor module software yourself? This is quite simple to do, the main thing is to follow the instructions:
- If your receiver is working, then reboot the device, if it is turned off, turn it on.
- The next step is to turn on the Tricolor TV channel on your TV.
- The company does everything for the convenience of its customers, so the software update window will pop up on its own after a while.
- In the selection menu you need to click the “yes” icon. In order not to go to the provider’s website, you can use this method to learn about new updates in a timely manner.
- You will start the update process, the progress of which you can see on your screen. The average waiting time is 5 minutes.
- After the latest version is installed, the receiver will reboot itself.
- After turning on the TV, it is worth checking. To do this, return to the Tricolor channel and check your version with the specified update on the official website.
If all the steps are completed correctly and everything matches, then in the near future you can forget about broadcast failures. Your TV will show like a clock.
If, when you turn on the firmware, your receiver does not respond to the remote control signal, do not be alarmed. Simply turn it on using the “standby” button on the device itself.
Remember that you will have to perform the update process regularly. If for some reason you forgot or were unable to update the firmware, contact the service center.
Step-by-step guide to action
Having seen such an image on the screen, you need to perform certain actions, as a result of which the updates will be installed. It is recommended to strictly follow the instructions below:
- Unplug the receiver from the outlet. Wait a while and turn it on again. Then tune into the information channel, where information about the available update will be displayed.
- By choosing a positive answer about changing the update. Confirm your consent to start the automatic process, during which the necessary data will be downloaded.
- Next, the receiver firmware will occur. This stage is the most important in updating the receiver. Therefore, it is necessary to ensure all conditions to prevent a power outage. Otherwise, premature shutdown of loading will lead to device failure, which can only be repaired by a specialist.
- After 15 minutes, the update will be completed completely. A message will appear on the screen indicating that the installation is complete. The next step is to reboot the receiver. This process is automatic and does not require intervention. If for some reason this does not happen, you must reboot the receiver yourself.
- The receiver update process is complete.
After the updated software is installed, the receiver settings are reset to factory settings. Therefore, it is necessary to re-configure the language, operator and other settings. The Installation Wizard will help you with this.
In order to make sure that the actions taken are correct, you must again enter the “Status” menu and view information about the receiver software. If everything is done correctly, the previously announced version will be displayed.
We flash the LED using the Zigbee protocol or the Tricolor GS SMH-ZW-I1 control module with PTVO firmware
After writing the post Zigbee router with WiFi or pumping up the Tricolor GS SMH-ZW-I1 control module, I began to be tormented by vague doubts that a lot was left unsaid, unsoldered and unflashed.
In fact, flashing the CC2351 chip into a Zigbee coordinator or router is a rather trivial task, and it is much more interesting to make an END-Device based on it. Most Habr readers are familiar with Arduino or ESP8266, and know that every beginner learning the basics of programming microcontrollers and circuit design on these development boards first learns how to blink an LED. GS SMH-ZW-I1 control module as a kind of development board and also blink the LED on it. You can do this without writing a single line of code, using the firmware configurator from ptvo, specially designed for creating your own Zigbee devices on CC2530, CC2531 chips, and even with support for signal amplifiers CC2590, CC2591, CC2592, RFX2401.
PTVO firmware - first introduction.
As I already mentioned, in order to create CC2530/2531 chip firmware for your device, it is not at all necessary to know how to program. This became possible thanks to the firmware configurator from the ptvo.info project
You can use the firmware configurator and the firmware itself for free, but in this case the functionality will be limited. The free version allows configuration of 8 inputs and 8 outputs (the paid version has 16), and it is not possible to create devices with a power saving mode, which is necessary when using battery power. In the case of creating a Zigbee device based on the Tricolor control module, the free functionality is enough for the eyes.
Let's download the latest version of the configurator and get acquainted with its functionality.
Firmware configurator interface ptvo.info
The configurator runs under the Windows operating system, the program interface is quite laconic, and there is support for the Russian language. The default language is English, but this can be easily changed in the Language menu.
An example of configuring inputs and outputs for working with sensors and buttons
The firmware generator supports work with a fairly large number of sensors and actuators, allows you to remember the state of outputs during a power failure and configure inputs to process single, double, triple clicks, and also bind inputs directly to the outputs of the CC2531 chip, providing the ability to change the states of these outputs by pressing a button . The state of the inputs and outputs can also be inverted directly in the firmware.
Message about incorrect configuration.
If during the configuration process incorrect or unsupported options in the current configuration were selected, the program will report this.
You can read more about the capabilities of the firmware here, and examples of ready-made devices based on it can be found here.
We make firmware for your device
In order to create firmware for your device on the CC2530/CC2531 chip, you must specify the board type and device type.
Selecting the board type
For a device based on the Tricolor control module, the “Board Type” parameter will correspond to the CC2530, and the type of device will depend on what we want to get at the output. For most devices, you need to select the "End device without router function" option, but I will select the "Router" option since I plan to expand the Zigbee network by using a homemade device.
Now you need to configure the inputs and outputs. We arm ourselves with a multimeter, a datasheet for the CC2531 chip and find which pins of the chip are located in convenient places on the printed circuit board. Let's start with the pin that controls the LED. Since almost all pins of the CC2531 chip at the output can produce a current of no more than 4 mA (except for pins P1_0 and P1_0, the current of which can be up to 20 mA), the LED is connected to the pin not directly, but through a transistor switch. Through simple movements with a multimeter, we find that the pin we need is pin P0_4. We configure it in the firmware.
Pin configuration
The remaining pins are configured in a similar way, but we are not interested in them for now; for our purposes, one pin on which the LED hangs is sufficient. Check the “Remember state” checkbox if it is necessary for the LED state to be saved during a power failure and restored after it appears. Save the firmware in *.hex format
Flashing the CC2531 chip. Another way.
To flash the Tricolor control module with your own firmware, you must have CC Debugger or use alternative flashing methods. I don’t have a programmer, sewing using a raspberry pi design is quite cumbersome, so I used Arduino Uno and CCloader for firmware. But this option is also not the most convenient, because you have to convert the hex firmware into bin format using a console program, and flash it using a console program.
But there is another way to flash the CC2531 chip using the VLK DIY Multi Flasher graphics program from @DJONvl and Arduino.
Download VLK DIY Multi Flasher, launch it, select the COM port on which the Arduino hangs, click Connect, and then Make Flasher. The Arduino will be flashed with the firmware necessary for the flasher to operate, after which you can connect the Tricolor control module to it in accordance with the table shown.
Next, you need to select the firmware for our device obtained using the PTVO firmware configurator and click Write. If you really want to, then first click Chip Erase, then Write. After some time, the chip will flash, reboot and enter pairing mode. At this point, we need to allow the connection in Zigbee2MQTT and wait until our homemade device passes the interview.
Flashing the LED via MQTT
After the interview is completed, a new device ptvo.switch will appear in Zigbee2MQTT
For convenience, let’s change the user name to something nice, for example, “router”, and then see what topics Zigbee2MQTT creates in the broker for this device.
Great! The device status can be obtained from the JSON payload “state_l1”, and the state of the LED can be controlled by sending a JSON payload with the value “ON” or “OFF” to the zigbee2mqtt/router/set topic
You can also control the LED from the Zigbee2MQTT web interface, but the interface is too overloaded for the ptvo.switch device.
Zigbee2MQTT web interface
The presence of unnecessary controls for a device with one LED is explained by the fact that Zigbee2MQTT cannot automatically determine which sensors, inputs and outputs are involved in the device’s firmware. If you want the z2m interface to have no unnecessary elements, you need to create firmware with a unique Manufacturer and Model identifier, download an external converter for it, and add it to Zigbee2MQTT.
Now you can fully use your homemade device as a Zigbee Router and integrate it into a Smart Home using the MQTT protocol.
Thus, you can create a Zigbee device based on the Tricolor control module, not limited to just an LED. A large number of sensors and actuators available in the PTVO firmware can seriously expand the functionality, turning the Tricolor control module into a Zigbee thermometer, voltage and current sensor, volume control, switch, and so on and so forth. But this is a topic for a new post.
Thank you very much for your attention, and good luck!
Changing software depending on the receiver model
As stated earlier, the update instruction may vary depending on the model of receiver you are using.
It should be remembered that software for specific set-top boxes that broadcast satellite television is released at different times.
For example, for the GS B520 model, the latest software was launched on June 5, 2021, while for the GS-8300 and other receivers in this series, the software was updated only in the fall of 2021.
Exact information on how to update the module software and how to do this specifically for your receiver can be found on the company’s official website or checked with the company’s help desk. Regular software updates will reduce the risk of problems and help ensure proper operation of the channels.