Interest in the VLC player, developed by enthusiasts since 1996 as part of the VideoLAN project, is due to several reasons. Firstly, the mentioned product is extremely popular among free software supporters (the number of downloads exceeds 485 million!) and is available for all kinds of operating systems, including mobile ones. Secondly, not long ago there was a major release of a new build of the program, which has matured to version 2.0.x and received a lot of interesting functions. Finally, thirdly, for many users VLC is still associated exclusively with a tool for watching video and listening to audio, the powerful filling of which allows you to solve much more interesting problems in practical terms. Today’s publication is devoted to a brief summary of them, equipped with an abundance of screenshots for greater clarity.
⇡#File conversion
With the widespread proliferation of portable computing devices with different technical characteristics, the problem of converting multimedia data from one format to another has become more relevant than ever, which can be dealt with in a jiffy using VLC. You just need to open the program, press Ctrl+R, on the “File” tab, select one or more objects that require processing and click on the “Convert/Save” button.
Next, you will need to enter the name of the resulting file, select an output format with a suitable profile for data compression and start the processing process by clicking the “Start” button. If you wish, you can go to the profile settings and play with codec parameters, picture resolution, bitrate and other audio/video characteristics, even including subtitles in the converted video. Adjusting codecs may require certain knowledge from the user, which can always be obtained on the pages of the VideoLAN Wiki reference and information site.
Screen video recording
VLC allows you to record your screen and save the result in different formats. No sound, but in good quality. Here's how to do it:
- Click “Media” → “Open Capture Device”.
- From the Capture Mode list, select Screen.
- Set the desired frame rate. 15 to 30 fps should be enough.
- Click the arrow next to the Play button and select Convert.
- In the “Profile” list, assign the appropriate format. For example, H.264 + MP3 (MP4) is suitable.
- Click “Browse”, enter the name of the future video file and select a folder to store it. Then click "Save".
- To enable recording, use the “Start” button.
- To stop, click “Stop” in the player menu.
⇡#Using videos as the background of the working environment
One of the interesting features of the VLC player is the ability to output video directly to the desktop of the operating system. To activate multimedia wallpaper, the role of which can be played by your favorite movie, you should go to the advanced settings of the program and in the “Video” field, check the box next to the “Video on the desktop” item. After this, all that remains is to select a similar menu item in the main application window and make sure that the operations performed were beneficial to the cause.
conclusions
In this article, we looked at how to set up streaming video through vlc, as well as how to play streaming video. Now you can stream video to your devices. Do you use streaming video? Write in the comments!
Related posts:
- Installing DeadBeef on Ubuntu
June 20, 2016
- How to use Avidemux
January 17, 2017
- How to use Kodi
March 14, 2017
- How to flip a video in VLC
January 9, 2018
⇡#Watching YouTube videos
It is well known that in order to view the content presented on the YouTube server, you need a browser with the Adobe Flash plugin installed or HTML5 support. If you don’t have an appropriate web browser at hand, the notorious VLC player can resolve the deadlock. The technique is simple: press Ctrl+N, copy the URL of the online video you like into the form for entering and click on the “Play” button. If you have a mediocre Internet channel, it would be a good idea to open a tab with additional parameters and adjust the amount of cache memory used when playing YouTube content. This kind of foresight will help you avoid annoying pauses during video playback.
Downloading videos from YouTube
The program can not only play, but also download videos from YouTube. But, again, this method does not work with some videos. To download videos from YouTube, do the following:
- Click Media → Open URL.
- Paste the video link into the "Enter network address" field.
- Click Play.
- Click Tools → Codec Information.
- Copy the link from the Location field.
- Open the copied link in your browser, right-click on the video and use the “Save video as” option.
⇡#Transcription of audio recordings
The issue of converting voice recordings into text format often baffles even experienced computer users: the corresponding software tools that simplify the solution of the problem are a big deal, and often they are of no use at all. In such cases, it is much more effective to use VLC with the “Step back”, “Step forward” and “Cycle A → B” keys placed on the toolbar through the interface settings. Using the mentioned controls, you can instantly rewind the recording ten seconds forward and backward and activate cyclic scrolling of selected sections of the audio file, which is useful when transcribing lectures, interviews, dictations of translators and other audio data.
Users with good memory can, instead of customizing the program interface, resort to the practical use of the player’s hot key system, which allows performing various actions, including rewinding the content being played on the computer. It should be noted that almost all VLC controls are duplicated by corresponding keyboard shortcuts, configurable depending on the user’s preferences.
Playing from the point where you finished watching
VLC can play a video from the point where the user finished watching it. To do this, the player remembers the playback progress in the last hundred files. To enable display from the last position on the view bar in VLC, do the following:
- Open the “Tools” → “Settings” → “Interface” section.
- Next to “Continue Playing,” select “Always” and save the change.
⇡#Organization of streaming audio/video broadcasting
And this task can be handled using VLC. In order to use the player as a server for streaming multimedia content, you need to make a number of program settings, guided by this (in English) or this (in Russian) instructions. In particular, you will need to decide on the broadcast source, select the network protocol that will be used for online broadcasting, set the settings for transcoding data into a suitable format, and activate the transmission of the media stream to client machines. Since multimedia broadcasts impose very strict requirements on the bandwidth of communication channels, before deploying a video server, it would be correct to make sure that the Internet connection you are using is capable of withstanding a powerful flow of outgoing traffic.
Possibilities
VLC player is a universal player that can play any multimedia files. Its strength is its support for a rich set of options tailored for viewing content.
There are no additional plugins or utilities with other purposes. Thanks to this, VLC player is both functional and does not require large resources from the device, compared to its competitors.
The following advantages can be noted for the VLC player:
Supports all known files (it can recognize and play any pictures, audio and video. In addition, there is a function for downloading new codecs)
Widespread (today this media player can be installed on almost any device, regardless of its platform and purpose)
Optimal system requirements (works without delay even on budget smartphones and set-top boxes with Smart TV, and does not overload the equipment
But the main advantage of the media player is the ability to watch interactive IPTV television absolutely free. Its options include everything for broadcast reception and broadcast control.
⇡#Saving streaming content to a file
Since we are talking about organizing online broadcasting using VLC, it would be logical to mention the player’s ability to not only distribute content over the network, but also save streaming content broadcast by someone to disk, automatically converting it to the most preferred format. This operation is carried out by analogy with the method described above for viewing YouTube videos, with the only exception that after entering the URL you need to click not “Play”, but “Convert”. A window will open with settings for saving the input stream and parameters of the codecs that will be used to convert the data. After cleaning them up, you can, keeping in mind copyrights and copyrights, begin to “rob” the audio/video stream.
Local networks are far from uncommon. They are found in offices, enterprises and even in private apartments and houses. Life connected to a local network is much more convenient: data exchange occurs faster. Not everyone knows that within such a network it is possible to open a real video broadcast. Our material will try to embrace the immensity. We will learn: how to set up broadcasting on a local network, and also create a web page that will be available to all computers connected to the network. By opening it in a browser, the user can enjoy watching the broadcast video. One of the main tools in our work will be VLC Media Player; it allows you not only to play audio and video files, but also organize streaming on the network.
I propose to define the conditions of our task more clearly. There are two computers on our network. The first one runs Windows 7, the second one runs Ubuntu Linux.
The computers are assigned the following IP addresses:
192.168.1.2 – computer running Windows 7
192.168.1.3 – Ubuntu Linux
Subnet mask: 255.255.255.0
Since my network is organized using a router, the IP address – 192.168.1.1 is occupied by this useful device.
If you have not yet set up a local network at home, I recommend reading the article: “How to connect two computers to a local network?”
Now directly about what needs to be done:
- Set up streaming a movie from a Windows 7 computer to a Ubuntu Linux computer. In our case, it will be the cult Soviet-era cartoon “Ghost Ship”
- Create a website on a computer running Windows 7 that will be accessible from a second computer.
- We will place a page on the website that will broadcast our streaming video. Accordingly, by opening this site from a computer running Ubuntu Linux, you can enjoy watching your favorite “Ghost Ship” without any tricks.
A version of this wonderful player exists for both Windows and Ubuntu Linux. This is no coincidence, because the player is built on open source code.
In Ubuntu Linux, to install the player, just go to the “Application Center”, enter VLC in the search and click the “Install” button
In order to download and install the player for the Windows 7 operating system, you need to follow the link:
This is the player developers page. Here we are interested in one single button “Download VLC”.
Clicking it will take us to the download page. We save the distribution kit with the program to our computer and start its installation.
So, VLC Media Player is installed on all computers. Go to a computer with Windows 7, open the player and go to the main menu “Media” - “Streaming”
The first thing we need to do is add our cartoon to the playlist. To do this, click the “Add” button and using Windows Explorer, select this movie on the hard drive of our computer.
After the movie is added to the playlist, click the “Stream” button at the bottom of the window and go to the next page
In the next window, practically nothing is required from us other than clicking the “Next” button
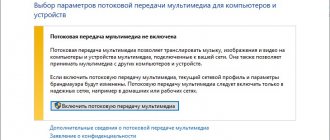
A very important window will open. Here we cannot get away with simply pressing one button and will have to perform certain magical actions so that streaming video will actually be broadcast over the network in the near future.
The first thing you need to pay attention to is the drop-down list at the top. Here you can select the protocols that will be used for broadcasting. In fact, a separate article could be written about each of them. And we will probably do this in the future.
Today we will simply select the HTTP protocol and click the “Add” button
The "Port" and "Path" text boxes will open. There is no need to touch them. Let’s leave everything as it is and pay attention to the “Profile” drop-down list, which is located below. Here we will select the option:
Video – MPEG-2 + MPGA (TS)
After all of the above has been completed, we again click the “Next” button and go to the next window. Here we are waiting for a kind of summary of the previous actions. In general, in this window our task is to simply click on the “Stream” button
If you did everything correctly, then in the player window we will see a modest inscription “Streaming”. This means that the broadcast of our video is officially opened, and you can start watching.
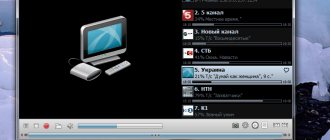
To view, we will move to a computer running Ubuntu Linux, where VLC Media Player is already installed. Open it and go to the main menu “Media” - “Open URL”
A window will open where you need to enter the address of our broadcast stream in a single text field.
Enter:
Then click the “Play” button.
You can safely enjoy watching the cartoon “Ghost Ship”
⇡#Taking screenshots from a video stream
Unlike a number of alternative media players, VLC includes special tools for creating snapshots of movies being played. There is no need to mess around with the Print Screen key, the operating system clipboard and graphic editors - just press Shift+S and the program will automatically write the selected frame to the computer disk in the specified directory. By default, images are saved in PNG format, which can be changed to JPG if desired.
How streaming video works
Streaming is a method of broadcasting video and audio files over a local network. Remote playback has become commonplace for most modern users. On a certain port, the server waits for a connection, and after pairing the devices, video is transmitted through it.
From the main computer, it is possible to broadcast several videos at once, even entire playlists. All actions performed on the main PC are reflected on other devices.
Broadcasting is supported by most personal computers or laptops. If you want to play a movie or video from a PC on the screen of a Samsung, LG or any other LED TV model, then to do this you need to find out the IP address of the computer. In the Linux operating system, it can be found through the terminal using the “sudo ifconfig” command. In Windows OS from Microsoft, you need to enter “ipconfig” in the command line. After this, you can go to the VLC media player settings.
⇡#Remote player control
Another documented but rarely used feature of VLC is the ability to remotely manipulate the program via a web interface. The beauty of it is that any computing device connected to a local network with an Internet browser on board, be it a smartphone or tablet, can act as a remote control. Those interested can personally see the flexibility of this tool by activating the remote control interface in the player settings and connecting to it through a browser. “Over the air” you can control almost all the main functions of the application: adjust the volume, control file playback and playlist, manipulate equalizer settings and other VLC parameters.
Using the built-in equalizer
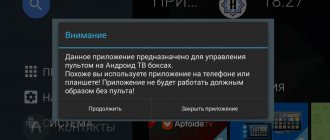
If suddenly you are not satisfied with the sound of a movie or music, you can adjust the audio to your taste. To do this, the program has as many as 11 parameters. Here's how to do it:
- Click “Tools” → “Effects and Filters” → “Audio Effects” → “Equalizer” and click “Enable”.
- Adjust audio settings manually or select one of the presets and save your changes.
⇡#Assembling video puzzles
For those who like to while away their free time solving various kinds of puzzles and logic puzzles, VLC can also serve them well. No tricks or shamanic dances with a tambourine - just open a window with graphic effects, check the box next to the “Puzzle” item and get from the playing video a mosaic broken into many fragments, which must be assembled into a single whole. The difficulty of the game can be adjusted by increasing the rows and columns that make up the puzzle. Control is carried out by deftly moving elements with the mouse.
Initial setup
When you first launch the application on your Smart TV or phone, you will need to run two commands:
- allow access to files and storage;
- select types of playable formats.
At the second stage, be sure to select audio and video - now when you click on media files in the manager, they will open in the media player. Also select the M3U and M3U8 formats - these are extensions of IPTV playlists.
It is also recommended to add the PLS extension, because... Some PC players record playlists of regular media files in it.
The installer was initially downloaded on the computers and now you need to open it. The installation will begin, during which you will be asked to select extensions, the files with which will be automatically linked to the player.
Attention ! In Windows 10, if M3U files are already associated with one player, the system will not give permission for this operation for another. In this case, you can change the recognition program through the properties by right-clicking on the icon of any M3U playlist and selecting the required program. Be sure to click “Apply”.
IPTV settings
To start watching interactive television, just open the playlist:
- launch VLC player;
- open the “Media” tab;
- select "Open file".
After this, a file system tray will open, in which you need to follow the path of the hosted IPTV playlist and select it. Playback of the first channel in the list will begin.
If there is no physical file, then select the “Insert link” option in the tab and indicate the address line where the IPTV playlist is located.
Expert advice
Gregory
Ask a Question
In the future, in order to avoid constantly opening the file and specifying a link, recently played playlists can be launched in one click. To do this, in the “Media” tab, just click on “Open from latest”. A list of the 10 most recently played IPTV playlists will open.
⇡#View photos
While designed for working with multimedia data, VLC copes well with other tasks. Thanks to built-in support for JPG, PNG, XCF, GIF, TIFF, LBM, PCX and Targa (TGA) graphic formats, the player can be used as a simple image viewer that perfectly complements the program's capabilities listed above.
It is hoped that the note we published will serve as good food for thought for all VLC users and, perhaps, will force someone to radically reconsider their attitude towards opensource solutions, which are often head and shoulders above commercial products. Both in terms of the quality of implementation, and in terms of the functionality carefully laid out by the developers.