And the fact is that when connecting a monitor or TV to a Windows 10 computer, HDMI is the most popular option due to the high quality of audio and video output. We will then look at the possible reasons that may be causing the problem, as well as the steps we should take to resolve the issue.
Contents [show]
- Reasons why Windows 10 does not detect the monitor via HDMI
- How to Fix HDMI Monitor Connection Problem Set HDMI as Default Device
- Manual screen detection
- Make sure display output is working correctly
- Update your display drivers
- Problems with viruses or malware
- Go back to the previous version of Windows 10
Why are there problems with HDMI?
HDMI is supposed to make it easy to connect all your devices with a single cable to transmit audio and video. To do this, connected devices must be "licensed" to communicate with each other through a standard known as HDCP .
This ability to recognize devices and transfer media is called HDMI handshake. If it doesn't work, it means that the HDCP encryption built into the HDMI signal is not recognized by one or more connected devices. This usually results in you being unable to watch movies or play video games.
There are a few things you can do to work around this problem. Here's how to fix HDMI problems .
Select the correct multi-monitor mode in Windows.
If you're using an HDMI screen as a second display in a dual-monitor setup, you'll need to make sure Windows is using the correct dual-monitor mode. You have four options:
- Use only one screen.
- Use only the second screen.
- Extend your desktop to both screens.
- Mirror the same desktop on both screens.
To quickly switch between these modes, hold down the Windows key + P. You can then use your mouse pointer to select your preferred mode. If you don't see anything on any screen, you can hold down the Windows key and press P repeatedly to switch between different modes.
How to troubleshoot an HDMI connection
Here are some steps that may help fix HDMI connection problems so you can get back to gaming or watching.
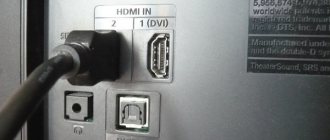
- Check the HDMI cable connection : make sure the cable is securely attached at both ends. HDMI connections do not fit as tightly as component or composite connections and sometimes lose connection. If this happens frequently, consider using locks for your HDMI cables or a self-locking cable.
- Repeat the power-on sequence for your devices : If you tend to turn on the TV first and then other devices, try turning on the additional devices first and then the TV.
If you have several different HDMI components, try running them in different combinations. Make sure you select the correct input for the device you're trying to use, whether it's a gaming console or Blu-ray player. Some devices are set to specific inputs and require you to tune into that input via the remote. - Try using a different HDMI input . Use your remote control to switch to another input on your TV, and then switch back to HDMI to check if the signal is correct. Otherwise, connect your device to another HDMI input and repeat the steps above. Once you have determined the best connection sequence, save it for future use.
- Check your source device's resolution setting : If your HDMI device has a settings menu to control video resolution, check to see if it's set to AUTO. If so, reset it to your TV or video projector's native resolution, such as 720p, 1080p, or 4K if you have a 4K-capable TV or video projector.
- Check the middleman : If your device is connected to an audio receiver or other middleman, disconnect the HDMI connection and connect it directly to the TV.
If this works, the problem is likely with the receiver or intermediary device you are using. Leave the HDMI source connected to the TV and make a separate audio connection from the device to the TV until you can determine the problem with the receiver. If the problem is the HDMI input on your audio receiver, you will still be able to use the receiver's audio inputs to pass audio from your HDMI device. - Check for firmware updates : Search online for firmware updates for your TV, HDMI device, or audio receiver. Also review user comments or complaints regarding HDMI handshake issues and follow the discussions and links to the suggested solution.
Temporarily use another exit
Some of the fixes below require a working screen with output available. Your video card probably has other types of image output. If your video card and TV share a port type other than HDMI, try it. This could be a permanent solution (DisplayPort is a better option over HDMI, for example) or just a temporary measure until you fix the problem.
If your display only has an HDMI input, you can use an adapter. Buy a DVI, VGA or DisplayPort to HDMI Adapter these days.
HDMI connection problem on HDR TV
The HDR implementation on many 4K Ultra HD TVs is known to cause problems with the HDMI connection. If you have a high dynamic range (HDR) TV and none of the above steps work, follow these troubleshooting tips:
- Make sure your audio receiver or other intermediate device is HDR compatible.
- Make sure your TV's firmware is up to date.
- If you have not already done so, replace your HDMI cable with a high-speed HDMI cable that is at least 10.2 Gbps, but preferably 18 Gbps.
If you have an HDR-enabled device, such as a UHD Blu-ray player or streaming device, connected to an HDR-compatible TV, the TV may not recognize HDR-encoded content. When an HDR TV or video projector detects an HDR signal, a confirmation message should appear on the screen. If it doesn't, the problem may be compatibility rather than connectivity.
If your TV or video projector still does not recognize the HDR source after changing settings and updating cables, contact technical support for your TV or HDMI source device.
How to turn it on correctly?
The best way to fix the problem and figure out what's wrong is to do it all over again.
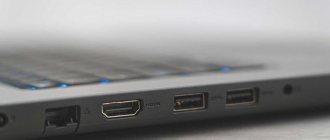
- Carefully insert one end of the cable into the connector of your laptop or computer, and the second into the HDMI port on your TV or other device.
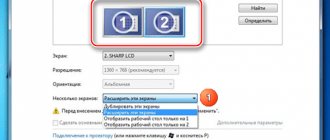
- In any free field of the desktop, right-click and select the desired section.
- Under the screen with the number – select the second item.
- Next we are offered several options. To display the monitor screen, it is better to select the first or fourth option. After that, click “Apply”.
To quickly turn on the display and screen duplication mode, you can simultaneously press two keys (located between the Ctrl and Alt keys) and the English button P. After that, simply select the mode. Just don’t get confused - you need to click on the English letter.
HDMI-DVI or DVI-HDMI connection problems
If you are trying to connect an HDMI device to a TV with a DVI connector, you may need to use an HDMI to DVI adapter cable. Alternatively, you can use an HDMI cable with an added HDMI to DVI adapter, or a DVI cable with a DVI to HDMI adapter. This allows communication between HDMI and DVI devices.
While HDMI can carry both video and audio signals, DVI connections can only carry video signals. This means that if you connect an HDMI source device to a DVI-equipped TV, you need to make a separate audio connection. Depending on the TV, this can be done using the RCA or 3.5 mm (AUX) audio jack.
TVs with older DVI may not have built-in software to recognize the HDMI source device. Contact your device manufacturer to find a solution.
Manually select the supported resolution and refresh rate.
When you connect an HDMI display, your computer should automatically select the correct resolution and refresh rate. If you don't do this, you should see an error message on your display indicating that an unsupported resolution or refresh rate was selected. In some cases, you will see nothing or just a “no signal” message.
For a secondary display, the easiest solution is to open the display settings and then change the resolution and refresh rate.
How you do this depends on the brand of GPU you have, as the name of the GPU utility and its location will vary. What's universal across all brands is that you access these settings by right-clicking on your desktop and selecting Nvidia, AMD, or Intel utility from there. Once in the utility, you will need to find the display settings. The example below is for our Nvidia laptop GPU for illustration purposes.
You can also use Windows' own Display Settings page to make the following changes:
- Open the Start menu and select the settings cog.
- Select System.
- Select Display.
- Select the display you want to change. If your display is not shown in the diagram, select Detect.
- Once you've selected the correct display, scroll down to Display Resolution and select the correct resolution for the screen in question.
- Now select Advanced display settings.
- Under Refresh Rate, select the correct refresh rate for your display. If you don't know the correct frequency, 60Hz is usually a safe choice.
After making these changes and closing the Settings window, your display should work if that was the problem. Please note that HDMI is limited to certain resolution and refresh rate combinations, depending on the version of HDMI you are using. For example, our screen can reach 2560×1440 at 165Hz via DisplayPort, but only 144Hz using HDMI.
Problem with HDMI connection to laptop or computer
If you are trying to use a PC or laptop as the source component, make sure that your computer's settings have HDMI selected as the default output connection. If you can't get the picture from your laptop onto your TV screen, try these troubleshooting tips:
- Boot your computer using an HDMI cable connected to your TV, which is already turned on.
- Boot your computer while the TV is off, and then turn on the TV.
- Boot your computer and turn on your TV before connecting the HDMI cable.
If your TV has a Video Graphics Array (VGA) input, you may have to use that instead of HDMI.
Driver installation and verification
And so, let me remind you that the HDMI output comes directly from the video card. It doesn't matter whether it's built-in or separate. Our task is to install newer drivers.
- Press two keys + R at the same time. Next, write the command as above in the picture.
- Go to the "Video adapters" section. Right-click on our card and then “Update drivers...”.
- We immediately select the first item and wait until the system finds a new driver on Microsoft servers. If the driver is found, install it. But it is not always possible to update the software this way. Sometimes the system finds nothing and you see a message that the driver does not need to be updated. In fact, he just didn't find it.
- To install the exact driver, you need to know the name of your video card. As you may have noticed, the name is displayed there in the “Device Manager”. Next, simply enter it into the search engine and download the driver from the official website.
- Don't forget to specify the operating system. We download only the latest version of the driver and the full package. After downloading, install and reboot the device.
If this does not help and there is still no image on the TV, then try a different port on the TV and on the laptop (if there is one). Otherwise, you need to take some other wire, perhaps the one you are using is broken or not compatible according to the standards. You can check the cable by connecting another laptop or computer to it.
Wireless HDMI connection problem
Wireless HDMI devices —those that use an external transmitter to wirelessly transmit audio/video signals to a receiver—can also cause connection problems.
There are two main "wireless HDMI" formats, each supporting their own group of products: WHDI and Wireless HD (WiHD). They are designed to make it easier to connect HDMI devices without cables.
Follow these troubleshooting steps if you are trying to connect a wireless HDMI device:
- Change the distance and position of wireless devices. As with Wi-Fi, a successful HDMI wireless connection depends on a minimum distance, a clear communication line, and limited interference. For particularly long distances, use HDMI signal boosters.
- Try different activation sequences like those mentioned above.
- Check product specifications and compatibility with any wireless HDMI device. Wireless HDMI devices have many technical differences when it comes to make, model, and industry standards, and the devices may not be compatible.
What should you do first?
First, you need to determine what caused the problem, since how to solve it may vary depending on the situation.
A common phenomenon is that HDMI does not work on a Windows laptop, that is, after the connection has been made, you only see an empty desktop on the screen. Here the problem lies not in the connector or cable. The fact is that the TV here acts as an extension of the laptop screen, i.e. it becomes an additional desktop area. To see the window in this situation, it will be enough to simply move it left or right.
This is not enough for correct operation, so you need to switch the display to full desktop duplication mode. To do this, proceed as follows:
- right-click on an empty area of the desktop;
- if the device does not see the TV display, then select “Detect”;
- Next you need to find the drop-down menu and there you will also find the “duplicate screens” item.
then select screen settings (or screen resolution - depending on the OS);
If the HDMI output on your laptop does not work, this method will help fix the problem.
The laptop sees the connection, but there is no image on the TV display. First of all, you need to check the connection. The wire should sit firmly; carefully inspect it for damage and kinks. If they are present, the cable will have to be replaced.
If everything is absolutely fine with the cable, there is no damage, then you need to check whether the correct socket was selected. Often TVs have several ports at the same time, but signal reception in the settings is set to only one port.
Everything is fine with the picture, but there is no sound. In this situation, your task is to route the audio signal correctly. To do this we do the following:
- in the “Control Panel” select the “Hardware and Sound” section;
- then go to the category called “Sound”;
- in the “Playback” tab, depending on the settings, select a TV or video card, click “Apply”.
If HDMI on your laptop stops working, and all of the above steps did not help, then you should check whether the port itself is in working condition. Sometimes they burn out - naturally, you will have to take the laptop to a service center. To avoid this problem, be sure to disconnect the cable cable and satellite dish from the TV before connecting. If the outlet that supplies power is not grounded, disconnect power from all devices before connecting.