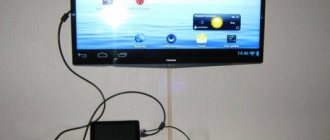
Viewing photos or video content on a large TV screen is much more convenient than on a laptop, tablet or smartphone. But ordinary copying of files and synchronization of TV with external devices can result in a serious problem.
Even if the content is downloaded to the TV, it is not a fact that it will be read correctly. Some TV equipment does not work with specific standards, for example, photographic RAW or MKV video. You have to convert them to other formats, keeping an eye on the capabilities of the standard player. But there is an easier way - to use DLNA technology.
What is DLNA
The abbreviation DLNA stands for Digital Living Network Alliance or in Russian “Alliance of Home Digital Networks”. This technology appeared after the rapid development of Smart-TV and is supported by leading TV equipment manufacturers.
DLNA support on a TV allows you to combine desktop computers, laptops, tablets and other gadgets with a similar standard into one network. That is, using this technology, you can share almost any content and view it on the selected device.
Installing Home Media Server (HMS)
Installation of HMS (Home Media Server) is carried out in the following sequence:
- Download the home media server installer, preferably from the official website.
- Launch the installer. The window prompts you to select the directory into which the installation files will be unpacked. You need to select a directory and press the “Run” button.
- After unpacking is completed, the program installation will automatically start. There are various settings here. In this window, you need to select the directory to install the Home Media Server (HMS) program and the “Program Group” (folder in the Start menu).
- After the installation folder is selected, you need to make a mark on “Create a shortcut to run the program on the desktop”, if necessary, and press the “Install” button.
- Upon completion of the installation, which lasts no more than a minute (depending on the equipment), the HMS is immediately prompted to start. The installation process is complete.
After installation is complete, it is better to delete unpacking files manually, because they are not automatically deleted.
How DLNA works
DLNA standards use UPnP protocols to receive and transmit files, as well as render various content on all connected devices. A local IP network is used as a base, allowing all actions to be performed in real time.
For correct synchronization of devices, equipment must have the appropriate protocols. Devices are connected to a common network via either a router or a Wi-Fi module.
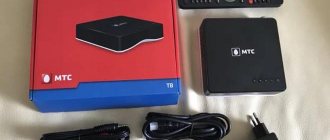
Advice! Finding out if your TV has DLNA is very easy. The box should display the technology logo - DLNA Certified.
Why technology is needed
These days, most multimedia equipment is equipped with DLNA technology.
There are more than 4 billion DLNA certified products in the world. However, each manufacturer tries to call it differently. “Smart Share” from Samsung, “Simple Share” from the manufacturer Philips... The names may differ, but in principle, they are all the same technology. The main advantage of DLNA is the ability to form a single memory database for faster exchange of large amounts of information. The most suitable device turns into a virtual media server, in the folders of which all the necessary files are stored. Any equipment synchronized with it can request, receive and use the necessary file. In practice, it looks like this: the user wants to view photos from his phone on a big screen. To do this, he copies them to a shared folder stored on the media server, after which he turns on the TV, goes into this directory and finds the pictures. This is very convenient because there is no need to transfer images using a flash drive.
But the main advantage of the technology is the ability to use television equipment, regardless of the model and year of manufacture. Of course, modern TV panels come with certified DLNA software, however, even older TV models can be turned into a media server. To do this, just add one of the programs:
- Twonky;
- Plex;
- TVersity;
- Windows Media Player.
Supported devices
This technology works with an impressive, but still limited list of equipment. Developers identify three main groups of devices that can fully support the DLNA standard.
Equipment compatible with the technology:
- Home Network Devices;
- Mobile Handheld Devices;
- Home Interoperability Devices.
The first group includes televisions, stereos, multimedia players, network storage and printers. The second are all mobile gadgets: tablets, video cameras, smartphones and other portable equipment. The last group includes modems, routers, converters and other devices that support specific communication standards.
Other options
The capabilities of the Home Media server reviewed do not end with DLNA. HMS can provide access to computer media resources using UPnP (Universal Plug and Play) technology and the HTTP protocol. This is more relevant for smartphones and tablets.
But this server can do a lot more for DLNA. For example, you can give access not only to computer resources, but also to streams of Internet radio and IPTV television. It is also possible to broadcast so-called podcasts from various online cinemas, such as hdserials.ru, hdkinoklub.ru and hundreds of others. There are also possibilities for transcoding media files of a format that is not supported on TV. How do you like this? All this will be discussed in the following articles, subscribe to our newsletter, as well as VKontakte and Twitter.
Equipment synchronization methods
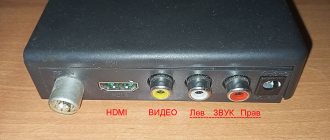
There are two options for supporting DLNA technology on a TV - built-in and external . In the first case, we have a wired connection organized via a USB interface or via a wireless Wi-Fi module. Codecs in the local firmware are responsible for playing content here, which significantly reduces the list of readable formats, because in a good half of cases standard players have modest functionality.
External DLNA support is provided using third-party devices: terrestrial, cable or satellite TV receivers, multimedia players, game consoles, etc. This option significantly expands the capabilities of content visualization and eliminates any conflicts of standards and problems with codecs.
Possible problems and their solutions
Sometimes, when creating a home media server, many users encounter problems that every user can solve.
The table below shows the most common problems and how to eliminate them.
| Problem | Solution |
| The server is detected, but cannot open on devices | Go to the server settings, in the “Devices” section, enter the old and new TV model name |
| File playback slows down or stops | Go to the settings and in the “Transcoding” section, set a smaller frame size and reduce the quality of the video content by one position |
| The "File type is not supported" icon appears | Restart Home Media Server and the TV itself 2-3 times |
The process of creating and setting up a home media server is simple; the main condition is to strictly follow the instructions given above.
Setting up DLNA on a Samsung TV
Before you start setting up your equipment, you should make sure whether your TV supports DLNA: the corresponding label on the box or the hologram on the back of the device. Next, you need to download special software from the company’s official website. For Samsung TVs this is PC Share Manager or AllShare.
Advice! The first utility will come in handy if the general network does not include a router. That is, for built-in synchronization. The second program acts as a media server, combining all external devices into a single network.
AllShare
The utility can be found on the official website. Next, you need to install it on a desktop computer or laptop, following the instructions of the assistant wizard.
Launching the program:
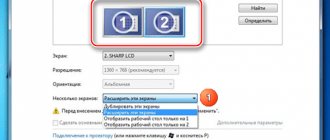
- We launch the utility and get to the main screen.
- We check the functionality of the shared server (the green indicator in the corresponding part of the interface should be lit).
- Turn on the TV and activate the AllShare program on it using the PIN code sent from the computer.
- Select from the list of presented PC devices and click “Connect”.
Setting up the utility:
- Go to “Settings” -> “Folder Settings”.
- Create a directory for public use by clicking “Add shared folder”.
- We specify the storage location for files transferred from connected devices. For each type of multimedia, you can set your own folder, or one for all.
- Open the “Rights Settings” tab.
- From the list presented, we find the connected TV and give it access to the public network by setting the beacon to “Allow”.
- Move the multimedia content to the created shared folder.
- We select a specific file and use the right mouse button to call up the context menu, where we select the name of the TV to view from the list.
The program is completely translated into Russian, so there should be no problems with the settings. If necessary, you can look into the local help system, which describes in detail the features of connecting third-party devices.
Share Manager
Important!
Before using the program, you must set up a connection on your PC by setting IP addresses for each device. This can be done in the “Network Center” section, which is located in the connection properties. For personal computers, the address is always the same - 192.168.1.1, as well as for Smart technology - 192.168.1.2. The subnet mask remains unchanged and is set automatically – 255.255.255.0.
After setting the IP addresses, you can launch and use the program.
- In the list presented, select the directory where the multimedia content is stored.
- At the top of the interface, find the folder with a green checkmark and click on it.
- Click on “Sharing”, then go to the “Set device policy” section.
- In the line with the name of the TV in the “Status” column, change the value to “Accepted” and click OK.
After all the above steps, the selected content will be broadcast on the TV screen.
Wi-CAT LLC
- ->
- Wive-NG - settings
- ->
- Configuring the built-in DLNA server xupnpd for...
In this article we will look at setting up media content broadcasting, in particular IPTV, in home and office networks using the built-in DLNA server xUPNPd.
Why is this needed: to view IPTV content on user devices that do not support Multicast and playlists, without using a set-top box (STB). All you need is a device on which you are going to view IPTV (TV, smartphone) with dlna support.
To begin with, recommendations and limitations:
1.
If your TV supports not only
dlna
, but also
installation of applications
that can work directly with multicast, playlists, etc., it is better
to use these applications
. The option discussed in the article is recommended for end devices that support dlna, but do not allow installation of applications for working with iptv.
2.
Using the method discussed in the article, you can only play
open channels
.
That is, if the provider encrypts
the streams, then nothing will work and
the method is not applicable
.
3.
The most effective way would be to use xupnpd in conjunction with
udpxy
to use the latter as a
multicast udp to http
, understandable for TVs.
The built-in option in xupnpd is extremely limited and can cause problems, especially when trying to watch iptv on several devices at the same time. This is especially important in networks that use Multicast
.
For networks that send a stream of open channels via http to HLS, this is not so critical. The procedure is as follows: first enable udpxy ( Services → Miscellaneous → Services IPTV → Multicast to http proxy → LAN or in the Russian version Services → Miscellaneous → IPTV Services → Convert multicast to http → LAN ), then enable xupnpd and configure it.
And so, let's start setting up.
Setting up iptv services in a wi-fi router with wive-ng software
You can get to the xupnpd settings in the web interface in the following way: Services → Miscellaneous → Services IPTV → DLNA media server (in the Russian version: Services → Miscellaneous → IPTV Services → DLNA media server ). By default it is disabled (in the Disable status). After selecting Enable and applying the settings, the service status will change to “ work ” / “ working ”. After this, you can start setting up (go to “Configure” / “Settings”)
Web - xUPNPd configuration interface looks like this:
web gui built-in dlna – xupnpd server
Method number 1 - download a playlist.
The easiest and fastest way to start watching iptv is to download the playlist provided by your provider for online TV. All you need to do is go to Playlists, select a playlist in m3u format previously downloaded to your PC, and download it by clicking the Send button.
downloading a playlist of Iptv channels from the provider to the wifi router
The result of this manipulation will be the appearance of the playlist in the list on the Playlists page
list of downloaded playlists
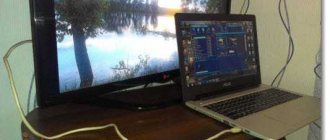
By clicking Back we return to the main menu. Now we can see the channels available for this playlist on our TV. For example, I’ll show you how it looks on a Smart TV from Samsung.
1. Go to the list of Sources. We select our router as a network device (its name will match what is displayed as a title on the xupnpd settings start page)
Selecting a wi-fi router with Wive-NG-mt software as a network source on a Samsung TV
2. Select the playlist we are interested in if there are several of them (or “click” on the only one). The playlist name will, of course, be the same as when downloading it from local storage.
Playlist selection
3. All available channels will be presented in the playlist as media files. Simply by selecting the one you are interested in, you can start browsing.
List of iptv channels available after connecting to the dlna server
The process of simply setting up IPTV without using STB can be considered complete.
Method number 2 - setting up a feed
to automatically receive a playlist
.
As you know, the operator can change the composition of the playlist. The method described above will require the user to control this fact and then download the updated playlist. The same applies to centralized broadcasting of media content in an enterprise. To save yourself from these gestures, just set up a feed. In this case, the playlist will be automatically loaded from the specified URL by timeout or by your command. All feeds currently configured are listed in the Feeds section.
Feeds section in web gui dlna server xupnpd
By default, several feeds of telecom operators have been added to Wive-ng (these are Ekaterinburg operators such as Convex, Planet and Insis, Omsk TTK), it is recommended to delete all unnecessary ones and leave only those that will be used.
If you previously created a feed, but forgot its contents, unfortunately, it is impossible to “enter” it through the web gui xupnpd. But you can use the following command:
[ [email protected] /]# cd etc/xupnpd/config && cat feeds.lua
the result will look like this:
feeds= { { "generic", "https://iptv.pantyushin.ru/oms.m3u", "TV-TTK-OMSK" }, { "generic", "https://www.adslclub.ru/tv /ws-omsk.m3u", "TV-RTK-OMSK" }, { "generic", "https://www.profintel.ru/files/tv/channels.m3u", "TV-INSIS-EKB" } , { "generic", "https://tv.convex.ru/tv_all.m3u", "TV-CONVEX-EKB" }, { "generic", "https://weburg.tv/playlist.m3u", "TV-PLANETA-EKB" }, }
i.e., the name of the feed, and its corresponding plugin and playlist URL.
To add your own feed
, corresponding to the operator’s playlist, you need to fill in three values in the Add feed section as follows: Plugin = Generic Feed data = m3u_url (i.e. link to the playlist in m3u format) Name = Any name under which you want to see your playlist in the list. In my case the setup looks like this:
list of created feeds
After completing the setup, click Add so that our data is saved after leaving the Feeds section - use Save, as usual.
Important: The Feed data field is case sensitive
. Be careful when specifying the URL (personally, I spent a lot of time trying to figure it out).
List of available playlists after updating feeds
If everything went well, the newly created feed with the name you specified will appear in the list of feeds. Going back to Playlists, you will see that nothing has changed - the list is still empty. Don't be afraid. If you have configured manual feed updates, you need to click Reload Feeds. After this, a playlist corresponding to the newly configured feed will appear in the playlist list. The playlist will appear on your TV in the same way as Method No. 1 discussed above.
Important
: by default Feeds reload interval = Playlists reload interval = 0, this means that feeds and playlists are updated by user command. To automate this process, you need to set the timeout in seconds: for example, 86,400 for updating once a day. Also, you must set the value to a non-zero value if you want to save the configured feeds even after updating the software to later versions.
To get to the xupnpd settings section, you need to go to the Config section
Go to the “Settings” section in web gui xupnpd
and find the block “Common (restart needed)”
xupnpd server dlna settings
Here you can change the display name of your device. The remaining settings should not be changed without understanding why this is being done.
Don’t forget to say save in xupnpd, as well as save & reboot to the router itself, to save rwfs.
If you find an error, please select a piece of text and press Ctrl+Enter.
Top applications for Philips Smart TV
Finally, I would like to recommend you the most popular applications for Philips Smart TV, which, unfortunately, are not initially included in the App Gallery. The top applications installed on Philips smart TVs include:
- Vintera . TV is a platform that contains a huge number of digital television channels in SD, HD and 3D quality. It should be taken into account that for comfortable viewing in high quality, high Internet speed is required, for 3D at least 10 Gbit/s.
- Youtube . com is the most popular service for posting and viewing online videos on a wide variety of topics.
- Ivi . ru is the most famous free online cinema for watching films in the Russian-language segment of the Internet. A huge number of films for every taste, from classics to the latest industry news.
- Skype . com – an application for online conferences and communication, I think it needs no introduction.
- Tvigle . ru is an online service with many Russian-language films, cartoons and TV series.
- Angry Birds is the most popular game that is present on almost any TV that supports Smart TV.
- Explore 3 D is an English-language service that allows you to watch movies in 3D absolutely free if you have special glasses.
This is not a complete list of popular applications that you can install on your TV. Everything is limited by your imagination and desire!