Various Full HD and Ultra HD tests from Burosch are used as reference tests and are used to evaluate the image quality on a TV or monitor screen.
Using such tests, you can optimize and adjust the image. You just need to ensure that the pictures from the test are displayed correctly on the screen and you can say that your TV is set up.
This setting occurs regardless of the screen size and is assessed by eye; each user makes the settings for himself.
The image adjustment must be done at home, in the place where the TV will work. Because in a store or at a factory, a different mode of operation of the television receiver could have been chosen for the demonstration. And using the settings, you can change the quality of the picture on the screen within fairly large limits.
The test images are selected in such a way that by setting them correctly, you can prepare your TV to display any scenes in terms of brightness, contrast, color, and clarity.
All pictures are static to give the eyes time to detect inaccuracies in the display on the screen.
Test images are divided into five groups:
- Basic samples for initial visual adjustments
- Test images for metrological calibration with light sensor
- Professional static reference images for image optimization
- Dynamic test rollers
- Professionally made real pictures
This lists the common characteristics of tests that may be encountered. Our tests only contain some pictures, but they are quite enough to set up your TV.
Each test image is used to configure a different parameter.
Our test includes:
- Five basic images for the first basic adjustment of picture quality on the screen:
- Format, size
- Brightness
- Contrast
- Color
- Focus (clarity)
- Test images with a large number of test zones
- Images for professional setup
- Real pictures for further customization and verification
What are dead pixels
In all LCD displays, the image is formed from a grid of pixels. They consist of three separate subpixels of red, green and blue, which are responsible for creating a full-color picture. For each subpixel there is a transistor that controls how it turns on and off.
This is what a dead pixel looks like on the screen / overclock.net
Even the matrix of a regular HD monitor contains over 6 million subpixels, and in 4K displays their number reaches 37 million. With such a huge number, some of the transistors may fail. Then certain subpixels remain on or, conversely, off.
Reasons for appearance
The cause of defects lies in the technology itself. The liquid crystal is very small and unstable. Any external influence during production may cause it to malfunction. This could be a speck of dust that gets on the matrix during assembly, mechanical damage to the crystalline substrate, increased voltage, heating, etc. Experts say that there is not a single fully functional matrix. Each of them has 1-2 defective crystals. A violation is considered if their number begins to increase and the defect becomes noticeable.
The appearance of defective elements can result from:
- excessive overheating or cooling;
- a nearby powerful source of electromagnetic waves (for example, a microwave oven);
- mechanical damage to the screen.
What pixel defects are there?
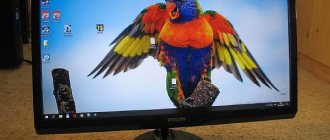
Broken pixels are any abnormal pixels that are noticeable against the general background, but this is not entirely correct. The only truly broken or dead pixels are those in which the transistor has failed. They do not glow with any color and simply remain black, falling out of the matrix grid. Clearly visible on a white background.
There are frozen pixels on the left and right, broken pixels in the center / digital-boom.ru
There are also frozen or stuck pixels - these are red, green, blue or white dots that are clearly visible against a black background. They occur when subpixels get stuck updating color.
Replacing the matrix
When the case is completely removed, you will see in front of you a metal matrix frame on which all the electronics and cables connected to them are attached.
The latter must be disconnected very carefully to prevent breakage. Replacing the LCD matrix on a TV is a fragile process. Then unscrew all the screws that secure the motherboard, power supply and other components.
Advice! In order not to get confused in the subsequent assembly, you can first photograph the placement of all elements of the TV.
After all the components of the model are disconnected from the matrix, you need to unpack the new screen and attach all the boards, cables and speakers to it in the reverse order. Once all the modules are in place, you can begin installing the frame and cover in place, as well as subsequently checking the functionality of the device.
How many dead pixels are allowed?
It seems logical to replace a computer monitor or TV with dead pixels, but manufacturers do not consider the presence of the latter to be a manufacturing defect. If you contact the service with such a complaint, you will most likely be refused service.
Dell Dead Pixel Policy / dell.com
Different suppliers have their own standards for the number of defective pixels depending on their location, resolution and display diagonal. Thus, he considers up to 10 frozen and 3 dead pixels to be normal on 20-inch screens. Samsung has 7 dead pixels for monitors, while Dell has 1-6 stuck and 6-13 dead pixels depending on the display line.
Sound check
To improve the sound and bring the parameters closer to cinematic ones, manufacturers use 20-watt audio systems and various technologies such as Ultra Surround, as in the 55UM7100PLB. But it’s still better to verify the sound quality in practice than just read about them in the technical specifications.
You don’t need much to do this—run any music video on TV. Gradually increasing the volume from minimum to maximum, make sure that no extraneous noise, rattling, or crackling appears.
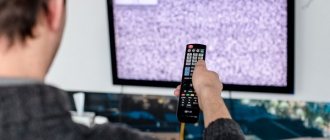
How to check the display
To avoid troubles, you should check the screen before purchasing. You can do this yourself or pay for the corresponding service in the store.
You can visually determine the absence of defective pixels by careful inspection on a solid white, black, red, green and blue background. To do this, you need to download such pictures to a flash drive and play them on the device you like. If none of the dots stand out from the overall color, then everything is in order with the screen.
Another option is to use special software, if you can run it. Essentially, these are the same color pictures, but in a more convenient format of applications or online services.
- Dead Pixel Tester is a simple utility for Windows with free access. After starting, you need to select a mode and carefully look at the screen.
- InjuredPixels is another free app for Windows. Colors can be switched with the mouse or using the arrows.
- Dead Pixel Buddy is an online color picker checking tool. Works in any browser, including mobile ones. Don't forget to enable full screen mode.
- LCD DeadPixel Test is another online service. Select a color, expand the window to full screen and check.
External inspection TV
The body and stand of a brand new TV are protected with film. We make sure that it is present and intact.
Upon visual inspection of, say, 55TU7100, there should be no signs of use or defects on the unit:
- scratches, chips and abrasions: carefully inspect polished metal panels, chrome elements; damage, if any, is clearly visible on shiny surfaces;
- dents or bent parts of the body, which should not be present in the factory version;
- damaged screws on the back panel: the TV may have already been disassembled and reassembled, and the service warranty will not be valid.
Everything is fine? We move on to the next stage of inspection.
How to remove dead pixels
Since black pixels are caused by damage to the transistor, they cannot be corrected without replacing these components. And this is almost unrealistic even in laboratory conditions. The situation is different with colored dots, which arise due to freezing of subpixels. You can try to remove them.
Software method
The method consists of cyclically displaying rapidly changing images, which, due to frequent color changes, increase the chance of returning frozen pixels to the ability to switch again.
There are many options for implementing this method through utilities, online services, and even YouTube videos. They can be used on a computer, as well as on a TV when connecting the PC using an HDMI cable.
- Bad Pixel is a professional paid utility for Windows, the creators of which promise to remove defective pixels in just 10 minutes.
- DeadPix is a universal program for Windows and Android that helps you find and then fix problem pixels by cycling colors.
- PixelHealer is another utility for Windows. Eliminates stuck pixels by quickly flickering RGB colors.
- JScreenFix is an online service for running on a computer, TV and mobile devices. Displays an area with digital noise that can be moved to the desired area of the screen.
- PixelFixel is a 12-hour YouTube video that you can play and leave overnight. Attention! The colors in the video change at a very high speed and can cause an epileptic attack. Do not look at the screen, but rather turn it to the side.
Manual method
Another way is to physically touch the screen. Light pressure helps bring frozen pixels back to their senses and restore functionality. The method does not work in all cases, but you can try.
instructables.com
- Find the glowing pixel and turn off your monitor or TV.
- Take a cotton swab or pencil eraser.
- Gently press the display several times in the area of the stuck pixel.
- Wait a few minutes, turn on the monitor and check the result.
Keep in mind that even if stuck pixels are gone, they may reappear. There is also a possibility that after the described manipulations, new defective pixels will appear.
If there are few colored dots and they do not interfere much with your work, it is better not to pay attention to them and leave everything as it is.
Checking connectors and interfaces
On the back of the TV panel there is a set of necessary ports for connecting a TV, synchronizing it with other gadgets, and installing storage devices. If one of them does not function properly, you will have to send the equipment for repair or do without any connector.
Therefore, when purchasing, we check all inputs:
- USB - an ordinary flash drive will help;
- HDMI, LAN, RF, VGA, audio and others - cables that should be included with the TV.
Wireless interfaces such as Wi-Fi (available in the UE50NU7002UXUA) and Bluetooth should not be ignored either. Try connecting to TV wirelessly using a smartphone or tablet and displaying a picture or video on the TV screen.
Diagnosis of LED backlight malfunction
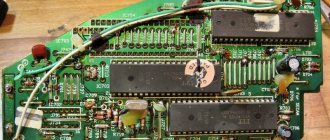
We will start repairing the LED backlight of the LG TV matrix by preparing the workplace, since when disassembling the TV we will need a separate table on which we will arrange such fragile parts as the matrix and light filters. I always repair such TVs with trepidation, since one wrong move can send the matrix to scrap.
Having laid the TV down, I unscrewed all the bolts around the perimeter of the cover.
TV after disassembly
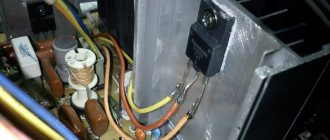
Having removed the cover, I decided to measure the voltage on the LED driver at the moment it was turned on.
Connector for LEDs
At the moment of switching on, the voltage rose to 130 volts, after which it slowly dropped to zero. This behavior of the driver is normal, since if there is no load, it goes into protection and turns off the power.
Complete disassembly of the TV. Step-by-step instruction
Having confirmed that it was the backlight that was faulty, I proceeded to completely disassemble the TV.
First, I disconnected the cables going to the T-CON board and the MAIN board, then unscrewed and removed these boards.
Disabling the loop to the T-CON board
Power supply and MAIN boards removed
Removing the protection of the T-CON board
There were no problems with the T-CON board either. Carefully snapped the cables that went to the matrix decoders and removed the T-CON board.
Disabling T-CON board loops
The cables are disconnected and the board is removed
Next, I unscrewed the bolts that held the protection of the matrix decoder, after which I removed it and put it aside.
Removing the decoder protection bar
NEXT WE DO EVERYTHING VERY AND VERY CAREFULLY!!!
- We turn the case over with the matrix facing up, and then carefully snap off the front metal frame.
We snap off these latches around the perimeter. If something cannot be removed immediately, under no circumstances do we use force. We take a good look at all the fasteners, look for the interfering latch, and only then remove the frame. - After removing the frame, it is necessary to release the decoders from the rubber holders.
The decoders have not yet been removed from the latches.
We also do this very carefully, first we release the lower part of the decoder, after which it should hang on the cable without any effort.
Decoders removed from latches - I removed the matrix along with the plastic frame. Since the frame sits tightly on the latches, I cut squares from the remains of thin plastic and inserted them under the latch, between the plastic part and the metal part, thereby freeing all the latches around the perimeter.
- After this, the frame along with the matrix was completely removed. It is necessary to place the removed matrix in a previously prepared place, while paying special attention to the cables so that they are not damaged in any way.
- After removing the frame, remove the films. We do this simply, move it to the bottommost layer (there is a layer like an org. stele), and remove it from the TV.
We got to the LEDs - Now you need to remove the reflective film. It is held on with the help of supporting clips.
We pry up the clip
The clip has been removed
This completes the disassembly.