| Service menu for various TVs |
| Full list · A · B · C · D · E · F · G · H · I · J · K · L · M · N · O · P · Q · R · S · T · U · V · W · X · Y · Z · Rus |
HITACHI CS2840TA.
Processor NES3-. NES2-. Chassis EUROSTE REO-2 (-/-) ( ) (TV) - in 1 sec. Exit - POWER OFF.
HITACHI C2528P445VT, C212528P745VT, C28P405VT. Processor CCU-SALO-09 (CCU20XX). DIGIT2000 chassis.
(P) (*) (O/V) (#) (M). Output - (TV).
HITACHI 43FDX, 53FDX.
Open the front panel (four screws, 2 on each side). Remove the center panel (six screws). Click the blue button on the left corner of the dial board. Exit - Press the blue button again
HITACHI C2578FS, C2589FS, CMT2578. Chassis V1
On the front panel of the TV, press and hold the (TVAV) button and turn on the TV. After completing all adjustments, press the ENTER button on the remote control (memory), then the or button turn off the TV.
HITACHI C2135MN
Turn on the TV from the front panel while holding the (-) button.
Often, user problems can be solved without calling a technician to your home. For your convenience, a consultation on setting up TVs has been organized.
Hitachi TV manual
In accordance with the instructions, the following buttons and connectors are located on the TV body:
TV/AV button to switch TV operating modes button to enter the main settings menu Prog. Up, Prog. Down buttons for switching television programs Volume Up, Volume Down buttons for increasing and decreasing the sound volume Operate/Standby button for turning on the TV and putting it into standby mode Power cord connector for connecting the power cord Power On/Off button for completely turning off the TV Hitachi S-VHS EXT-4S video input Super VHS Video Audio EXT-4 video and audio input phone headphone connector Audio Line Outs linear audio output Subwoofer Out audio output for subwoofer PC Audio Input audio input for computer Aerial antenna input Scart 2 (EXT-2) scart connector Scart I ( EXT-I) scart connector HDMI Input (EXT-S) input for connecting HDMI Component Audio Inputs component audio input Component Video (YPbPr) component video input VGA Input video input for connecting to a computer
Which TVs support digital broadcasting?
Modern televisions capable of receiving a digital signal operate according to the DVB-T2 standard. They are equipped with the appropriate components and can switch to a new broadcast format without connecting additional telecommunications devices. We have a separate instruction on how to set up digital channels on new models.
The DVB-T2 standard is supported by all TVs from the following manufacturers:
Television devices with the DVB-T standard, which processes exclusively analog signals, do not support the digital broadcast format. Models with this broadcasting technology were produced until 2013. To set up digital channels, you will need a set-top box with a built-in DVB-T2 standard.
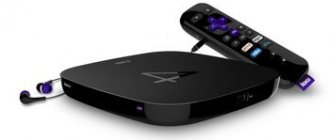
Example of a set-top box with the DVB-T2 standard
To check your TV for support of the DVB-T2 standard, you must read the instructions or contact the technical support of the device manufacturers. But the easiest thing is to look at the connectors on your TV. If there are connectors for tulips or SCART, then by purchasing an additional set-top box you can set up digital channels and watch them for free.
Those who only have a SCART connector will need to buy an adapter for tulips.
For those who have very old TV boxes, see the instructions below.
Is an old analogue TV antenna suitable?
If you live in a city on high floors, then you can first connect the set-top box to see if it can find digital channels. If the channels are found, then you won’t have to buy or connect an old antenna. Where a weak signal level cannot be avoided without an antenna, you may even need an active antenna with power.
Antennas, as well as set-top boxes, can be bought inexpensively in China:
Algorithms for setting up channels by brand
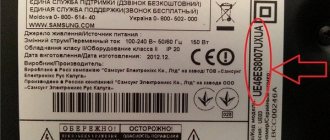
Before you start directly searching for channels, you need to make sure that the TV supports a digital signal. Many series and models of TVs, although they have a built-in digital tuner, may use the outdated DVB-T standard instead of the new DVB-T2, which is used everywhere. This can be done in two ways:
- find out the model code on the factory sticker and find out about it on the Internet;
- Check the information in the TV menu in the help tab.
Samsung
For Q, M and LS series:
- Find and press the “Home” button on the remote control, a menu will open.
- Select the “Source” sub-item, in which you should indicate “TV”.
- Return to the menu again using the same button and select “Settings”.
- Go to the “Broadcast” item and select “Auto Configuration”.
- Click on “Start”. A pop-up notification will notify you that the current channel list will be erased based on the scanning results.
- Select the signal source - in this case, “Antenna”.
- Select the type of channels - “Digital” or “Digital Analogue”. The difference is that in the second option there is no need to additionally configure the connection of each territorial TV channel, if broadcasting is carried out on it.
- Specify the search mode - select “Full”, in which case the system will find everything that comes from the signal source.
- Start the process by clicking the “Scan” button.
- All found TV channels will be displayed on the screen (both TV, digital and analogue). A scale will also be displayed showing the scanned part of the range.
- After completing the procedure, press the “Close” button and exit the search menu by pressing the “Return” key on the remote control.
For F, E, J and H series:
This range of devices involves a slightly different search process:
- Turn on the TV and immediately press the “Source” button.
- In the window that appears, select “TV”.
- Open the menu (using the button of the same name, or “Keyboard”, select the “Menu” item).
- Select “Broadcast”, and then “Auto-tuning”, similar to the list for Q, M and LS models.
- Reactivate autotuning.
- In the notification about changing the channel list settings, click the “Start” button.
- Select the origin of the signal - DVB-T2 or “Antenna” (depending on the version) to connect to free broadcasting.
- Specify the type of channels - you should give preference to the “Digital and Analog” category, in order to avoid re-tuning the remaining analog channels in the search.
- Select scan type. Click on “Full” to add more programs.
- Click on “Scan”.
- At the end of the procedure, click on the “Close” button and leave the menu.
Automatic search for TVs with Smart TV option:
- Press the “Settings” button on the remote control.
- Select the “Menu” sub-item (picture with a gear symbol).
- Open the “All settings” item.
- Select the “Channels” column, then go to “Search for channels and settings”.
- Select "Auto search". Make sure that in the “reception mode” column there is the inscription DVB-T2 or DVB-T/T2.
- Mark the required signal reception path and click “Next”.
- Set scanning parameters. To search for over-the-air channels, just check the box next to the “Digital only” line.
- After the search indicator reaches 100%, a window with a “Done” button will appear. You need to move the slider to the button and click “OK”.
- This completes the auto search process. You can use digital television.
Auto search on a TV without Smart TV
- Also click on “Settings”.
- In the “Settings” menu that appears, select “Channels”.
- Go to the “Autosearch” window by pressing the “Right” key on the remote control. Click "OK".
- Select the “Antenna” sub-item and click “Next”.
- Check the box “Digital only” and secure it by clicking on “Run”.
- Based on the search results, the “Done” button will appear on the screen.
Philips
In this brand, the auto search order depends on the year of manufacture of a particular TV.
On an old TV made before 2011:
The setup process for an old Philips digital TV is as follows:
- Open the settings menu using the “Home” button (in some models it is indicated by an image in the form of a house).
- From the menu you need to go to the “Configuration” column. If the system does not support the Russian language, it can be recognized by its gear icon.
- In this tab you need to open the “Installation” sub-item and confirm by clicking on “OK”.
- In the same thread, select “Setting up TV channels”, and then “Automatic installation”. Confirm the action with the “Start” button.
- If you are required to select a country, indicate “Russia”. If this is not supported, choose Finland or Switzerland: the countries' broadcasting standards are the same.
- Select “Digital” settings mode.
- After which the TV will offer a choice of signal source for scanning. Specify “Antenna” or “Air”.
- The software will offer a choice of search options - “Manual” and “Auto Search”. Select the second one and click the “Start” button.
- After the scanning process is completed, click “Finish”. The TV will automatically save the channels found.
During the setup process, the software may request a PIN code. If nothing has changed, you need to dial one of the standard options - 1111, 1234 and 0000. In the future, it can be changed to a custom option.
On a modern TV
The auto-tuning procedure for a newer TV looks different:
- Open the menu using the Home button.
- Select the “Installation” sub-item.
- Go to the next folder and click “Search for channels”.
- After “Reinstalling channels”.
- Select country. As in the previous case, if Russia is not on the list, you need to indicate Finland or Switzerland. In new versions, Germany will also fit. If the name of the TV contains the combination PFL, this will be the best option.
- Select digital broadcast mode (DVB)/
- Determine the origin of the signal - “Antenna” for over-the-air channels.
- Select the “Scan frequencies” item, select “Quick” in the drop-down menu and secure it with the “Start” button. The search will take 10-20 minutes.
In cases where you plan to alternately use the antenna and television cable/wireless network, it is highly advisable to configure it at this stage. To do this, you need to manually enter the value of network frequencies and transmission speed - this data can be obtained upon request from the cable network operator.
For TVs with Smart TV function, additional network settings will be required:
- Launch the WI-FI router, or connect the network cable to the TV connector.
- Open the menu and select “Network Connection”.
- Specify the connection method: via Wi-Fi network or wire.
- When using a router, you need to enable WPS - automatic interconnection of devices without passwords. If this function is missing, you will have to scan the network and enter the password yourself.
- After connecting the smart TV to the network, it will most likely start the update procedure.
- Then just select “Set up channels”, and then click “Search”. No additional manipulations are required: the idea of the Smart TV function is that the TV can turn into a multimedia platform that does not require excessive human attention.
Autosearch will still be the easiest way. The exact algorithm varies greatly depending on the model and specific software, however, the general procedure is similar and intuitive:
- Open the menu using the button of the same name on the remote control (In some cases it is signed as “Home”).
- Then select the “Settings” tab, then “Settings”.
- In the settings menu, select the “Digital Configuration” sub-item.
- In the pop-up menu, you must activate the sub-item “Automatic search for digital stations”.
- As in all other cases, select “Antenna” as the signal source.
- An automatic scan of the frequency range will start, storing all detected channels in memory.
- At the end of the process, a notification will appear prompting you to familiarize yourself with the list of TV channels. After viewing, click “OK” and exit the settings menu by pressing the “Back” button.
Important! Some TV models (for example, a number of Sony Bravia) provide two search methods - “Fast” and “Full”. The second option is to scan the entire frequency range several times, eliminating the possibility of an unsuccessful search. However, this method takes up to 60 minutes.
Other brands
It is not difficult to notice that the procedure for automatically searching for TV channels is almost identical on a device of any brand. Based on any of the above guides, you can set up auto search on TVs from other companies. The only difficulties may be:
- password requirement. As a rule, it is indicated in the instructions and is a simple combination of zeros or ones;
- absence of Russian language - just choose Sweden or Germany.
Ways to connect an old TV to digital television
If the user has a Soviet or tube TV, then connection methods using plugs will not be effective; they simply are not there.
It is most logical to buy another more modern TV than to buy and remake various devices.
For those who want or are comfortable with technology, here are other ways.
Use of RG 6U or SAT cables. The setup is done by connecting a cable antenna to the TV and set-top box using RG 6U or SAT cables, which are actively used in the manufacture of older TV models. That is, take a regular cable of the required length and attach a regular “female” and “male” plug at the ends, respectively. Connect one to the set-top box, the other end to the TV. Buy a set-top box with an antenna output.
Problems can arise at different stages, so ask yourself if you are willing to spend your time on this. Here is a more detailed video on connecting to an old record TV.
Antenna for digital TV
I noticed that many people have old Soviet antennas, perhaps some of them will catch, but it is better to replace it with a new digital antenna.
It is best to go to a store that sells digital antennas (where they sell TVs), ask which antennas pick up the signal well and buy it.
Life hack - warn the seller, if the antenna does not receive reception, bring it back.
I would also like to point out that it is better to install the antenna outdoors and not use indoor options. Of course, there are people who live in an area with reliable signal reception from a digital tower and can install an indoor antenna for them. But for most people, only an external directional antenna is suitable.
Settings and search for digital channels
Step-by-step instructions on how to set up an old TV for digital broadcasting depend on the type of connection. If the user switches to a new broadcast format using a standard antenna, he will be able to save some money.
The procedure for connecting and setting up a digital set-top box includes the following steps:
Equipment connection diagram.
To activate broadcasting in digital format, you need to know how to set up a set-top box for 20 channels. The automatic search function is designed to find channels. The instructions for the TV indicate how to enable this function. The system searches for the necessary signals and establishes a connection with the antenna.
After finding digital channels, the TV will begin broadcasting the image. With automatic search, you can achieve the best broadcast frequency, but manual tuning allows you to save each channel in the device’s memory.
The following video clearly shows the process of connecting digital television on an old TV:
Source
Frequently asked questions about setting up analog channels
Sometimes during the process of setting up channels certain questions may arise, some of which are discussed below.
How to tune channels on a TV without a remote control?
The process of automatic and manual setup in this case occurs in a similar way, but to access the TV menu, buttons located directly on its body are used:
If there are no such buttons, you will need to purchase a remote control.
How to tune channels on an old TV?
In the absence of a menu, channel tuning is carried out using special controls, which can be located under the switch buttons or on the back side near the antenna connector. In addition, on old domestic TVs such as “Electron” or “Rubin” and portable car TV receivers, bands can be switched using jumpers, sliders or buttons. Setting up television channels for such devices is done only by hand.
Features and criteria for selecting consoles
The digital television receiver, suitable for older TVs, is made in the form of a small box with a dashboard and various connectors for connection. It comes with a remote control. At the same time, the console itself performs several functions at once:
Set-top boxes are selected based on the presence of certain connectors. Tulips and HDMI are considered classic options. In terms of signal transmission power, for example, private antennas often require amplifiers. Depending on the availability of additional options: recording video files, delayed start or recording from a specific time, reading information from USB drives and drives.
Selecting a digital set-top box
As for choosing a digital set-top box. Of course, like any equipment, especially if you bought it cheaply, it may not work.
Always keep your store receipts. If something happens, you can return the equipment within 14 days.
But there are no special selection criteria. I usually select equipment with an iron case, medium in size, without unnecessary functions.
You look according to your wishes, the normal price is from 900 to 1500 rubles.
If you have a digital tuner built into your TV, you don’t need to buy a set-top box. It is important!
To find out if your TV supports digital broadcasting, read the instructions that came with your TV. If they are not there, then go to the “Autosearch” section. In models that support digital TV, there will be 2 sections: search for “Analogue channels” and “Digital channels”.
What connectors are used to connect the set-top box
All receivers, regardless of configuration and number of options, have an antenna input and output. Additionally provided: coaxial digital audio output, HDMI, SCART, RCA (tulip) connectors.
You must select a connection option based on the availability of appropriate connectors on the TV itself. It is worth considering that through tulips the maximum image quality will be no more than 1080p. It is better to use HDMI or IPTV (connection via digital audio output).
Let's look at the features of each cable (method of connecting equipment).
Tulips
The RCA cable has three connectors on both sides, red, yellow and white. There are corresponding inputs and outputs on set-top boxes and old TVs. They are painted the same color.
You only need to connect the red and white wires. They transmit audio signals. The yellow wire is not required - it sends video and is used when connecting a DVD player.
Important! You can connect equipment through the tulip only when it is turned off. Before assembling the digital broadcast chain, turn off everything from the network. After connection, turn it on and check that the settings are correct.
Scart port
To connect digital television to an old TV, a Scart cable is often used. It is a more compact version of tulips. On the TV side there are also 3 wires of yellow, red and white. But on the console side there is only one. The connection must also be made with the equipment turned off. The yellow entrance is not needed.
HDMI connection
One of the common options for turning on digital channels on an old TV is to choose an HDMI adapter. This input is found in more modern LCD or plasma TVs.
This method has high quality sound and image transmission. You can watch movies and TV series in Full HD format. Previously, this method had a disadvantage - the difficulty of supporting analog channels. Since they have now been disabled, this problem has automatically gone away.
DVI/D-SUB option
Powerful modern receivers are suitable for Smart TV. We will not consider it in detail, since this option exists, but is not suitable for old TVs. Smart TV is a new digital version of television that works through a stable Internet connection.
LAN cable
This type of digital television operates via the Internet. In this case, a connection to Wi-Fi or a standard network is not required. IPTV is carried out by operators providing paid channel packages. The number of TV channels depends on your choice and the amount of the subscription fee.
Setting up and connecting digital television to old TVs via LAN ports is carried out by specialists who provide television broadcasting services. If in the future the user needs help with setting up, adding or deleting channels, he can call the operator’s technical support line.
Antenna input
A common connection option. Cable digital television, coming from large satellite dishes, is stretched along the entrances of multi-storey buildings. They transmit the signal via cables to apartments where a receiver is needed for decoding.
An antenna connection makes it possible to distribute digital broadcasting to two TVs in the house at once. This will require a special connector. And you need to tune channels at different frequencies. If signal interference occurs, the audio and video quality will deteriorate.
General procedure for setting up broadcast channels
Automatic search is the easiest way to tune in to receive digital television channels available in your region. At the same time, in addition to digital channels, local analogue channels are also displayed in the search. The automatic search and installation method has the advantage of high speed of the process. To do this, just set a couple of parameters, and the rest of the work will be done by the system. All you have to do is wait for the scanning and installation to complete.
The operating principle is the same for all TV models:
- Connect the antenna to the TV. The first should be located strictly opposite the nearest repeater - compared to the UHF antenna, the UHF is very sensitive to the vector of the incoming signal.
- Open the menu (the corresponding button on the remote control).
- Go to the “Options” or “Settings” subsection, depending on the company and software interface.
- In this sub-item, select “TV”, “Reception” or “Signal”.
- Indicate the origin of the signal: “Antenna” - for terrestrial TV channels.
- Select automatic search. In the case of an over-the-air signal, you do not need to indicate the frequencies of the provider.
- During the search process, the found TV channels will be displayed.
- At the end of the process, confirm the recording by clicking on “OK”; the TV programs will be saved in the TV’s memory.
- Leave the menu by pressing the “Return” or “Back” button.
The TV is now ready to broadcast TV programs.
Reference! In order to be sure that the process was successful, you need to restart the TV.
Manual setting
In cases where the auto search did not produce results, or did not show a complete list of available channels, you need to scan manually:
- Find your location using the RTRS service and click on it. The parameters window that opens lists the broadcast frequencies of digital channels, taking into account two nearby repeaters. You should remember these values.
- Open the menu and go to settings mode.
- Select the “TV” sub-item, but unlike the previous method, select manual settings.
- Select an antenna as the signal source.
- Enter the frequency value (MHz) and channel number (TVK) for one multiplex recorded in the first paragraph.
- Start scanning.
- Wait for saving after detecting channels.
- Repeat the scanning process for the second multiplex using the appropriate values.
- Reboot the TV and make sure the process is successful.
Budget options for connecting to digital television
The model of a digital set-top box for connecting television to an old TV depends on the equipment itself. Soviet devices are connected using a separate circuit. In order not to purchase an expensive receiver, you can opt for a classic decoder without recording or TV program functions.
A budget option for watching a large number of TV channels is to contact operators who provide set-top boxes for rent. This method is possible in multi-storey buildings where Internet is provided from Beeline, MTS or other operators.
If you are connecting an old TV to a satellite dish, you will need a Smart Card from the selected subscriber. It gives access to paid channels, expanding the list of programs from 20 to 200 or more. For example, Tricolor offers a wide broadcast range.
Important! Before choosing a set-top box and how to connect it to your old TV, check to see if it definitely does not have a built-in T2 series module. This applies to plasma and liquid crystal thin TVs. You can check the information on the manufacturer's official website. If there is a module, a set-top box for 20 channels is not needed at all.
Common problems and their solutions
Channels are not picked up at all, “no signal”
In this case, you need to check:
- equipment for breakdowns (TV, antennas and connecting cable). If you discover a problem, you should contact a specialist;
- antenna adjustment. The UHF antenna is extremely sensitive to the vector of the incoming signal. In most cases, changing the orientation of the antenna helps;
- distance to the repeater and signal strength. This information is provided by the RTRS service. Most likely, your receiver is in a “dead zone” that is not covered by television broadcasts. Unfortunately, until new towers are installed, reception in this area is impossible. You will have to resort to satellite broadcasting, available anywhere open to the south;
- being in a radio silence zone. The passage of the signal may be hampered by a nearby natural object (hill, mountain, etc.) or a man-made obstacle (main walls and ceilings). The situation can be corrected by changing the position of the antenna (for example, installing it on the roof), which allows you to get out of the radio shadow. The second option would be to connect to another repeater located within a radius of 30-35 km.
Only part of the channels are caught
Here you need to check:
- setting up a broadcast from a nearby tower. It is necessary to configure each multiplex on a separate frequency manually;
- setting up the tuner in the system itself. A number of channels may not have been preserved. Repeated automatic or manual TV tuning will help correct the situation.
There were channels, but they disappeared
If the signal was previously received reliably, but then the channels disappeared, the reason for this may be:
- the appearance of new obstacles on the way to the antenna from the repeater. You need to explore the surrounding area using a reception map;
- technical problems with the repeater. It is customary to cover such events with the help of alerts, which can be found in the regional media, local forum or public page.
- antenna malfunction. When using collective, you need to contact the service company. If you are using an individual one, it is worth checking the position of the antenna cable for a break and the position of the antenna itself.
Weak signal
The reasons are similar to the case of a complete absence of signal:
- long distance between receiver and repeater. The only solution to the problem is to purchase a new active antenna capable of receiving weak signals;
- radio silence zone. The antenna position needs to be changed.
The image slows down or freezes
- unstable signal. Fine tuning and searching for a suitable place for the antenna in space or installing an amplifier is required;
- interference and interference. Digital television has a peculiarity: it clearly receives the signal, or does not perceive it at all, while the hardware completes the image based on previous frames. You need to wait until the interference disappears or try to eliminate it by adjusting the antenna and tuner.
Source
Is it possible to connect digital broadcasting to Soviet TV?
Analogue channels are no longer broadcast. Soviet equipment is not suitable for digital broadcasting. But this does not mean that you need to run to the store for new equipment. You can try the direct connection to the antenna:
This is a rather dangerous method that requires skills in working with television equipment. You need to work especially carefully with very old TVs, the Ruby or Horizon series.
Important! The quality of channels on an old Soviet TV will not be ideal. The equipment itself is not capable of reproducing digital broadcasting, much less showing movies in Full HD format.
Now you know how to connect and configure digital channels on an old TV through a set-top box (receiver). Exact setup instructions vary by tuner model. They must be included with the equipment package.
Source
Adding regional analogue channels
Most regions of the country support the broadcast of regional analogue TV channels in parallel with the broadcasting of the federal multiplex. To increase the number of TV programs, you need to add them to the list of your TV, for which you need:
- Point the antennas towards the repeater and turn on the search for analog channels in the TV settings menu.
- The further procedure will depend on the receiver model. For example, on Samsung TVs you need to separately indicate that only digital channels should be taken into account in the scan: auto-tuning searches for everything that the antenna receives. In order to catch an analog signal, you need to select the appropriate sub-item.
- After successfully searching for all TV channels, you need to record them in the TV memory.
Important! Modern TV models do not support manual tuning of TV channels. Searching requires scanning the entire range using auto search.
Hitachi TV remote control
The TV remote control contains the following control buttons:
Initial TV setup
The Automatic Programming System menu will be displayed on the screen when you turn on your TV for the first time. Automatic tuning searches, sorts all channels and stores them on your device, according to the broadcast of television programs in your area.
Automatic program. First of all, select the language and country using the cursor buttons. This affects the setup and sorting process. To start auto tuning your Hitachi TV, press the red button or the “OK” button. Once completed, the program table will appear on the screen. In the program table you will see the program numbers and names assigned to the programs. If you do not accept the locations and/or program names, you can change them in the program menu. (See page 14)
Menu System
Hitachi TV is designed with a menu system to provide easy control of all customizable features.
Press the button marked in Figure 13 to enter the menu. Use the cursor buttons to select Menu Title, then select the desired menu item and the OK button to confirm your selection.
Press button 13 again to exit the menu.
Use button 14 to return to the previous menu.
Image menu
How to manually tune channels on your TV
For all its apparent simplicity of automatic configuration, it has several significant drawbacks. Some channels may repeat or have distorted picture or sound. In this case, you should correct the situation manually. Here are step-by-step instructions for manually setting up TV channels:
- In the “Channel Tuning” menu, use the navigation buttons to select “Manual Tuning” and press ENTER/OK.
- Select the “Program” item and assign a serial number to the channel by pressing the number buttons on the remote control.
- Select the color system used in your region: PAL, SECAM, NTSC or AUTO.
- Select the sound system: 2.0 (stereo), 5.1, etc.
- Perform a “Search” for the channel and, if successful, add it to the TV’s memory by pressing the “Save” button.
- Repeat the same procedure for all required channels.
The manual channel tuning menu may look like this:
It should be remembered that all actions in the proposed instructions are confirmed by pressing the ENTER/OK button.
Answers to questions on Hitachi TV
Digital TV from antenna
Your TV has a DVB-T2 tuner, which allows you to receive digital programs from your own antenna. Setup is usually not difficult. It is enough to set the option for terrestrial (terrestrial) television in the automatic configuration mode. However, reception is not possible in areas where there is no signal from the television center, or in a radio shadow area. In addition, the receiving antenna should be positioned and oriented correctly.
Selecting an external source
6.28.2019 Hitachi S9B000727 Smolensk How to select on the TV the source to which the power is connected (AV/HDMI). There is no button on the remote control.
Sorting TV channels
How to set up a Hitachi TV
The Hitachi TV is fully configured for television channels with optimal image and sound characteristics set, the TV is connected to the home network and to the Internet, and the user is trained in the basic capabilities of the TV. We know how to set it up.
Hitachi TV manual
In accordance with the instructions, the following buttons and connectors are located on the TV body:
TV/AV button for switching TV operating modes MENU button for entering the main settings menu Prog. Up, Prog. Down buttons for switching television programs Volume Up, Volume Down buttons for increasing and decreasing the sound volume Operate/Standby button for turning on the TV and putting it into standby mode Power cord connector for connecting the power cord Power On/Off button for completely turning off the TV Hitachi S-VHS EXT-4S video input Super VHS Video Audio EXT-4 video and audio input Headphone headphone connector Audio Line Outs linear audio output Subwoofer Out audio output for subwoofer PC Audio Input audio input for computer Aerial antenna input Scart 2 (EXT-2) scart connector Scart I ( EXT-I) scart connector HDMI Input (EXT-S) input for connecting HDMI Component Audio Inputs component audio input Component Video (YPbPr) component video input VGA Input video input for connecting to a computer
Brands
- A
- B
- C
- D
- E
- F
- G
- H
- I
- J
- K
- L
- M
- N
- O
- P
- Q
- R
- S
- T
- U
- V
- W
- X
- Y
- Z
- B
- D
- N
- P
- R
- T
- U
- E
- 3
- A Ab ipbox,
- Absolute,
- Acer
- Actia,
- Acv,
- adb,
- Aeg,
- Aeronik,
- Aerotek,
- Agfa,
- Aic,
- Air-green
- Airties
- Airtone,
- Aiwa,
- Akado,
- Akai,
- Akira,
- Alaska,
- Alex bauman,
- Alfa gold,
- Alpine,
- Amcv,
- Amino/stream TV,
- Amstar,
- An-motors,
- Android,
- AOC,
- Apollo,
- Apple
- Aragon,
- Arcam,
- Arion,
- Artel,
- Asano,
- Aston,
- Asus,
- Atlanfa,
- Atlanta,
- Attitude,
- Aun,
- Aura,
- Aux,
- Ave,
- Averdigi,
- Aver,
- Avest,
- Azur,
- Baikal (Baikal),
- Cadena,
- D-color
- Echo,
- Falcon eye,
- Gal,
- Haier,
- iconbit,
- Jax,
- Kaon,
- Lava,
- Mag,
- Nad,
- Odeon,
- Palsonic,
- Qunda,
- Rard,
- Sadko (sadko),
- Tadiran,
- U2c,
- Vantage,
- Waltham,
- Xiaomi
- Yamaha
- Zala,
- Beeline set-top boxes cisco / motorola,
- dom.ru,
- no brand
- irc remotes,
- radio remote controls for different sat,
- telecard,
- universal TV, DVD, sat, aux,
- electronics,
- 3q,