First, let's figure out what Miracast is? This technology allows you to transfer media files from one device to another using Wi-Fi standards (Wi-Fi Direct). Most often they use the transfer of images, videos from a phone, tablet or laptop to a TV. Unfortunately, not all TVs have the Smart TV function, and this little thing can slightly turn even an old TV into a technological device.
This is exactly the kind of thing you can see on all similar sites that talk about the Miracast adapter. In fact, to be honest, I would not put this thing at the top of the pedestal. I would call it a kind of “crutch” between the Smart TV set-top box and the TV.
Appearance and functionality
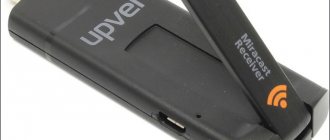
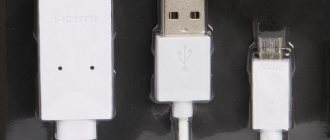
If you look from afar, it looks more like a regular flash drive and takes up little space. This can be chalked up as a plus. The HDMI standard is used as an output. As you probably already know, this port standard was invented specifically for transmitting multimedia data packets.
The most commonly used standard is HDMI 1.4-1.6. It makes no sense to set 2.0, since Miracast can usually transmit the maximum picture resolution in Full HD format or a resolution of 1920 by 1080 pixels or pixels. This is an excellent format with good resolution. But the 4K Ultra HD format or 3840 by 2160 pixels is not supported. And hardware, such a small thing, such a resolution simply wouldn’t work.
To connect, you need to plug it into a free HDMI port. To power the system, it has a Micro USB input on the back. The power cord should be in the box. But be careful, they are usually quite short. That is, if you do not have a USB port on your TV, you will have to connect it through the power supply to an outlet. This is not convenient, and the wire may not be enough.
And now about the functionality. New models must support two standards: Miracast; AirPlay. The first one works with almost all smartphones and phones. And the second one was created at Apple. And works with iPhone and iPad products.
In general, you connect and can duplicate the screen of your phone, tablet, laptop onto the TV screen. There is support for DLNA - that is, you can transfer movies and pictures to the TV over the network, which are located, for example, on the same computer. It, in turn, must be connected to the local network. But for the same Android, additional programs are needed that work with this technology.
Miracast technology: what is it and how to use it
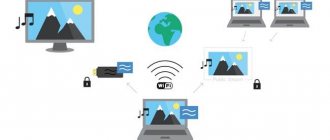
Miracast is a type of connection that sends streaming video. That is, the video signal is simply broadcast, without the need to send files and store them on the receiving device. Image quality can be up to Full HD 1080p. In addition, 5.1 surround sound is transmitted. And all this – without wires and routers. Connection is carried out using simple instructions.
One of the nicest features is that technology doesn't care what video stream you broadcast. You can transmit video encoded with any codecs, packaged in any formats, even write-protected.
Selectable characteristics
First of all, you need to look at the processor model and its bit capacity. It is he who will process the information and send it to TVs. Cheap models for 1300 rubles usually start to slow down a little when watching a video in Full HD. More expensive models from 3000 do not suffer from this problem.
It is also worth paying attention to the RAM. It is better to take models from 128 MB. I already talked about the maximum resolution - the technology allows you to view a maximum of 1080p. Almost all of them have support for Wi-Fi 2.4 GHz and the 802n standard. This is the maximum standard for this frequency, with wide coverage and speed. So connecting to the router should go without any problems. Otherwise, they are all the same, so in the end we look at the hardware: percent and RAM.
How to connect WiFi for Miracast: system requirements
Oddly enough, WiFi connection is not required here. A different technology is used: WiFi Direct. The only important thing is that Miracast support must be on both the receiving device (TV) and the transmitter (computer, smartphone, etc.). Currently there are no difficulties with this:
- The technology is present on most modern Smart TVs. If you don’t have it, you can buy an adapter that plugs into the HDMI port. It looks something like the photo below.
- On the computer side, technology support depends on the operating system. Starting from Windows 8.1, it is built into the OS. For Win 7, this is only possible for computers with certain system requirements and requires the installation of additional software. If you are the owner of a PC with this particular OS, we recommend that you do not be lazy and then read our instructions on how to use Miracast on Windows 7. This will help you avoid many mistakes.
- The Miracast function is built-in on phones and smartphones starting from Android version 4.2. Apple products do not support this technology, replacing it with their counterpart without Wi-Fi Direct.
How to connect and configure the receiver
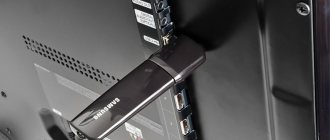
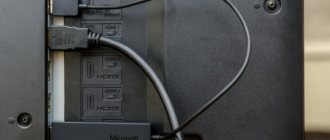
- We insert the receiver into the HDMI port. We take a USB cable from the box and insert one end into the module, and the other into the USB input on the TV. You can see the picture at the very top of the article.
- Turn on the TV and go to the “Input” menu. We need to select exactly the HDMI port to which we connected the flash drive. You can switch all ports.
- After, you should see the device menu. At the very top, in the “SSID” field, the name of the wireless network of this module is written, and the password is indicated to the right. Now just take your phone, tablet and connect to this network.
- After that, open any browser and enter the IP adapter. It is also listed in the menu just below and starts with the numbers “192.168”.
- Find the section for connecting to your home Wi-Fi network. Usually has a wave icon. Just click on it. Select the home router network from the list and enter its password.
- Also, don't forget to specify the Airplay mode (if supported) or Miracast. The first is required for Apple products, and the second for other devices.
How Miracast works
Many people are surprised that the methods for connecting WiFi and Miracast are completely different. Wi-Fi is a centralized network connected to a router. It is the router that broadcasts the signal through which devices connect to the Internet and to each other. But that's not the way Miracast works. WiFi Direct is used here: two gadgets are connected directly, as if using a wire. It's fast, convenient and reliable.
As soon as I learned about technology, it changed my attitude towards video and music. It allows you to create a media center for the whole house, broadcasting the same stream to different screens and devices. At the same time, you do not need to install the application for Miracast - except for computers with Windows 7 and certain requirements. In the case of smartphones, there are separate features in the Google Play store that simplify connection or provide additional functionality. But every program with Miracast uses the basic capabilities of the Android OS.
Is it worth taking it at all?
As I already said, this “thing” is a more stripped-down version of the same Smart TV set-top box. Its functionality is limited, and you can find a lot of dissatisfied customers on the Internet due to slowdowns when watching videos. I would recommend the adapter for those people who travel a lot. Then you can easily connect it to your TV and temporarily turn it into some kind of “Smart”.
For the home, it’s even hard for me to imagine why this adapter is needed. Possibly to connect your phone and display the screen during the game. But modern set-top boxes support this technology without any problems.
I can’t say anything about DLNA, since I didn’t use it with this adapter. But when transferring large files, most likely the hardware simply won’t hold up. You must understand that this small flash drive cannot a priori have strong hardware, and it costs quite a lot. There are models that cost up to 3,500 rubles. For that amount you can buy a full-fledged set-top box with full functionality.
Still, I advise you to take a separate set-top box or even a new TV. The attachment is a more economical option. If your family uses Apple products, then it is better to take Apple TV. This box also supports AirPlay, DLNA and much more.
But I told you my opinion. Please write in the comments - why did you decide to buy a Miracast adapter for your TV? It would also be useful to listen to the opinions of users of this flash drive.
Miracast standard - old protocols in a new wrapper
Not long ago (starting with JellyBean 4.2) Google added support for Miracast technology to Android. The article is devoted to the practical study of this technology using reverse engineering methods. What is Miracast in a nutshell? This is the next brainchild of the Wi-Fi Alliance - a standard for transmitting multimedia content over a Wi-Fi network in peer-to-peer mode. For the user, this means, first of all, that to connect to a TV (for example), he does not need a Wi-Fi router. According to the alliance, the two devices should communicate with each other directly. This is ensured by using the Wi-Fi Direct standard authored by the same organization. In other words, the new standard solves problems very similar to AirPlay from Apple, WiDi from Intel, or good old DLNA. Why was it necessary to fence the garden - you ask. Why not use an already existing solution? It will be difficult for me to answer here. It is clear that licensing solutions from direct competitors or even from Intel is not a kosher option and also has a fatal flaw
, but why not take the same DLNA, perhaps modifying it a little with a rasp. Perhaps you wanted something new, with the now fashionable words peer-to-peer? I won't guess. One way or another, the technology was implemented in Android, and recent phones like the Nexus 4 and Samsung Galaxy S3 have it on board.
The situation is worse with TV manufacturers. If DLNA support is already available in almost every modern TV of a fairly high level, then with Miracast things are worse. Despite the existence of chips, the models of TVs and projectors that can receive Miracast can be counted on one hand. However, the situation will probably change in 2014, but for now the user can be content with numerous gadgets that receive the signal via Wi-Fi and convert it to HDMI. This thing is plugged into the HDMI connector of the TV, and now you have a Miracast-enabled device!
One of the engineering samples with a Broadcom chip fell into my tenacious hands:
After making sure that everything was working perfectly with the Android smartphone, I thought about the question: is it possible to broadcast via Miracast directly from Linux? After all, what is Android inside? Same Linux...
To begin with, I wanted to understand what the Miracast protocol stack actually looks like? What's behind the beautiful name? Is the video signal sent directly to Ethernet frames or is IP and even higher-level protocols used? Unfortunately, the standard itself, although open, is far from free, so we had to find other, more traditional ways of research. In some presentation I picked up the keywords - MPEG-TS and RTSP, and this made it possible to spin the ball further. If I have any idea, RTSP is TCP and TCP is IP. And IP is a suitable protocol that can be listened to with tcpdump! No sooner said than done, running tcpdump on the Nexus and enabling Wireless display in the settings, after 5 minutes I had a packet dump acceptable for further analysis.
Temporarily putting aside the difficulties with connecting via Wi-Fi, I immediately started analyzing the TCP stream. And this is what I saw:
OPTIONS * RTSP/1.0 Date: Fri, 08 Mar 2013 12:37:54 +0000 Server: Mine/1.0 CSeq: 1 Require: org.wfa.wfd1.0 RTSP/1.0 200 OK CSeq: 1 Public: org.wfa. wfd1.0, GET_PARAMETER, SET_PARAMETER OPTIONS * RTSP/1.0 CSeq: 1 Require: org.wfa.wfd1.0 RTSP/1.0 200 OK Date: Fri, 08 Mar 2013 12:37:54 +0000 Server: Mine/1.0 CSeq: 1 Public: org.wfa.wfd1.0, SETUP, TEARDOWN, PLAY, PAUSE, GET_PARAMETER, SET_PARAMETER GET_PARAMETER rtsp://localhost/wfd1.0 RTSP/1.0 Date: Fri, 08 Mar 2013 12:37:54 +0000 Server : Mine/1.0 CSeq: 2 Content-Type: text/parameters Content-Length: 83 wfd_content_protection wfd_video_formats wfd_audio_codecs wfd_client_rtp_ports RTSP/1.0 200 OK CSeq: 2 Content-Type: text/parameters Content-Length: 751 wfd_content_protection: none wfd_video_ formats: 00 00 02 10 0001bdeb 3fffffff 00000fff 00 0000 0000 11 none none, 02 08 0001bdeb 3fffffff 00000fff 00 0000 0000 11 none none, 02 04 0001bdeb 3ffffffff 00000fff 00 0 000 0000 11 none none, 02 02 0001bdeb 3fffffff 00000fff 00 0000 0000 11 none none, 02 01 0001bdeb 3ffffffff 00000fff 00 0000 0000 11 none none, 01 10 0001bdeb 3fffffff 00000fff 00 0000 0000 11 none none, 01 08 0001bdeb 3ffffffff 00000fff 00 0000 00 00 11 none none, 01 04 0001bdeb 3fffffff 00000fff 00 0000 0000 11 none none, 01 02 0001bdeb 3fffffff 00000fff 00 0000 0000 11 none none, 01 01 0001bdeb 3fffffff 00000fff 00 0000 0000 11 none none wfd_audio_codecs: LPCM 00000003 00 wfd_client_rtp_ports: RTP/AVP/UDP;unicast 6 500 0 mode=play SET_PARAMETER rtsp://localhost/wfd1.0 RTSP/ 1.0 Date: Fri, 08 Mar 2013 12:37:54 +0000 Server: Mine/1.0 CSeq: 3 Content-Type: text/parameters Content-Length: 248 wfd_video_formats: 28 00 02 02 00000020 0000000000 0000 00 none none wfd_audio_code cs: LPCM 00000002 00 wfd_presentation_URL: rtsp://192.168.16.40/wfd1.0/streamid=0 none wfd_client_rtp_ports: RTP/AVP/UDP;unicast 6500 0 mode=play RTSP/1.0 200 OK CSeq: 3 SET_PARAMETER rtsp://localhost/wfd1 .0 RTSP/1.0 Date: Fri, 08 Mar 2013 12:37:54 +0000 Server: Mine/1.0 CSeq: 4 Content-Type: text/parameters Content-Length: 27 wfd_trigger_method: SETUP RTSP/1.0 200 OK CSeq: 4 SETUP rtsp://192.168.16.40/wfd1.0/streamid=0 RTSP/1.0 CSeq: 2 Transport: RTP/AVP/UDP;unicast;client_port=6500 RTSP/1.0 200 OK Date: Fri, 08 Mar 2013 12:37 :55 +0000 Server: Mine/1.0 CSeq: 2 Session: 1219569791;timeout=30 Transport: RTP/AVP/UDP;unicast;client_port=6500;server_port=15550 PLAY rtsp://192.168.16.40/wfd1.0/streamid =0 RTSP/1.0 CSeq: 3 Session: 1219569791 RTSP/1.0 200 OK Date: Fri, 08 Mar 2013 12:37:55 +0000 Server: Mine/1.0 CSeq: 3 Session: 1219569791;timeout=30 Range: npt=now - SET_PARAMETER rtsp://localhost/wfd1.0 RTSP/1.0 Date: Fri, 08 Mar 2013 12:38:07 +0000 Server: Mine/1.0 CSeq: 5 Content-Type: text/parameters Content-Length: 30 wfd_trigger_method: TEARDOWN RTSP/1.0 200 OK CSeq: 5 TEARDOWN rtsp://192.168.16.40/wfd1.0/streamid=0 RTSP/1.0 CSeq: 4 Session: 1219569791 RTSP/1.0 200 OK Date: Fri, 08 Mar 2013 12:38: 09 +0000 Server: Mine/1.0 CSeq: 4 Session: 1219569791;timeout=30 Connection: close
Isn't it true, it resembles regular RTSP. So, part of the job is done. It remains to understand how Miracast’s implementation of RTSP differs from the standard one. For those who have never encountered RTSP (Real Time Streaming Protocol), let me remind you that it is used to control the multimedia stream from the server to the client. In other words, it allows you to issue commands such as PLAY, PAUSE, TEARDOWN, etc. It is also possible to exchange options and configure parameters. It was {GET|SET}_PARAMETER that became my main headache during the analysis. Without a standard at hand, I couldn't know what all these wfd_video_formats, wfd_audio_codecs, etc. meant. But I could have guessed!
Since I understood from the analysis of MPEG-TS frames that the standard resolution was 720x480, and the H.264 (AVC) codec, it was a good idea to create a video file with exactly the same parameters, and then the fields like wfd_video_formats can be left unchanged! After rummaging through DVDs, I re-encoded a small VOB from the television series “Cracker” into the format I needed using ffmpeg. Now all that was left was to feed the file to the server. But for this you need to find a server!
In order not to write an RTSP server myself (which was not part of my plans), I started looking at Open Source options that would be easy to modify to be compatible with Miracast. If you looked carefully at the logs from tcpdump, you might have noticed several oddities. The traditional client-server model of RTSP has been replaced by peer-to-peer interaction. This means that activity in requests can come not only from the client (in this case it is a TV or projector), but also from the “server” (that is, a phone or computer). Why it was necessary to do this is unclear, but the fact remains that both the “client” and the “server” can send requests whenever they want, which negates their traditional roles. However, I will continue to call the side that sends the video signal the server (in our case, it will be Linix-PC), and the side that receives and decodes the video will be the client (in our case, it will be the projector).
So, after several hours of searching, I settled on live555. This server is written in C++, distributed under the LGPL license and supports both RTSP and MPEG-TS broadcasting. Having looked at the RTSP handler, I realized that it is quite possible to rework it for the peer-to-peer specifics of Miracast. But it still remained to make the client (i.e. Miracast gadget) connect to Linux!
This task was more difficult than Goethe's Faust. Before, I had never set up even regular Wi-Fi in Linux, rightly believing that the wires were somehow more reliable. What can we say about Wi-Fi Direct. However, after reading a stack of manuals, I realized that I needed to dig in the direction of the mysterious WPA supplicant. What is this supplicant for? It is this that provides authentication when connecting via Wi-Fi to an access point or to another node. As I wrote above, Miracast works in p2p mode, i.e. devices communicate directly, bypassing routers. This feature, fortunately, is supported in the latest versions of wpa_supplicant. I don’t know exactly when p2p support was added, but version 2.1-devel already has it.
However, updating the supplicant is not enough! You also need to have configuration files for it. With little effort, I wrote a configuration acceptable for my device (NetGear, WNA1100 Wireless-N 150), perhaps it will suit you too.
So, in the /etc/wpa_p2p.conf file we write:
ctrl_interface=/var/run/wpa_supplicant ap_scan=1 device_name=JellyFish device_type=1-0050F204-1
Next, you need a shell script to launch supplicant:
sudo iwconfig wlan0 mode ad-hoc sudo ip link set wlan0 up sudo wpa_supplicant -Dnl80211 -c /etc/wpa_p2p.conf -i wlan0 -dt
That seems to be all (let me clarify that this configuration works in the Ubuntu-based distribution of Linux Mint 13 Maya, kernel version - 3.2.0-57-generic).
Next you need to master a utility such as wpa_cli, which allows you to manage the connection “manually”. After running wpa_supplicant through the script, you need to open a separate console and output something like:
sudo wpa_cli
This is the command interface to the supplicant. By turning on the gadget, we can use the p2p_find command to find all devices in the area that are ready to connect to us in p2p mode. Next, using the p2p_connect command, we make the connection itself.
Here is an example log for my device:
wpa_cli v2.1-devel Selected interface 'wlan0′ Interactive mode > p2p_find OK <3>P2P-DEVICE-FOUND 02:90:4c:04:04:04 p2p_dev_addr=02:90:4c:04:04:04 pri_dev_type= 7-0050F204-1 name='MLT-52-2123′ config_methods=0x4688 dev_capab=0x25 group_capab=0xa > > p2p_connect 02:90:4c:04:04:04 pbc OK <3>P2P-FIND-STOPPED <— Here you need to press the button on the device <3>P2P-GO-NEG-SUCCESS <4>Failed to initiate AP scan <4>Failed to initiate AP scan <4>Failed to initiate AP scan <4>Failed to initiate AP scan <3> CTRL-EVENT-SCAN-RESULTS <3>WPS-AP-AVAILABLE-PBC <3>SME: Trying to authenticate with 02:90:4c:04:84:04 (SSID='DIRECT-fCMLT-52-2123′ freq =2412 MHz) <3>Trying to associate with 02:90:4c:04:84:04 (SSID='DIRECT-fCMLT-52-2123′ freq=2412 MHz) <3>CTRL-EVENT-SCAN-RESULTS < 3>WPS-AP-AVAILABLE-PBC <3>SME: Trying to authenticate with 02:90:4c:04:84:04 (SSID='DIRECT-fCMLT-52-2123′ freq=2412 MHz) <3>Trying to associate with 02:90:4c:04:84:04 (SSID='DIRECT-fCMLT-52-2123′ freq=2412 MHz) <3>Associated with 02:90:4c:04:84:04 <3> CTRL-EVENT-EAP-STARTED EAP authentication started <3>CTRL-EVENT-EAP-PROPOSED-METHOD vendor=14122 method=1 <3>CTRL-EVENT-EAP-METHOD EAP vendor 14122 method 1 (WSC) selected <3> WPS-CRED-RECEIVED <3>WPS-SUCCESS <3>P2P-GROUP-FORMATION-SUCCESS <3>CTRL-EVENT-EAP-FAILURE EAP authentication failed <3>CTRL-EVENT-DISCONNECTED bssid=02:90:4c: 04:84:04 reason=3 locally_generated=1 <3>CTRL-EVENT-SCAN-RESULTS <3>WPS-AP-AVAILABLE <3>SME: Trying to authenticate with 02:90:4c:04:84:04 ( SSID='DIRECT-fCMLT-52-2123′ freq=2412 MHz) <3>Trying to associate with 02:90:4c:04:84:04 (SSID='DIRECT-fCMLT-52-2123' freq=2412 MHz ) <3>Associated with 02:90:4c:04:84:04 <3>WPA: Key negotiation completed with 02:90:4c:04:84:04 [PTK=CCMP GTK=CCMP] <3>CTRL- EVENT-CONNECTED — Connection to 02:90:4c:04:84:04 completed [id=0 id_str=] <3>P2P-GROUP-STARTED wlan0 client ssid=”DIRECT-fCMLT-52-2123″ freq=2412 psk =fd435c6683ae5d7c9e3398dab15cc1b80d7f308b3fe7330db044ea90dcf7ac31 go_dev_addr=02:90:4c:04:04:04 [PERSISTENT]
In principle, everything is clear from the log, except perhaps for the mysterious word 'pbc' in the p2p_connect command after the device address. What does it mean? This is one of the authentication options when connecting via Wi-Fi direct. It means Push Button Control. This is a simplified authentication that does not require the user to enter a password or even a pin code. Just at the moment of connection you need to press a button on the device, and authentication will be considered successful.
So, from the log we see that the connection was successful. And now we are able to get the IP address for the wlan0 interface. In this case, the DHCP server will be a TV or projector. Let's enter in a separate terminal:
sudo dhclient wlan0
If we then run tcpdump, we will detect attempts to send a SYN packet to port 7236. This port differs from the standard port for RTSP (554), but this should not scare us. The most important thing is that the gadget wants to come to an agreement with us! By launching a slightly modified livemedia server on this port (7236), we get the opportunity to debug the actual “client-server” interaction.
I will not bore the reader with the details of debugging the protocol, I will only say that all the problems were solved one way or another. And finally, the result is obvious - I was able to watch videos from my PC via the newfangled Miracast!
Do you need it? Don't know. In any case, it’s always interesting to understand a new standard (unless, of course, it’s ASN.1).
For those who were too lazy to delve into the technical details, I will briefly outline the connection procedure for Miracast-based devices:
- Using Wi-Fi direct, devices find each other (usually the video source finds the display device)
- Using one or another form of authentication (in our case, pbc), devices are united into a P2P group
- One of the devices receives an IP address via DHCP (in our case, this is the source of video data)
- The RTSP server is started on the data source on port 7236
- The client connects to the RTSP server and requests a certain predefined URL (/wfd1.0/streamid=0)
- The RTSP server begins transmitting video (and possibly audio) data in the form of MPEG-TS packaged in RTP packets.
- The client unpacks the data and displays it on an output device.
Of the obvious disadvantages of Miracast (not mentioned in the Wiki), I would note the following:
- If you connect to a Miracast device, you lose the ability to work via regular (non-P2P) Wi-Fi. To simultaneously use traditional Wi-Fi and Wi-Fi direct, you need a special dual-channel Wi-Fi adapter. Not all phones have it!
- The picture quality in dynamic scenes suffers even at a resolution of 720x480, 30 FPS. I'm not talking about Full HD. Of course, with the advent of more powerful processors the picture will change, but so far everything is sad.
That's all. If you have any questions, ask in the comments.
Setting up Miracast
Once the user is convinced that the existing devices support Miracast technology, they should begin connecting the devices. You need to activate the connection with the expectation that the mobile phone or tablet will be the sender, and the computer or TV will be the receiver.
Smartphone setup
The process of setting up a mobile phone will not take much time. Below are detailed instructions for selecting parameters on Android and iOS smartphones. To set up Android:
- Activate the wireless network connection.
- Connect your mobile phone or tablet to the WI-FI router.
- Find the tab with the wireless screen. This subsection may be located in the “Wireless Network”, “Wi-Fi” or even in the “Screen” sections. Depends on the phone model.
- Open the section using the “Enable option” button.
- Select the required device from the list of devices that appears.
- Wait for the final stage of synchronization.
Activation on iPhones takes much less time:
- You need to open the list of available router connections.
- Find a network that uses Miracast technology.
- Open the sharing window.
- Select the "Airplay" tab.
- Decide on the screen for sending the signal.
- Enable repeat videos.
- Wait for the devices to synchronize.
Computer settings
The process of connecting a computer is more labor-intensive, since operating system settings take longer to synchronize with Miracast technology. What needs to be done:
- Join the wireless network provided by the TV.
- Open main system settings.
- Find the section with devices.
- Add the required device using the “Connected devices” block.
- In the window that appears, find the name of the element from which the Miracast network is distributed (TV).
After completing the actions, computer synchronization will begin. The corresponding picture should appear on the desktop. If the synchronization procedure was unsuccessful or the picture did not appear, you need to carry out the following manipulations:
- Start the screen output setting mode manually through the control panel or the “WIN P” combination.
- Connect to the wireless screen by clicking on the corresponding button.
- Indicate the name of the device in the input line.
- Select display to duplicate.
Pros and cons of Miracast
Like any other solution, Miracast technology has both advantages and disadvantages. Below we will describe some of the most important of them.
Advantages:
- Miracast technology allows you to organize the transmission of video images using a wireless network of the popular IEEE 802.11n standard;
- Miracast provides a stable image, without desynchronization and delays;
- Miracast works without using a Wi-Fi router, which significantly expands the scope of this technology;
- The transmitted image is protected from third-party access using WPA2 technology;
- The technology is Wi-Fi based, so its use does not greatly increase battery consumption;
- Miracast makes it easy to discover and connect devices that send and receive images;
- The technology is an approved Wi-Fi Alliance standard;
- Miracast supports DRM content and 3D;
Flaws:
- Different Miracast-enabled devices often have compatibility issues;
- At the moment, Miracast does not support high resolutions (in the current version, a maximum of 1920x1200 pixels);
- The closed codec H.264 is used for video transmission;
Which Miracast should you get?
If your TV doesn't already have Miracast, you can buy a Miracast dongle like Chromecast. It costs significantly less and will work offline.
My personal recommendation is the AnyCast M100, which works with Apple's AirPlay standard so you can mirror iPhone or iPad screens, too.
Anycast M100 4K/1080P Wireless Display Adapter, SmartSee WiFi Display, HDMI Screen Mirroring Dual Core H.265/HEVC HD TV Decoder, No Switching Support Miracast Airplay DLNA 4K 1080P
Anycast M100 4K/1080P Wireless Display Adapter, SmartSee WiFi Display, HDMI Screen Mirroring Dual Core H.265/HEVC HD TV Decoder, No Switching Support Miracast Airplay DLNA 4K 1080P Buy Now on Amazon $24.98
If you can spend a little more, you can try Microsoft's Wireless Display Adapter, which has proven to be quite popular for Windows desktop users.
Microsoft P3Q-00001 Wireless Display Adapter
Microsoft P3Q-00001 Wireless Display Adapter Buy Now on Amazon $39.69
What is a Miracast adapter?
In order to organize such a screen broadcast from a computer, laptop or smartphone to TV, it is necessary that both devices support Miracast. This implies that they have two components:
- Hardware, that is, built-in or external wifi adapter with Miracast support
- Software - applications for reproducing the screen of a computer or smartphone on TV
With the second, the situation is simpler - you just need to download one of the many programs for broadcasting the screen. Moreover, many mobile applications already have such an add-on by default - stock video players and even everyone’s favorite YouTube player.
The first point is a little more complicated. Not all modern TVs, even with Smart TV, have built-in support for screen mirroring via MiraScreen or WiFi Direct. This applies to any manufacturer, be it Samsung, LG, Philips, Sony or anyone else. But the issue can be resolved very simply - using an external wireless adapter with Miracast support.
The Miracast adapter connects to the TV via an HDMI connector, so the main condition for using it is the presence of this port on the TV.
In this case, according to Miracast standards, the video will be broadcast in very good quality - FullHD (1920×1200) with H.264 compression. There are a huge number of similar adapters on the market, operating at both 2.4 GHz and 5 GHz frequencies. As already noted, they may be called MiraScreen, AnyCast, ChromeCast, depending on the manufacturer.
What is your opinion: is WiFi harmful?
Yes
22.94%
No
77.06%
Voted: 33179
For example, today I took two Miracast adapters. One model is made in the form of a “flash drive”
The other is more massive with an additional, separate module to improve the quality of signal transmission
Both also come with HDMI cables and USB power cords.
Possible problems and solutions
Let's figure out what to do if Miracast doesn't work in Windows 10, let's look at the typical, most common problems that may cause there to be no connection to the Windows 10 wireless display.
No Miracast support
If, when connecting, the computer does not see the connection created by the TV, then you need to:
- the TV must be within the wireless signal access area; make sure that thick concrete walls do not interfere with Wi-Fi reception;
- The TV must have a built-in Miracast module.
You can try to fix the problem by flashing the TV. It is also recommended to update the Wi-Fi adapter driver.
The problem usually occurs on older TV models.
There is no sign connecting to a wireless display
Sometimes, when setting up a connection in the “Project” menu (called by pressing Win + P at the same time), there is no option to connect to a wireless display. This may happen if there is no Wi-Fi adapter installed on the PC or its drivers are not working correctly. In this case, first of all, you need to check whether the wireless adapter is connected. If connected, you need to download the latest drivers from the Wi-Fi adapter manufacturer’s website and update them. Sometimes rolling back to an older version of the driver can help.
Rebooting the devices usually resolves this issue.
If this does not help, you can purchase an external Miracast module that connects to a USB connector.
Antivirus firewall interferes
The Windows 10 operating system has a firewall (firewall), which is turned on by default, and an antivirus is usually installed on the computer. Sometimes these programs can make mistakes and mistake Miracast for potentially malicious software and block its activity. In this case, try disabling the firewall and antivirus, and then check the operation of Miracast. If the problem lies with your firewall or antivirus, add Miracast to the exceptions.
Although Miracast technology is not very widely known yet, it provides users with ample opportunities. With its help you can connect your computer to your TV. In this case, an additional cable, which usually gets in the way and gets tangled, is not needed. Using Miracast, you can easily display images from your smartphone to your TV.
How to find out if a device supports Miracast
Output and broadcast images from a computer to a TV via Wi-Fi
Most mobile devices and TVs released in 2015 or later will support Miracast. The technology is implemented depending on the vendor and equipment model.
For mobile devices running the Android operating system, the option is called “Wireless Monitor”. Located in the “Screen” tab, “Settings” menu. We go into it, turn on the function, watch the video on the TV screen.
Important! The technology is available starting from version 4.2.
Apple has built the technology into a separate feature called AirPlay. To connect to the TV, the smartphone owner activates the option. After a successful connection, the communicator will display a message about the completed synchronization.
The graphical shell of TVs differs by manufacturer: each vendor creates its own interface.
There is no universal menu item that is responsible for Miracast. The user will have to search for the section independently. As a rule, it is located in the tab that contains the wireless network settings.
If the TV settings do not have the “Miracast” function, you need to use external adapters. You must purchase and connect an adapter to an HDMI or USB connector, depending on the model.
Microsoft has included technology support for Windows 8 and higher. The option is located in one path, so let’s look at the example of the latest version of Windows 10.
Important! Owners of laptops running Windows 7 need to install the eighth version of the operating system or upgrade to the tenth.
Click “Start” and enter the word Miracast. Follow the inscription and a new working window will open.
A message will appear at the top of the menu whether the laptop supports the technology or not. If not, the user buys a USB adapter and connects it to the computer.
Important! Before purchasing an adapter, check which WiFi adapters support Miracast. The information is on the official website of the laptop manufacturer.