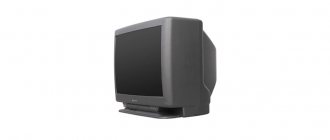
Typically, diagnosing a problem with a TV takes much more time than fixing the identified problem. Of course, you can always entrust this work to a professional, but in the end the whole procedure will be delayed even more. Therefore, users often try to repair the TV power supply with their own hands. Is it worth doing? How to proceed when repairing it yourself? What nuances do you need to pay attention to in order to be sure that the power supply is faulty and not cause even more damage to the TV? You will find answers to all these and numerous other questions in this material.
Manifestation of PSU malfunction
Unlike other TV components, any failure of the power supply immediately affects the performance of the TV as a whole. This means that after turning on the TV to the network, the activity indicator will not even light up, not to mention the output of sound, pictures or other signs of life. The breakdown may be as follows:
- the TV does not turn on and the LED does not light up;
- the device does not function due to protection in the power supply, which is usually accompanied by a whistling noise from the pulse transformer. This manifestation may also indicate the necessary repair of the LED backlight in the TV;
- The output voltage is too low or too high from the power supply.
If the device can turn on and simply exhibits some kind of defect in its operation, then this is most likely caused by another component of the TV, and not the power supply. However, there are also a number of exceptions in which the problem is still associated with the power supply:
- the device does not turn on, although the standby LED is on;
- the image appears some time after the sound;
- To get a normal picture and sound, the TV must be turned on and off several times.
Separately, it is also worth mentioning possible breakdowns of other components of the TV, which are not caused by problems with the power supply, but directly affect its operation. These include power supply units, feedback circuits, power supply loads, and so on.
Pressing cables
After playing with pressing the train, the idea was born to simply press them in the right places with the appropriate design. double-sided tape along the entire screen to the metal frame that is located on top of the matrix from the inside This is so that the pressure is uniform everywhere and no new mechanical stress arises.
On this strip of tape I glued
a strip of sealing material in which motherboards and other computer parts are packaged.
It turned out that there will be a sealing pad just opposite the contact of the cable with the matrix .
This is where she will lie down.
The meaning of the idea is to press the cables to the matrix.
After assembling this miracle, it turned out that the thickness of the seal was not enough. I chose a thicker seal.
And I glued this seal directly to the junction of the cables with the Samsung LE40A454C1 matrix.
Main reasons
Failure of the power supply is one of the most common breakdowns of modern LED TVs. The cause of this malfunction can be caused by many factors, but among them there are 4 main ones:
- Unstable voltage. If the voltage in the outlet constantly “jumps”, then it can not only worsen the performance of the TV, but also lead to wear and tear of its components.
- Short circuit. Causes burnout of the power supply or other components of the TV.
- Burnt out mains fuse. In this case, the standby indicator will not light up.
- Capacitors wear out over time. A very common problem that does not depend on external factors. Worn capacitors can be identified by their swelling.
No image
Another common cause of Toshiba TV malfunctions. Under such circumstances, there is a possibility of failure of the corresponding module, or of connecting the display to the transfer circuit. Here you will need to find the appropriate diagram, and then use a special tool to determine the presence of short circuits or lack of contact. Subsequently, it is necessary to restore the conductivity of the signal so that the image can be transmitted to the screen. Additionally, a failure in the settings may occur, in which case you will have to roll them back to the factory state. If the cause of the breakdown is the device matrix, then it must be replaced with a corresponding working module. As in any other situation, all work is performed with the power turned off.
Analysis and determination of the problem
The first step is to disassemble the TV by removing the back cover of the device, which is secured with screws around the perimeter. Depending on the model and manufacturer of your TV, you can gain access to the power supply after this stage.
If you did not notice this part after removing the cover, then it is protected by a protective metal casing. In some models, it is also possible to install another protection specifically for the power supply. At each stage, you will need to unscrew the screws in a circle that secure the component to be removed.
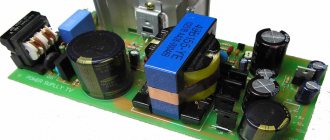
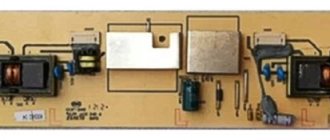
What does a power supply unit and its components look like?
Before you start repairing the TV power supply, you need to understand what this component looks like. All modern models have several power supplies, but they are all placed on one board. It is not at all difficult to distinguish it from others, because in addition to capacitors and other components, this board also contains three transformers (painted black and yellow).
As for the components of the power supply, they are as follows:
- Standby power supply. In order for the device to be in standby mode (the LED is lit) and await any command, it must receive a voltage of 5V. It is the duty power supply unit that supplies it to the TV.
- Inverter block. If the TV tries to turn on, but then immediately goes back to standby mode, then the problem is related to this part. It is responsible for powering the corresponding component, so if there is no power, the processor cannot receive confirmation of functionality from the inverter and replaces the mode with standby mode.
- PFC block. Power is divided into active and reactive. The first one does useful work, and the reactive one simply passes from the generator to the load and back. The second type can be inductive or, as is typical for TVs, capacitive (capacitors). Reactive power is needed for the operation of the TV, but it can significantly increase energy consumption and also wear out capacitors faster, which negatively affects the durability of the power supply as a whole.
To eliminate these phenomena, a special PFC (Power Factor Correction) block is used, which, as its name suggests, deals with power factor correction.
Checking the voltage in the socket on the control unit
The TV may not turn on due to unstable voltage, so this problem is solved with the help of a stabilizer. Also, the cause is often a malfunctioning extension cord or socket. Moreover, different power sources in the apartment can be connected to different machines in the panel, so the presence of light in the house does not mean that the outlet you need is supplied with electricity. If there are no problems with the power supply, then you need to use a tester to ring the output of the standby power supply.
The result should be 5V, and if you get a lower value or no voltage at all, then the problem is worn capacitors. They can be identified by visual inspection, because such components will be swollen.
In the same case, when no problem is found here either, it is necessary to check the fuse. To do this, you also need to ring it, checking if there is a short circuit somewhere. Additionally, you need to inspect the back of the board by removing it from the frame.
No sound
This type of breakdown occurs most often, since audio conductors have the least load resistance. A common reason here is when the corresponding contact is broken, which is why it is necessary to fully restore it in all damaged areas. In addition, the malfunction may be a breakdown of the speakers themselves. Here a full replacement is required, since it is almost impossible to restore the devices. Also, a defect is periodically observed in the corresponding sound card, which is why it undergoes a full inspection and diagnostics, after which it is resoldered or completely replaced with another device. The last possible breakdown is the lack of a signal from the main distribution module. As a rule, in such a situation, a full reset of settings and encodings to factory values is carried out, or replacement or overhaul of this accessory is carried out.
There may be no sound for several reasons
Important! The sound components are separate from all other modules, which makes it much easier to identify a breakdown and fix it, but this is not always acceptable due to the complex design of the circuit.
Troubleshooting
First of all, it is necessary to discharge the input capacitors. If this is not done, then during the repair process there may be a short circuit or other problems that will lead to more serious damage. To discharge, you can use a low-resistance resistor, a tester or a regular light bulb, brought to the contacts for a few seconds. After this, you can unsolder the damaged capacitors and replace them with working ones with the same power.
Important! Any repair of a power supply is associated with a number of risks. If you act carelessly, you can cause even greater harm to the TV or even your own health. If you have any doubts about your own abilities, you should trust the repair procedure to an experienced technician.
A video lesson from a master will tell you in detail about the entire process of repairing a power supply:
Operating principle of the LCD matrix
An LCD matrix is a working surface made of glass with several million pixels; they change color, as well as the brightness of their glow, due to the influence of external control signals. Matrix pixels form the image that we see.
In order to control some pixels, microcircuits are used. ICs are drivers that control signals that send a specific signal for each pixel. Typically, control drivers are located on flexible cables soldered into the very base of the matrix glass. This cable cannot be separated from the glass; it is also impossible to replace one cable. In addition, it contains driver power parts, as well as decoder chips.
Replacing a cracked display yourself
If you decide to fix the problem yourself, use the general recommendations. Please read the device installation instructions first. So, how to replace:
- Disconnect the TV from the power supply, remove all cables from the outside;
- place the device on a soft and flat surface;
- unscrew the screws;
- remove the frame on the damaged screen;
- remove cables and wires from the inside, remove the screen;
- mount the new panel and connect cables and wires. Turn on the power.
As you can see, it’s not difficult to do everything yourself. The main thing is that changing the screen does not cost you more than buying a new plasma.
Expert advice
- If there are vertical thin stripes, it is worth checking not only the matrix, but also the video amplifier and color block;
- Lamps in the matrix may burn out due to power surges. They are being replaced;
- Matrix repair makes sense only if the price of a new TV is higher than the part;
- The body of the equipment is assembled in the opposite direction;
- Some cables can only be removed by lifting the clamping bar;
- If the TV's warranty is still valid, but the matrix is broken, take it to a service center for repair.
Watch a video on how to dismantle the matrix of a large diagonal TV