How to find out that Vityaz TV supports digital TV
If your model has Smart TV, then it is guaranteed to support DVB-T/ DVB-T2/ DVB-C broadcast formats. You can find out more detailed information in the product data sheet.
You can also find the technical specifications of your model on the Internet. To do this, you usually enter the brand and model of the television receiver into the search engine.
Soon information about all Vityaz TVs that support the digital broadcast format will be added to the site.
| Model | DVB-T2 | Diagonal |
| 43LF1207 | Yes | 42.5 |
| 46LCD821-5DC | No | 46 |
| 50L401B03 | No | 50 |
| 50LU1201 | Yes | 50.0 |
History of the enterprise development
In the spring of 1976, the Vitebsk Television Plant was created. A year later, the first color TV, Vityaz-722, appeared. During the year, the company collected 500 copies. Within a year, production volume increased 100 times and amounted to about 50 thousand copies. Another year of work allowed us to double production volume. Already in 1884, the half-millionth television set rolled off the assembly line. It took another 4 years to reach the 1 million milestone.
In August 1985, production of integral modular models began. One of the first was the Vityaz Ts381D model.
By 1989, the enterprise became self-sustaining. It was renamed the Vityaz production association. In addition to producing televisions, the company began to engage in other activities. By 1990, production of medical equipment began. A year later, a wood processing workshop was opened.
The company paid great attention to quality. For this purpose, our own certification workshop was opened. This happened in 1991.
The network of branches grew. They appeared not only in Belarus, but also in the neighboring Baltic countries, Ukraine and Russia. By 1993, more than 70 branded shopping centers were opened in the CIS countries.
Since 1995, television production has been carried out using self-made mono-chassis. In 1998, they began assembling the analogue digital TV “Vityaz” (37-54 centimeters diagonally). Within a short time, the company mastered the production of more than 30 models. Their size was increased to 34-72 centimeters (14-29 inches).
In 2002, models with a completely flat screen appeared. It was a Vityaz TV, 54 centimeters diagonally. By 2007, the kinescope size of some models had already reached 42 inches.
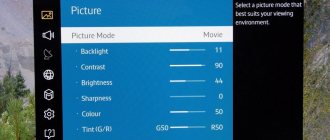
Setting up channels
In order to connect and configure digital TV on your Vityaz TV, you need to perform several simple steps. First of all, decide what kind of television you will use.
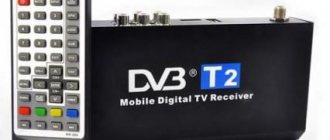
DVB-T2 is digital terrestrial TV; a UHF antenna is required for reception. DVB-C is cable TV; to watch it you need to connect to a cable operator. Almost every larger city has a provider that provides this service DVB-S and DVB-S2 is satellite TV . To view it, you need a satellite dish and an access card along with a slot. IPTV is a new technology that is increasingly replacing conventional television. To view, you need a TV with Smart TV to download an application for viewing IP-TV or a set-top box.
Automatic search
Let's move on to the main question of how to connect your Vityaz TV to digital TV.
- First of all, connect your antenna to the TV socket.
- Next, take the remote control, you can also use the buttons on the front panel.
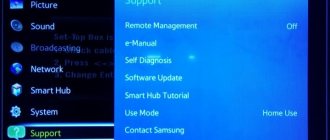
- Press the TV Menu button, usually this button is designated MENU.
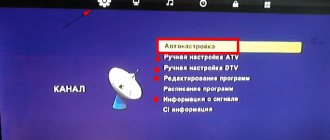
- Find the Channel section, usually located under the gear icon.
- Here we select the first item Auto setup .
- Selecting a country : Select your broadcasting country, in my case it is Russia.
- DTV setting type, if you need local TV channels, then also choose ATV. In the future, you will be able to watch both Digital and Analog programs.
- Next, select Broadcast standard , to view using an antenna, as mentioned above, select DVB-T2
- Click on start and wait for the scan to finish, which may take several minutes.
- When you select DVB-C , you will have additional fields. Search Type - Full. Auto network ID, speed Symbol is also Auto.
Be sure to wait until the lower scale is filled to one hundred percent, do not interrupt the setting.
Manual DTV setup
In addition to automatic search, you can use another way to quickly configure programs on your Vityaz TV.
- To do this, select the item Manual DTV setup .
- Next we enter the frequency
- And start the search
- We save the found channels,
In this mode, you can see the strength and quality of the received signal, which will help you configure your antenna. After all, if there is a weak signal, then you will encounter constant interference with program freezes.
Tip 2: How to set up sorting
After the process is completed, the line “DVB-C setup menu” will appear in the menu in the “Settings” tab. Once you go there, you can adjust the setting manually (define the frequency of 338 MHz and speed of 6875 KS/s).
Use the login button at the top of the page if you are registered or go through the simple registration procedure on the Portal.
Included in SERV from the MAK 2002 maxi universal remote control, code 1310 teletext button with (i) The M button of the TV Vityaz remote control corresponds to the DISPL button of the RC-5 remote control.
You can:
- Leave everything in the same place and continue torturing yourself and the equipment
- Call a specialist who understands. It will easily and quickly fix this problem, and will even provide a guarantee for long-term use. And you will save much more time.
Editing channels
On the Vityaz TV you can use a convenient function like sorting found programs. After all, sometimes you may not be satisfied with the location of the found TV channels. Therefore, to arrange all your favorite programs in new positions, simply go to the menu and select Edit Programs. Here you will have access to deleting, sorting, changing the name and blocking channels. To do this, use the colored buttons on your remote control. Under each light its purpose is written. Also, often in the menu there is such a function as sorting LCN , it must be disabled or otherwise the list of channels will start with 800, which is very inconvenient.
ELECTRONICS FORUM
When you turn on the TV, the mains fuse FU1 blows. Check the serviceability of the mains filter elements, fuse rectifiers FU and transistor VT. The TV does not turn on, the mains fuse is working. They also check the integrity of the windings and transformer T. There is no image stabilization when the mains voltage changes. They check the elements of the power supply circuit of the frame coils, paying special attention to their soldering. Then use an oscilloscope to check the presence of personnel sawtooth pulses on the pin. Monitor the voltage at the pin.
Typical TV malfunctions and their elimination
When you turn on the TV, the mains fuse FU1 blows
Check the serviceability of the mains filter elements, rectifiers of fuse FU401 and transistor VT402.
Table 2. List of service menu parameters
| Parameter | Recommended parameter values | Parameter description |
| IF | 38 | Drive selection |
| IP | 65 | Adjusting the PLL tuner level |
| IFL1 | 39,9 | IF selection for SECAM (33.40-33.90 MHz) |
| IPL1 | 65 | PLL adjustment for SECAM system |
| IFOF | 33 | IF level offset |
| A.G. | 10 | AGC adjustment |
| HSH | 24 | Horizontal shift |
| VS | 24 | Vertical tilt |
| V.A. | 58 | Vertical size |
| VSD | off/on | Vertical scan control (on/off) |
| V.S.H. | 38 | Vertical shift |
| S.C. | 7 | S-correction |
| EW16 | 58 | Horizontal Size (16:9) |
| PW16 | 18 | Parabola horizontal (16:9) |
| CP16 | 14 | Horizontal angular parabola (16:9) |
| TC16 | 28 | Trapezoid horizontal (16:9) |
| EW4 | 36 | Horizontal Width (4:3) |
| PW4 | 18 | Parabola horizontally (4:3) |
| CP4 | 12 | Horizontal angular parabola (4:3) |
| TC4 | 27 | Trapezoid horizontal (4:3) |
| WR | 32 | White correction (red) |
| W.G. | 32 | White Correction (Green) |
| W.B. | 32 | White Correction (Blue) |
| Ys | 14 | Luminance (Y) delay for SECAM |
| Yn | 8 | Luminance (Y) delay for NTSC |
| Yp | Luminance (Y) delay for PAL | |
| Yo | Luminance (Y) signal delay for external sources | |
| C.L. | 4 | CRT cathode current level |
| BITS | 77 | Control bit combination (does not change) |
| OSD | 7 | OSD Brightness |
| Op1 | 01 | Initial data for option byte settings |
| Op2 | 01 | Not used |
| Op3 | C8 | Not used |
| Op4 | 84 | Not used |
| Op5 | 15 | Not used |
| Op6 | 04 | Not used |
| Op7 | C1 | Not used |
| TSL | 45 | Setting the lower frequency limit of the VL subband |
| TEL | 160 | Setting the upper frequency limit of the VL subband |
| TSM | 160 | Setting the lower frequency limit of the VH subband |
| TOPIC | 440 | Setting the upper frequency limit of the VH subband |
| TSH | 440 | Setting the lower frequency limit of the U subband |
| THE | 863 | Setting the upper frequency limit of the U subband |
| TBL | A2* | VL subband selection |
| TBM | 94* | VH subband selection |
| TBH | 31* | U sub-band selection |
| INIT CTV 832PR V0.45 | Initializing the contents of the memory chip (PROM) | |
The TV does not turn on, the mains fuse is good
Check the serviceability of elements R404, R405, VD402, VT401, FU401, D401, C409, C413. They also check the integrity of windings 1-6 and 3-4 of the T401 transformer.
There is no image stabilization when the mains voltage changes
They check elements VD402, VD403, VD405, C409, C413, as well as optocoupler D402 and microcircuit D401.
The TV turns on. A thin horizontal line is visible on the screen
The image is reduced vertically
Check the elements R311, C312, C313, the presence of +14 V voltage on the pin. 3 D301 chips. If the faulty element is not identified, replace D301.
The reverse lines of the beam are visible on the screen, and there is also a twist from above
Check the serviceability of elements VD301, R303, C304.
No picture or sound
They check the operation of the D102 chip, the VT101 transistor, and the passage of signals from the tuner to D102 (pin 48, 49).
They check the elements of the horizontal scanning output stage: transistors VT301-VT303, transformers T1 and T302, as well as the passage of horizontal pulses from the pin. 40 D102 before UTZOZ.
There is no memory of user settings data
Replace the D101 chip, having previously copied the original (factory) data into it.
Author: Pchelintsev Nikolay
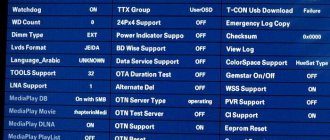
Adjustment in service mode
Switching the TV to service mode can be done in two ways:
The list of service menu parameters is given in table. 12.
Table 1. List of service menu parameters
| Selector typeParameter | TBL | TBM | TBH |
| Parameter value | |||
| KS-H-134/136, UV1318 EL2787-104 | A1 | 92 | 34 |
| KS-H-132; CKB-362D | A2 | 94 | 31 |
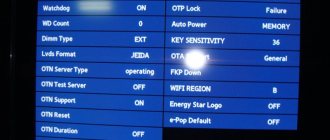