Instructions for connecting World Vision set-top boxes to TVs
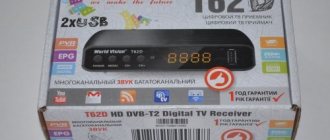
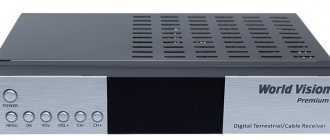
According to our observations, the most popular World Vision set-top boxes at the moment remain the following models: Premium , T62A and T62D . That is why we will take screenshots of equipment for further instructions for these consoles.
However, we dare to assure you that the instructions are equally suitable for any of the device models of this company, the main thing is to do everything in the same way as the review. The general connection diagram is as follows
The antenna is connected directly to the digital set-top box through the corresponding input. In this case, the connection to the TV itself is made by ONE of 3 options:
- Via HDMI cable. Such a wire is usually not included in the kit. However, if your TV has such an input, then it must be used first. The thing is that HDMI provides the best image quality and is generally more durable. It is best to buy a cable from trusted companies: Twisted Veins, Mediabridge ULTRA, Monoprice. A meter of their cable will cost 2-3 times more than cheap analogues, but their quality will be 5 times higher.
- Via RSA (tulips). Particularly relevant for TVs older than 7-10 years of production. These models do not have HDMI, but there are multi-colored inputs for RSA. They are also called “tulips” for their corresponding color. 2-3 meters of this cable are often included with the set-top box. Its quality leaves much to be desired and when using it, be prepared to replace it after 2-3 months of active use. On some TVs you will find options in which you will need to connect not 3, but 2 or 1 RSA output. The principle does not change here, the main thing is not to make a mistake with the colors.
- Using converters and adapters. This is especially true in case of absence or failure of any output on the TV.
- Adapter from RSA to SCART. A special SCART output can be found on TVs that are more than 10 years old. According to our observations, many subscribers still have such “tenacious” TVs. In stores, the adapter can be seen for 200-300 rubles.
- RSA-HDMI signal converter. It may be useful if, for example, the output for “Tulips” on your TV is broken. Costs vary, from 500-1000 rubles on average.
Regarding adapters, we will say that they should be used only in case of urgent need. It just doesn’t make sense to resort to their help.
After the device is connected, to turn on the set-top box and check the connection, you must do the following:
- In the TV menu, go to the signal display mode you need. For HDMI, this is the corresponding mode. For RSA, AV (Audio-Video) is usually selected.
- After this, you can turn on the set-top box and press the power button on the remote control.
- If the welcome menu appears, then the connection was made correctly and you can begin directly setting up digital channels.
How to connect the set-top box
The World Vision kit includes the digital set-top box itself, a remote control, a PCA cable for connecting to TV, batteries, and instructions.
You can also use an HDMI cable to connect a digital set-top box to your TV. If there are corresponding connectors on the TV panel. If you have an old TV, use the PCA cable that comes with the kit, you need to connect it according to the lights, yellow video, red and white wires are audio.
- First of all, turn off the power supply to the TV and set-top box and only then start connecting.
- The next step is to connect the antenna cable to the antenna input of the digital set-top box using a plug.
- Connect the video cable to the appropriate jacks on your TV and set-top box.
- After this, we connect the power supply to the TV and set-top box.
- You need to turn on the video channel on your TV; in some models it is called AV.
Search and configure 20 digital channels on World Vision set-top boxes
When you connect any of the World Vision set-top boxes for the first time, a special welcome message should appear on the TV, in which you will be prompted to quickly set up the device. In any case, if the antenna selection was made correctly, the tuner will be able to independently configure all available channels. To do this you need:
- Go to the device menu by pressing the corresponding button on the remote control.
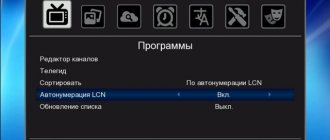
- Press the “Menu” button and go to the search section. Specify in the DVB-T2 range item. If the antenna has a signal amplifier, then also switch the power to “on”.
- Select “Auto search” and click “OK”.
- The set-top box will search across all available frequency ranges. The search will continue for 5-10 minutes. During this time, the device will save the entire available channel list and save the settings when finished.
The auto-search function is very convenient in cases where there is a stable signal and the antenna itself is well-tuned and is capable of receiving a digital signal without problems.
Manual search
If there are problems with the signal strength or the device cannot detect the required number of channels for no apparent reason, then you should repeat the search procedure in manual mode. The sequence of actions is as follows:
- Go to the console menu, to the search section.
- Select “Manual search” there and press “OK” on the remote control.
- After that, go to the Internet and open the interactive map of CETV. We indicate your area of residence on it and write down the parameters of the television tower closest to you. We will be interested in the channel number for RTRS 1 and RTRS 2.
- In the set-top box menu, first indicate the number of the first channel from the card. At the same time, we check that the power and quality of the signal changes from 0% to some value. In this case, it is not necessary to have 100%. In some areas of residence, 60%, 70%, etc. is enough for normal broadcasting...
- Click “OK”. The search will find available TV channels and radio.
Manual search
To manually search, you must enter the frequency or TV channel number. To do this, in “Search for channels” select “Manual search”
Next we will see the search settings:
What settings should I set here?
In order to answer this question, you must first go to the CETV Interactive Map service.
Next, we find our locality. If it is very small and not marked on the map, we look for the closest one to it. One or more towers will be located nearby. To find out the radius of its action, just click on it and select the desired multiplex (there are two in total). By the way, please note that the status of both is broadcast:
Accordingly, to check the coverage area of the tower, we first select “RTRS-1 TV Channel Package”, then “RTRS-2 TV Channel Package”
This way you can check whether digital terrestrial television will be available in your locality. In parentheses for each TVC there is a frequency parameter (in mgHz) - this is exactly the parameter that we must set when manually setting up channels (the only thing that can be converted to kHz)
Firmware for World Vision tuners
A software update is necessary in the following cases:
- When the set-top box starts to work inadequately: reboot, freeze, or refuse to connect to the TV.
- When will a new, stable version of the software be released?
To update you need:
- Download the latest version of the set-top box software from the official website. The firmware format will be .bin.
- Write the file to a flash drive with the Fat32 file system.
- Insert the USB drive into the console and go to the menu.
- In the “System” section, select “Software Update”.
- Then update via USB.
- Specify the path to the file and click update.
If the software file meets the hardware requirements, then the firmware will take 10-20 minutes. When finished, the device will reboot.
World Vision Errors
During the operation of the site, we have accumulated a lot of questions from subscribers regarding World Vision set-top boxes. For some topics we will try to answer and provide possible solutions to problems.
The set-top box does not search for channels / finds less than 20
- Try searching manually.
- Make sure you select the correct antenna. If the distance to the TV tower in your region is more than 10 km, then you will need an outdoor antenna with a signal amplifier.
- Check the antenna cable for integrity.
The device does not connect to the TV
- There may be problems due to old software. It needs to be updated.
- Check the cable connecting to the TV. In 30% of cases the culprit is just a wire.
The console reboots or freezes
- Update your software.
- Reset to factory settings.
How to set up a learning remote
In total, the universal remote control has 4 programmable buttons: TV Power, Vol+-, AV. To program them, you must press the OK and 0 buttons simultaneously, the red light should light up. After this, place another remote control opposite the student and press the button on the second one that you would like to program. After that, on the original remote control, press and hold the button that you would like to transfer. It is necessary to hold it until the remote control is not trained, the diode blinks 2 times. At this point the learning process can be considered complete.
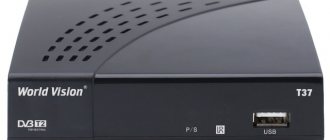
Instructions for WORLD VISION T37 in Russian in pdf format for the device: digital terrestrial DVB-T2 receiver. Read the instructions to become familiar with the functions and operating conditions, characteristics and troubleshooting methods. This user manual will help you use all the functionality of the product and increase its service life, provided that all the rules set out in the document are followed.
Setting up channels
Channels are configured on the set-top box itself and its remote control is used. The TV remote control is only needed to turn the TV on and off.
- Click on the Menu button and go to the Search or Channel section.
- Since World Vision set-top boxes are suitable for cable and over-the-air broadcasting, we select the desired search range.
- We choose DVB-C if you have cable TV.
- Choose DVB-T2 if you want to tune channels from the antenna.
- Search type All.
- Click on Autosearch and wait for the scan to finish.
File description:
Device type: digital terrestrial DVB-T2 receiver
| 2 | 9.51MB | To read the instructions, select the file in the list that you want to download, click on the “Download” button and you will be redirected to a page where you will need to enter the code from the image. If the answer is correct, a button to receive the file will appear in place of the picture. If there is a “View” button in the file field, this means that you can view the instructions online, without having to download it to your computer. If you think the material is not complete or you need additional information on this device, for example a driver, additional files, such as firmware or firmware, then you can contact the moderators and members of our community, who will try to quickly respond to your question. You can also view instructions on your Android device World Vision has been operating in our market for more than 16 years. Currently, the manufacturer sells more than 40 types of DVB-T2 set-top boxes and this allows it to be among the 2-3 most popular digital equipment companies in our country. Just think about it, in just 13 years they were able to sell 10 million units of receivers. This, in turn, allowed them to release new models that meet all digital television standards and can receive all 20 free channels without any problems. Today we will talk about this manufacturer in more detail. We will study the connection procedure, and also show a visual overview of searching for digital channels from World Vision devices. Additionally, we will try to answer the questions that have accumulated regarding these set-top boxes and provide the most possible causes of certain problems with the equipment. |
World Vision set-top box does not find channels
Has the image disappeared from the screen? The reasons are as follows:
- system failure;
- technical malfunction of the device;
- internal breakdowns.
We recommend updating your system and downloading the new update. Also try turning on the receiver and antenna again.
Does not respond to the remote control or the button does not work
The remote control does not work if there is no charge. Press all the buttons and check that the device is working properly. No signal? Insert new batteries and try again.
No signal
The “No Signal” error is due to temporary interruptions. Wait a couple of minutes and turn on the TV again. Often, the problem goes away within a few minutes.
Poor image quality
Image quality varies depending on weather conditions. First check if the antenna is working properly. Turn it towards the tower to improve the signal. Also use an amplifier to improve picture quality.
Mila Artyukhova (Articles written: 40)
I bought it to use the monitor as a TV, I have cable at home, the set-top box does not find the channels....what should I do?
Hello, what is the model of the console?
In 2021, the set-top box worked at the dacha, but in 2021 it says there is no signal, 30% on the scale, and it also shows radio channels and how to remove them, because you need television channels.
Hello, try setting up digital TV channels yourself.
Source