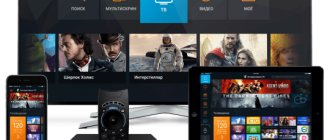
For several years now, in addition to traditional cable television, Rostelecom has been offering its customers to connect to interactive TV. The provision of this type of service is very popular among providers today, and simply a high-quality picture with standard channels is no longer enough to satisfy the desires of sophisticated subscribers. A small set-top box, slightly larger than the palm of your hand, performs dozens of functions, from recording video to viewing video in 3D format. However, before you start enjoying the purchased gadget, you need to configure the Rostelecom TV set-top box. To do this, just read the information below.
Types of equipment for IPTV
The company offers several types of television set-top boxes, which differ in configuration and built-in functions.
First of all, models differ in the presence or absence of a hard drive, which, in turn, affects the ability to record programs or videos. The line of equipment is periodically updated, some models become outdated, and more adaptive ones take their place.
Everything that is currently presented on the company’s website has a powerful processor and fully meets the buyer’s requirements. In addition to large RAM, the new models also have functions for viewing images in 3D. All models are equipped with a USB connector (and in expensive models, several), which makes it possible to use a Wi-Fi adapter or use the device as a media player and watch movies downloaded to a flash drive.
The equipment is produced at Ukrainian and Russian factories. Price range from 3 to 10 thousand rubles.
At the same time, you can configure a Rostelecom set-top box of any type according to approximately the same scheme.
Set-top box equipment
The contents of Rostelecom equipment for the TV include:
- prefix;
- remote controller;
- power adapter;
- network cable;
- composite cable;
- tulip cable + RCA-SCART converter.
Set for interactive television from Rostelecom.
The basic package of modern models often does not include an HDMI cable (although this port is included in the set-top box), so it should be purchased separately. Almost all components of the Rostelecom set-top box can be purchased separately. The price list is posted on the website rt.ru, in the Television - Equipment section.
How to connect IPTV Rostelecom on a computer or laptop
You can also watch the broadcast in good quality on a computer or laptop. In this case, a separate connection is not required. To watch TV programs in good quality on your PC or laptop, you should install a player from Rostelecom, with which the connection will be made automatically.
At the user's request, the function of creating a playlist is available. To do this you need to follow a number of simple steps:
- Download the player from the Rostelecom website.
- Run the installation wizard (it is advisable to perform a complete installation of the program).
- Open the player after the installation process is complete.
- Set up your location, that is, indicate the locality (city, village, urban settlement, etc.) and the service provider (Rostelecom).
This software comes with a Yandex browser, as well as other programs. If you do not want to install them, you can perform a personalized installation and uncheck unnecessary programs during installation, selecting the settings as desired by the user.
This completes the installation and configuration of the player, which makes it possible to view channels on a desktop computer or laptop.
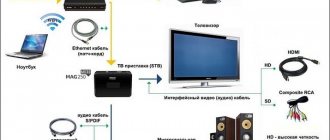
Assembly instructions
There are several cable connectors on the back of the console. Some of them may not be useful, so you should not look for missing components. Each connector is labeled, which will greatly simplify the connection.
- We connect the power supply to the appropriate connector. The device should only be connected to the network after the general assembly has been completed.
- We connect the network cable to the LAN connector. We connect it to a router or switch.
- If you decide to use a standard tulip cable, then connect it as follows: insert the black end into the set-top box (the connector is labeled AV), and its colored plugs into the corresponding grooves in the TV. If the grooves on the back wall of the TV are not painted, then you should know that the white and red plugs are inserted into the left and right inputs, respectively, and the yellow one is in the middle.
- Connecting an HDMI cable is even easier - we connect the connectors on the TV and the set-top box with an HDMI cable.
The TV may not have an HDMI input. Check availability before purchasing additional equipment.
- If the Wi-Fi connection method is selected, then insert the Wi-Fi adapter into the USB connector.
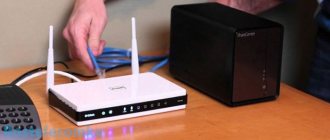
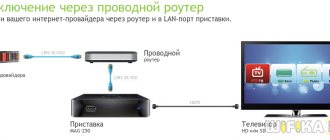
Connecting a TV set-top box via a router
Before you find out how IPTV is set up in Rostelecom, it is worth considering separately the option of connecting via a router, since this is the most used and reliable method. It is noteworthy that the devices sold by the company do not require configuration; the provider’s firmware assumes automatic connection. However, if the user already has a router and does not need a new one, then it will need to be additionally registered. Usually these are simple steps and can be easily completed by following the instructions.
A proven Zyxel router model.
As an example, let's take the Zyxel Keenetic model, which is also often configured automatically. If auto-tuning does not happen, then open “Internet” on the control panel, then select “Connections”. We are interested in the term “Broadband connection”. By clicking on it, in the window that appears, you need to check the Lan4 box.
Internal interface of the Zyxel Keenetic 2 router.
Any router, including Zyxel Keenetic, is configured via a computer. To do this, you need to open your browser and enter 192.168.1.1/ or 192.168.0.1/ into the address bar. For more convenient setup, use the instructions for setting up Rostelecom routers.
Video: instructions for setting up the Rostelecom set-top box, connecting via a Wi-Fi router.
Asus RT-G32
If you own Asus equipment, this part of the manual is intended for you:
- Open any Internet browser.
- Go to the device address – the default is “192.168.1.1”.
- On the authorization page, users will need to provide a password and login to log in. The word “admin” must be entered in both fields. If the data is not suitable, and there is no way to find out what is correct, you will have to reset the router to factory configurations.
- Using the menu on the left side of the interface, go to the page called “LAN”.
- Open the "Routing" tab.
- Check the box next to “Enable multicast routing”.
- Click "Done" to complete the process and close the window.
TV setup
The next question that is usually asked after successful installation is how to set up IPTV. Before setting up the set-top box, you should make sure that when the power is turned on, the blue indicator on it lights up - this indicates that the assembly was successful.
Using the TV remote control, select the AV display mode (if connected via a tulip cable) or HDMI (if using this signal source). From this moment on, Rostelecom interactive television should load automatically, the process usually takes no more than 2-3 minutes. After it is completed, a window for entering your login and password will appear on the screen.
Login and password information must be specified in the contract. Traditionally, they consist exclusively of numbers and are entered by pressing the buttons on the set-top box remote control.
Upon successful identification, a list of channels or a menu for entering services appears on the screen. Now you can enjoy pictures of interactive television, check the availability of available channels, and try to access video rental services.
Frequent problems and solutions
Well, now you know how to activate Rostelecom television, as you can see, there is nothing complicated about it. However, not everything always goes like clockwork. Let's look at the probable mistakes that people make, especially beginners, when they try to set up a router and set-top box:
- Cables and inputs are confused. Once again check the diagram given in the instructions and the situation with your wires. As we wrote above, if the problem is in the cord connection, you will see a “No Signal” sign on the screen;
- The router may not work due to the lack of Internet, by the way, did you remember to pay for it?
- There is always the possibility of technical work on the provider’s line, or you were in a hurry and the television has not yet been activated for you. Please call technical service at the number given above;
- Sometimes there is no point in looking for the reason why the router could not be configured. Try first the universal solution of every programmer, which, surprisingly, often works. Reboot all devices. Just unplug them, wait a couple of minutes and plug them back in.
If you find that the LED lights on the receiver or router are red or one of the lights is blinking a different color, the equipment may be faulty. It is better for you to call the technical service and discuss possible solutions with the specialists.
We wish you to set up your router and set-top box the first time and, from now on, spend great evenings in the company of your family while watching Rostelecom interactive television. Don't miss high-profile premieres!
IPTV service menu Rostelkom
a list of channels that corresponds to the selected connection tariff. The number of channels can be increased by purchasing additional packages. Connect to the Multiscreen service and the choice of TV shows and opportunities will become even greater.
Video: instructions for using interactive TV.
- TV program guide;
- Time Shift function. Using this service, you can stop a show or movie at any time and continue watching it from the same point later. You can also record or rewind the necessary pieces, including large ones; all saved information is located in the Rostelecom cloud.
- video rental A large selection of films that you can add to your collection for a fee.
- application services. Useful information about the weather, exchange rates, traffic jams, as well as access to social networks directly from the TV screen - this is not all that the service can offer. It is assumed that all services will be enabled at once.
Solving connection problems
Sometimes it happens that even though the installation is supposedly correct, the television does not appear or stops working. In this case, the first step is to carry out a simple five-step check:
- Check if the invoice has been paid. If there is debt on the contract, the television will not work, no matter how you set it up.
- We inspect all cables for tight contact between connectors and devices.
- We examine the wires for damage or kinks.
- Reboot the set-top box (you can disconnect it from the network for a couple of minutes).
- Reboot the router. For example, Zyxel Keenetic has a special Reset button. If there is no such button as on the kinetics, then we use the option of disconnecting from the power supply.
If none of the above steps apply, then you need to contact the free technical support line at 8-800-707-18-11 and report your problem and the actions taken. The engineer will check the functionality of the line and help restore the service.
Attention! To provide information, the operator will ask for information about the owner of the contract; be prepared to provide your last name and passport details.
That's all that can be said about how to set up interactive TV from Rostelecom. To summarize, we can conclude that, despite different connection options, different models of set-top boxes and routers, the setup scheme remains approximately the same. All that needs to be done is to assemble the device kit, connect it to the TV and router and configure it with the remote control. A properly structured process will take a few minutes. Well, if any difficulties arise, a company specialist will always come to the rescue.
Troubleshooting
During the process of setting up and using the set-top box, the user may encounter a number of errors. In most cases, problems can be resolved on your own. First, check that the connection is correct and try rebooting the receiver. Press and hold the "Power" button on the remote for 10 seconds. If this does not help, move on to the next steps.
Control conflict between set-top box and TV
If the remote control simultaneously sends a signal to both the TV and the receiver, you need to change the control code for the TV set-top box. This is done as follows.
- Press the "Power" and "OK" buttons simultaneously. Hold for 2-3 seconds.
- Dial any of the combinations: 3220, 3221, 3222, 3223 or 3224.
- If the problem persists, try entering a different code.
After loading a cartoon appears
The error indicates a connection to a different connector. Most often, socket 4 is used for correct operation of the receiver. Try connecting your device to it. If the problem cannot be resolved, check your router settings. The port is indicated in the “IPTV” tab.
IP Address Error Message
An error with a black screen background occurs either due to problems on the part of the provider, or due to incorrect configuration. First, make sure the cables are intact. Try connecting them again. If all else fails, contact a technical support representative. If configured correctly and there is a connection to the Internet, most often the problem lies in damaged wires.
Server communication error message: "Loading error"
The message “Server not found” indicates a problem on the provider’s side. If a problem occurs, you should call technical support.
Wired interface not available
The error occurs due to problems with the Internet. Reboot the router and make sure the wires are intact. Most often, after these actions, the connection is restored.
Reset
To return the remote control to factory settings, hold down the “Power” and “OK” buttons simultaneously for 2-3 seconds. After turning on the programming mode, enter the service combination - 977. If you did everything correctly, the LED of the “Power” button will blink 4 times.
D-Link DIR-615 is an inexpensive, affordable, functional and very popular router. In this regard, the question very often arises - does the DIR-615 support IPTV? In this article I will answer this question.
First, in order to sweep away all unnecessary questions, I will give a little theory. In the networks of different providers, 2 different technologies are used to deliver multicast traffic (read television) to the subscriber’s device. Moreover, the same operator in one region can use one technology, and in another region - another.
The difference between these two types is in the method of delivering TV traffic to the user’s end device: 1 technology - Using 802.1q - tagging (marking) traffic on the subscriber router. In this case, multicast traffic is transmitted in a virtual network (VLAN) separate from Internet traffic. This scheme is used, for example, by OJSC Rostelecom, Saratov region. At the moment, 802.1q tagging is not supported by any of the existing D-Link DIR-615 firmware. Technology 2 - Using MVR - Registration of Multicast VLANs - allowing you to transmit a multicast stream as if “on top” of Internet traffic without requiring traffic marking on the subscriber side. This scheme is used more often than the first. As an example, I can cite such providers as TTK, Beeline, and again OJSC Rostelecom in the Samara region. The D-Link DIR-615 router supports this IPTV delivery technology. To configure, you need to go to the router’s web interface (standard address https://192.168.0.1) and select the ADVANCED -> ADVANCED NETWORK section.
Check the Enable UPnP and Enable Multicast Streams checkboxes. Now we plug in the STB set-top box into any LAN port of the router - everything should work.
Note: These instructions are relevant for setting up IPTV on most DIR-300 and DIR-320 firmwares. There is only a slight difference in the need to transfer the Wi-Fi adapter to the DIR-300 and DIR-320 in the so-called. advanced mode for broadcasting IPTV wirelessly. This is done in the same section by checking the “Wireless enhancement mode” checkbox.