Review of the IPTV set-top box emulator
An IPTV set-top box emulator is a multifunctional player that allows you to use the services of providers that provide access to digital television. Support for standard m3u playlists, including channel lists, is not provided. The developers only offer emulation of several set-top boxes (support for MAG200, MAG250, AuraHD models is provided), and then connection to dedicated portals with content.
Download and Install
The official version of the IPTV Set-Top Box Emulator player was released exclusively for Android: distribution kits for Windows, MacOS or iOS have not yet appeared (and the situation is unlikely to change in the near future - the developers are still silent about cross-platform support). And, since only the Android version is available, the software will have to be downloaded from the Google Play digital store.
The player is presented in Free and Premium editions. The second option is devoid of advertising integrations and does not interrupt running broadcasts in inappropriate places. But the installation and configuration of the versions is similar - you will have to repeat the simple algorithm of actions, fill out a number of text fields and start viewing. You don’t have to understand additional parameters - even a beginner can handle everything (no confusing things or terms like Mac Address will come across on the way).
▍What is Middleware?
Wikipedia has a good and concise definition:
Middleware is middleware for managing the IPTV complex. This is the main component of the IPTV solution, since it ultimately determines the set of services available to the subscriber, the user interface, transition logic and control algorithm. Middleware is entrusted with the role of coordinator in the process of interaction between almost all components of the complex.
I completely agree with this definition. It is impossible to build an IPTV/OTT service without Middleware. There are many developers on the market, each Middleware has its own characteristics: a list of supported devices, a list of supported CAS systems, a user interface, a list of supported video servers, different APIs for billing, cost and support.
Having chosen one solution, the operator is tied to Middleware and cannot quickly and cheaply change the solution, because this will require changing the software on the set-top boxes (or replacing them if the list of supported devices does not match). You will also need to re-integrate with billing and the content closing system. It's time and money, and the larger the subscriber base, the more difficult it is.
We have a good article on Middleware on our website.
Setting up Stalker portals
After loading the player, the most important stage will begin - connecting to the provider’s services:
- First you need to open the settings through a special context menu located in the upper left corner (three vertically positioned sticks).
- Next, go to the “Change profile data” item. In the directory that opens, you will have to enter a name (anything will do - there are no “best” options), and then specify the address of the portal (Portal). Open "Stalker" with a popular set of channels - https://old.tvclub.us or https://iptv.tvclub.us.
- If the portal has already been installed using the links provided above, then the last step remains - go to the “STB Configuration” section. Here you need to select “Set-top box type” and specify the “MAG 250” option. The changes need to be saved, and then go back a couple of steps to the context menu. A new item will appear there – “Restart portal”.
- After the reboot, a standard login form will appear - you will have to enter the login and password specified on the TVClub website or the service from which the link to the portal was copied. And, depending on the status on the site, it will be possible to unblock content, and at the same time open a channel for adults or a set of programs about sports, TV series and films.
Viewing TV channels, TV programs and program archives
After full setup, all that remains is to figure out the features of interaction with the player. There are few nuances, but some need to be discussed in detail:
- Channels are viewed through the TV or Smart TV category (depending on the player version). In the list that appears, you must specify a content package: the available options will appear in the form of a “carousel” with the ability to select.
- The “TV Guide”, hidden to the right (you need to click on the “Right” button in the player interface) of the channel list, will help you view the program schedule.
- But the same “TV Guide” will help you look into the archive, but only if the operator saves the broadcast history (a hint is a special clock icon to the left of the channel name).
- The last step is to click on the name of the missed program and start watching. There is no need to go to your profile and subscribe to channels to access archives.
At the time of writing, four free stalker portals were tested on Uclan Denys H.264, Uclan Denys Combo, Uclan Denys IPTV+ receivers:
https://stalkermix.ru/stalker_portal/c/ https://185.87.50.3/stalker_portal/c/ https://old.ttt5.me/stalker_portal/c/ https://stb.myott.pw/stalker_portal/ c/
All portals work, some are better, some are worse. As a result, you can watch quite a lot of TV channels in a convenient interface.
Installing these portals is very simple. First, we make 4 copies of the Stalker Portal application. To do this, press OPT on the remote control and select “Add resource” in the drop-down window
Next, select “Stalker TV”
Here you can change the name of the application and use the virtual keyboard to enter the address of the stalker portal
And so 4 times, for each Stalker portal.
It is much more convenient to first create 4 copies of Stalker TV, then use the IP address of the receiver to access it from your computer by typing the address of your receiver in the browser. For example like this:
And here just paste the copied address
This way you can very quickly set up several free Stalker portals.
- Category: Entertainment
- Date of issue:
2020-02-10 - Current version:
3.10.1 - File size:
90.86 MB - Compatibility:
Requires Windows 10/8.1/8/7/Vista
StalkerTV for PC Screenshots
▍Settings
After installation, the first thing you want to do is open the portal on the set-top box to make sure that the installation was successful and evaluate the interface from the user’s side. But it’s too early, it will be completely boring, let’s add some content for now.
By default, the admin interface is in English. You can switch to Russian at the bottom of the page:
▍Adding a TV channel
Expand the “IPTV Channels” menu and open the “Channels” page. The list will already have a pre-installed TV channel “Test channel”, delete it and let’s add your channel (the “Add a channel” button).
Fill in the basic fields: “Channel number”, “Channel name”, upload the logo, check the “Basic channel” box.
Click on the “Add link” button, a pop-up window appears with a form for adding a channel URL and additional options. As we can see from the prompt, you need to enter “solution+URL” in this line. Solution is a hint for the console player which library to use for playback. In most cases, it is enough to specify “auto” (for example, “auto udp://239.255.1.1:5500”). For HLS, the solution recommended by Infomir is ffmpeg.
Since I have a Flussonic video server, I immediately enable support for temporary links. They are needed to protect content from unauthorized viewing.
The result should be:
Let's skip setting up the program guide (EPG) and TV archive (DVR) for now. Save.
▍Adding a movie
Menu “Video club” → “List of films”.
The process for adding movies isn't much different, but there's a nice bonus: autofill. It is enough to write the name of the film/series in the original language and Stalker will be able to obtain metadata from the TMDB or Kinopoisk database.
Manually filling out the list of actors, logo, director, release year, genre and other information, without which the movie catalog on the console will look incomplete, is very labor-intensive when you need to add a lot of movies. Thank you, Infomir.
It is possible to add TV series with the correct sorting of episodes. You don't need to start each episode as a separate movie and write the season and episode number in the title.
For each movie or series, you can add several links for viewing in different qualities; this can be convenient if you already have sources in different qualities and do not use multibitrate HLS.
▍Program Guide (EPG)
It’s impossible to build a service without a program guide; people are no longer interested in just clicking on channels. An EPG is needed not only so that the user can see the name of the current program and what will happen tonight, but also to organize a video archive! Allowing users to watch programs that have already passed (so-called Catch UP).
Stalker can import EPG from XMLTV format.
XMLTV is a popular XML-based program guide format supported by all EPG providers. Contains a detailed description: title, start time, end time, genre, description, picture, list of actors, age rating and other information.
To continue setting up, we need to get the EPG supplier. They can be paid, or they can be free. They differ in the number of TV channels and the amount of information (for example, not everyone has pictures for each program and a list of actors). I won’t advertise any services, find the program guide in XMLTV format on Google and let’s continue.
Open the menu “IPTV channels” → “EPG”. “Add EPG” button.
We will need to insert a link to the web server where the xml file is located. From my own experience, I’ll add that suppliers most often upload to a password-protected FTP server, and in addition they archive it, so we insert a link to localhost into Stalker, and add a script to crontab that will download and unpack XMLTV into the desired folder.
After adding the link, click "update". If you did everything correctly, you will get:
Now go to the TV channel settings. Menu “IPTV channels” → “Channels”, click edit our TV channel. We are interested in the “EPG” section, indicate the ID of our TV channel and, if necessary, adjust the time to our time zone.
How to find out the XMLTV ID of a TV channel
Open the XMLTV file with a text editor and look. In this example: “Channel One” - 1, “Russia 1” - 2, “TVC” - 3.
Channel One Russia 1 TVC NTV Russia Culture TNT
For each TV channel you will have to manually specify an ID. I don't know a way to automate this yet.
▍Appearance
Infomir has been developing a new modern interface for a long time, but it is still turned off by default. I didn’t notice any obvious bugs in it, it works very well, exactly its screenshot at the beginning of the article.
To activate it, go to the “Settings” → “Appearance” menu. On this page we can familiarize ourselves with all available topics.
Click “Apply” under the topic “Stalker 5x - graphite”.
▍Launch the portal on the console
I hope you have a MAG console at hand? Using the remote control or USB keyboard, go to the set-top box settings → “Servers” → “Portals” and specify the URL of the server where you installed Stalker.
URL for clients: https://ip/stalker_portal/c/
We save, reboot the console and get into our Middleware. No logins or passwords are required; by default, no authorization is required.
download and install StalkerTV on your personal computer and Mac
Check compatible PC apps or alternatives
| application | Download | Rating | Developer |
| stalkertv | Get the app or alternatives | 3.3/5 10 review |
Or follow the instructions below to use on PC
If you want to install and use StalkerTV on your PC or Mac, you will need to download and install the Desktop App emulator for your computer. We've worked hard to help you understand how to use the app for your computer in 4 easy steps below:
Step 1: Download Android Emulator for PC and Mac
Fine. First of all. If you want to use the app on your computer, first visit the Mac or Windows AppStore and search for either the Bluestacks app or the Nox app. Most tutorials online recommend the Bluestacks app, and I might be tempted to recommend it because you're more likely to be able to easily find solutions online if you're having trouble using the Bluestacks app on your computer. You can download Bluestacks Pc or Mac software here.
Step 2: Install the Emulator on PC or Mac
Now that you have downloaded the emulator of your choice, go to the Downloads folder on your computer to find the emulator app or Bluestacks. Once you have found it, click on it to install the application or exe on your computer or Mac. Now click “Next” to accept the license agreement. To install the application correctly, follow the on-screen instructions. If you do this correctly, the Emulator application will be installed successfully.
Step 3: StalkerTV for PC - Windows 7/8/8.1/10
Now open the Emulator app that you have installed and find its search bar. Once you find it, enter StalkerTV in the search bar and click Search. Click on StalkerTV application icon. Window StalkerTV in Play Store or App Store and it will display Store in your emulator app. Now click the “Install” button and, for example, on an iPhone or Android device, your application will begin downloading. Now we're all done. You will see an icon called All Apps. Click on it and it will take you to a page containing all the apps you have installed. You must see . Click on it and start using the application.
Step 4: StalkerTV for Mac OS
Hello. Mac user! The steps to use StalkerTV for Mac are exactly the same as for Windows OS above. All you need to do is install Nox Application Emulator or Bluestack on your Macintosh. You can get it here.
Thanks for reading this tutorial. Have a good day!
In this article I will tell you how to install an IPTV set-top box emulator and configure the Stalker portal.
After this, you will be able to watch thousands of channels and movies for free without constantly changing the link to the IPTV playlist.
▍Installation
Infomir has some documentation and an image of VirtualBox
| To install Stalker you will have to install more than 200 packages on your OS. I recommend selecting a separate virtual machine or installing it in a Docker container, otherwise conflicts may arise with other web services. |
VirtualBox image
Launching a VirtualBox image is not difficult, but I’ll briefly describe how it’s done:
- Install VirtualBox. Website: www.virtualbox.org
- Download and unpack the zip archive with the image. Current link on the page: https://wiki.mir.eu/doku.php/stalker:start
- Launch VirtualBox, “Machine” menu, click “Add” (Ctrl+A) and select the file VmVirtualBox_Ubuntu14.04.4.x64_MW.Stalker.Demo
- We launch the virtual machine, log in (test/test), look at the machine’s IP address and open the administrative interface in the browser.
- In the “Storage” admin interface, change the IP address of the storage to the IP of the virtual machine interface
▍Docker container
Let's install Stalker in a Docker container. It's fast and convenient. If you don’t know what Docker is and have never worked with it, read the article habrahabr.ru/post/310460. It will give a complete picture of how containers work. But now this knowledge is not needed.
The developers strongly recommend using Ubuntu Server LTS, while 16.04 is not supported yet, and 12.04 is no longer used by many people. Docker will allow you to run Stalker on your favorite distribution.
To continue, we need Docker itself and Docker-compose. Installation example for most distributions:
curl -sSL https://get.docker.com/ | sh curl -L https://github.com/docker/compose/releases/download/1.8.0/docker-compose-`uname -s`-`uname -m` > /usr/local/bin/docker-compose && chmod +x /usr/local/bin/docker-compose
Let's create a working folder in which Stalker will live and download the docker-compose file:
mkdir /opt/stalker && wget -O /opt/stalker/docker-compose.yml https://gist.githubusercontent.com/klyushkov/3cc71f3fe3ea27a44c4a6985a1504d4a/raw/c38c746369e4b5238db23ef83ccf5592dc53a63a/stal ker-docker-compose.yml
Launch Stalker:
cd /opt/stalker && docker-compose up -d
We launch the utility, which will download the latest version of Stalker and fill in the database for us:
docker exec -it stalker_portal_1 /opt/deploy.sh
We are waiting for the script to be executed. It takes me about 4 minutes (what happens there during this time?). Done, the Stalker admin panel is available at:
https://ip/stalker_portal/
Log in using the standard login/password: admin/1.
Once again, all together to show how simple everything is, literally 3 commands:
mkdir /opt/stalker && wget -O /opt/stalker/docker-compose.yml https://gist.githubusercontent.com/klyushkov/3cc71f3fe3ea27a44c4a6985a1504d4a/raw/c38c746369e4b5238db23ef83ccf5592dc53a63a/stal ker-docker-compose.yml cd /opt/stalker && docker-compose up -d docker exec -it stalker_portal_1 /opt/deploy.sh
Video “Installing Stalker Middleware in 2 minutes”:
▍Installation without virtualization and containers
You can install it the old fashioned way, just install the necessary packages and edit a few files manually. This method is the longest and most labor-intensive, but is perfect if you are going to run the server in Production.
If you already have a server with nginx+apache2+php5, then you are in luck; Stalker will probably start without installing additional packages. But, as far as I know, nginx+apache2 are rarely used together; nginx+php-fpm is much more convenient.
Instructions from the developer: wiki.mir.eu/doku.php/stalker:install_and_configure
IPTV set-top box emulator: download and setup
An IPTV set-top box emulator is an application that emulates (copies) the functions and interface of IPTV set-top boxes on other devices, for example, Android phones.
We will look at the most popular IPTV set-top box emulator of the same name. The application has been actively developing since 2015 and has more than 500,000 active users.
The program is free and has unobtrusive advertising. The interface is extremely simple and will be clear after just a few minutes of use.
Emulator page on Google Play Market
Download IPTV set-top box emulator:
Installation is the most common, as in other applications on Android. Everything is set up and working perfectly, except for the Stalker portal we need.
Therefore, we move on to the next stage.
Stalker IPTV portal: installation, registration and configuration
Stalker portal is a collection of hundreds or thousands of IPTV broadcasts collected in one link: TV channels, films, music and videos. It is usually grouped by topic and supports EPG (TV program).
Setting up the Stalker portal takes no more than a few minutes. The main difficulty is to find a stable and free portal. I have listed the best of them below.
1. When you launch it for the first time, a window will appear with short instructions on how to control the emulator. This can be done either through touch input or through a regular television remote control.
Click on Configure application to open the settings.
2. If you accidentally skipped the initial setting, the following picture will be installed in the background.
3. To enter the settings from the main page, you need to move your mouse and click on the icon with three dots in the upper right corner. (For the remote control - hold down the Menu or OK key).
4. On the panel that opens, click on Settings.
The settings are extensive, and the application can be further customized. But since everything works without this, we immediately move on to setting up the Stalker portal.
5. Click on the Profiles section.
6. You can add a new profile or change the old one. I chose the second option.
7. Open Portal Settings. You can also change the profile name for convenience.
8. First of all, change the language. Click on this section.
9. Change en to ru and confirm editing.
10. The main thing is to establish the address of a good Stalker portal. Below I have indicated the most reliable of them.
11. Exit settings and open the menu on the main page. Reboot the emulator.
12. The next time you boot, the Stalker portal that we just installed opens.
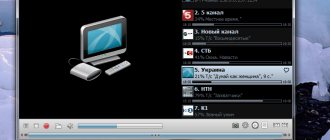
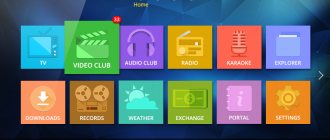
13. The Stalker portal shows exchange rates (for Ukraine - hryvnia, for Russia - ruble), weather, TV channels by topic, films and videos.
It is also possible to run ForkPlayer, OttPlayer, YouTube and Oll.tv.
TV channels are sorted by topic and country. Preview and adding to favorites is available.
Films are divided into categories and by year. All new products for 2020 are available in good quality.
Additional applications are launched from the main page.
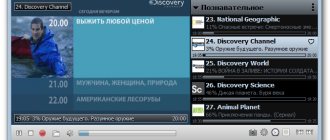
Example of ForkPlayer working
ForkPlayer has the same functionality as on regular devices.
Stalker Middleware: a comprehensive solution for IPTV/OTT market participants
The modern content market is developing under the influence of various factors, and some of them can become a threat to its participants. On the one hand, new companies face high barriers to entry into the market, and existing operators are constantly competing to see who will offer services cheaper and who will provide more services. On the other hand, OTT services are exerting pressure. Thirdly, there is an incredible boom in the development of mobile technologies. This fact makes user experience especially relevant.
How can we turn these threats into opportunities?
The experience of Novitrade specialists has shown that the Stalker Middleware platform, which is used in conjunction with MAG set-top boxes, offers effective solutions in response to market threats.
Stalker Middleware is the most popular software in Ukraine for organizing IPTV and OTT projects. Free Stalker Middleware software allows you to quickly launch a project without large capital investments. And when the project grows, you can painlessly switch to any advanced software with which MAG consoles are integrated.
With Stalker Middleware you don't limit your services to IPTV channels. This software will also allow you to provide Video-on-Demand, Music-on-Demand, Online Radio, Karaoke.
Help from professionals in creating your IPTV/OTT project
You can set up a project based on Stalker Middleware in a few hours. Qualified Novitrade employees, technical documentation and support service of Infomir, the company that develops this software, will help you with this.
As already mentioned, Stalker Middleware is absolutely free software. Anyone can start using Stalker Middleware without functional limitations or the need to purchase an extended version. After two weeks or a month (as is usually the case), you will not be disturbed by a pop-up window with a message that the introductory test period has ended - do not expect a catch, the software is truly free.
Current functionality that your subscribers are waiting for
Stalker Middleware is an open platform, which means you can develop and adapt its functionality to suit your needs yourself.
The product architecture uses a component approach, which makes the product very flexible. You can replace “native” components with those that you created yourself or with components from other developers.
Some Stalker Middleware features can serve as an additional source of profit and loyalty for your customers. Among them:
Multiscreen application for Android
Subscribers will be able to watch your content on the screens of smartphones and tablets. By doing this, you will create additional convenience for them and can even monetize by charging for access to content from mobile devices.
OTT applications
Stalker Middleware is integrated with most popular OTT applications, allowing you to make them part of your services. By creating personal agreements with services, you will receive another source of profit, and the service itself will receive new subscribers.
User experience on par with mobile devices
Stalker Middleware developers are constantly working on the stability and performance of the software. By introducing Picture in Picture and Task Manager technologies, they make the Stalker Middleware interface clearer and “smarter,” which is what users who are accustomed to multitasking mobile devices need.
Thus, Stalker Middleware is free software that can solve the main problems of participants in the interactive TV market.
For companies just starting out, it provides maximum support and minimum costs. For experienced players - opportunities for independent development, differentiation and additional income through the sale of premium functions. Stalker Middleware also increases subscriber loyalty through continuous improvement of user experience.
To verify all of the above, you can contact Novitrade, where they will provide you with a test sample of the MAG set-top box on Stalker Middleware. You will be able to explore the administrator and user interface, familiarize yourself with the settings and try out all the described functions and benefits.
Working Stalker portals for IPTV (2021)
List of stable free Stalker portals for IPTV. Each portal has its own list of channels, movies and applications. In addition, sometimes they are no longer supported by developers.
Update. In 2021, many free portals stopped working: some became paid, others closed completely. I monitor forums and collect working sources. Share in the comments with other users if you know a stable service.
The best free Stalker portals:
▍Why Stalker?
First of all, Stalker is interesting because it is free. True, it’s free, without trial periods and functionality limitations. The source code can be downloaded on GitHub.
This is a very important advantage of Stalker over solutions from other manufacturers. I have been working in the IPTV industry for many years and do not know of any other free solutions. I asked my colleagues and even the developers of Infomir, they don’t know either. Write in the comments if you know other free solutions.
Not every operator is ready to invest money in purchasing Middleware, because it is not immediately clear why it is needed at all. Satellite receivers receive TV channels, a CAS system protects content, set-top boxes show video, billing counts money. What does Middleware do? Does it show the channel list and weather?
Of course not, but this is already enough to get interested in the free solution and install Stalker on a test server to get to know each other better.