We take a non-working iptv playlist and select the necessary data from it
And so about everything in order.
The first thing we need is a non-working iptv playlist. It looks like this: #EXTM3U #EXTINF:-1, RBK https://37.192.0.182:81/udp/239.1.1.2:1234 #EXTINF:-1, WORLD https://37.192.0.182:81/udp/ 239.1.1.3:1234 #EXTINF:-1, Rain https://37.192.0.182:81/udp/239.1.1.6:1234 #EXTINF:-1, LifeNews https://37.192.0.182:81/udp/239.1. 1.7:1234 #EXTINF:-1, Strana https://37.192.0.182:81/udp/239.1.1.9:1234 #EXTINF:-1, 2×2 https://37.192.0.182:81/udp/239.1. 2.1:1234 #EXTINF:-1, WBC https://37.192.0.182:81/udp/239.1.2.2:1234 #EXTINF:-1, Your Success https://37.192.0.182:81/udp/239.1.2.3 :1234
In the non-working iptv m3u playlist, we find the ip address of the server that broadcasts ip television to the internet. This address must be after https://
In our case it is: 37.192.0.182
#EXTM3U #EXTINF:-1, RBK https:// 37.192.0.182 :81/udp/239.1.1.2:1234
Introduction and lesson on using the site www.ripe.net
You need to copy the ip address with iptv broadcast. You need to insert the search string on the website www.ripe.net, to do this follow the link https://apps.db.ripe.net/search/query.html#resultsAnchor.
Here you have inserted the IP. Next, click the “Search” button. After a few seconds, the search result will appear. It will be something like this:
We get information about what kind of Internet provider broadcasts IPTV, where it is located, who it belongs to, and a lot of other useful information. But from this list you only need the top line that begins - “inetnum:”. From this line we copy the range of IP addresses belonging to this Internet company: 37.192.0.0 - 37.192.7.255
Preparing all the necessary elements to restore an iptv playlist
In this article we will tell you how to easily restore a non-working playlist. To do this, we take a non-working iptv playlist:
In addition to the non-working playlist, I will need the playlistfinder program.
And so we begin to restore the playlist. To do this, run playlistfinder.app.exe.
This is what the playlistfinder program interface looks like.
At the very top line “Playlist(Original)” there is a button with an ellipsis.
Using it, we select a non-working iptv playlist and open it.
Only a few seconds pass. And this is what playlistfinder looks like with a loaded non-working playlist. What else do we see on the screen:
- “$ Donate $” (donate) - help the author of the program;
- "DDNS" - dynamic DNS;
- “Country” is the country in which iptv broadcasting takes place;
- “Network” - the network of the Internet provider that broadcasts channels from this playlist;
- “Ranges” - ranges of IP addresses in which the search for a valid IP television broadcast will take place;
- “Ports” - ports that will be checked for openness of iptv broadcasting;
- “Connections” - connections, the number of simultaneously polled IP addresses (to reduce search time, we recommend increasing the value from 400 to 1400).
Download, install and configure Advanced Port Scanner.
And so you downloaded the installer for the Advanced Port Scanner program. Let's install it.
Make a couple of clicks on the installer. You will be presented with a choice of program interface language. Russian is the default language and click the “Ok” button.
Welcome to the Advanced Port Scanner Installation Wizard. Now you can make a choice which version of Advanced Port Scanner you need. If you click next, Advanced Port Scanner will be installed on drive C in Program Files. But you don’t have to install it by selecting the “Run” line.
And also if you select “Advanced settings” you can create a portable version of the program. It can be installed, for example, on a USB flash drive and Advanced Port Scanner can be launched on any other computer without installing it.
You click the “Next” button, thereby setting the Advanced Port Scanner program to “Default”. Agree to the license agreement and click the “Install” button
And the user interface of the program appears in front of you. It looks like this. The main thing you will use is
- Scan button
- String with the range of scanned IP addresses
- String with the range of scanned Ports
Setting up Advanced Port Scanner. For myself, I made the following settings for the program for scanning ports. These settings are made to reduce the time it takes to search for open ports. I look in the second line from the top for “Settings” and select “Options” from the drop-down menu.
A new window appears in front of me. In the left column I select "Performance". A “Scanning speed” slider appears on the right side. I move the slider to the maximum to the right and click the “OK” button. This means that the program will be configured for the maximum port scanning speed. (To do this, you need at least a dual-core computer with two gigabytes of RAM, as well as Internet access of at least 2 Mbit/s)
There is another important item in the program settings - “Resources”. Actually, what we will be looking for is configured in it. I leave checkboxes only next to c:
HTTP - used to transfer arbitrary data (source https://ru.wikipedia.org/wiki/HTTP)
HTTPS is an extension of the HTTP protocol that supports encryption (source https://ru.wikipedia.org/wiki/HTTPS)
FTP is a standard protocol designed for transferring files over TCP networks (source https://ru.wikipedia.org/wiki/FTP)
After these steps, Advanced Port Scanner is configured and ready to use. It will look for IP addresses with open ports through which IP television is broadcast.
Scanning ports using Advanced Port Scanner
Launch Advanced Port Scanner. Paste the range of IP addresses you found 37.192.0.0 - 37.192.7.255 into the line under the “Scan” button. And also in the line immediately following the line “Range of IP addresses” we insert the port that we will search for. In our case it is: 81
#EXTM3U #EXTINF:-1, RBK https://37.192.0.182: 81 /udp/239.1.1.2:1234
After entering the initial data, such as the range of IP addresses and port number, click the “Scan” button. Once again, our range of IP addresses is 37.192.0.0 - 37.192.7.255 and port 81.
When the number of scanned IPs exceeds 20 thousand, it is better to divide the scanning into several stages. Moreover, each stage should include up to 20 thousand IPs.
After scanning which took 5 minutes. We get this result. In it we will need an IP with open port 81.
In our case, the port scanner found 6 IP addresses with open port 81. Now we need to substitute the found addresses into a non-working playlist. This is quite easy to do. Open a non-working playlist using standard Windows notepad. Press the key combination “Ctrl+H” to open the “Replace” window. Insert the existing IP of the non-working sheet into the top line, and one of the found IPs into the bottom line. Then click the “Replace All” button.
Save the changes and close the IPTV playlist. We check its operation using the VLC media player program.
Not all of the found IP addresses will revive a broken IPTV playlist. It happens that not one of the IP addresses will revive the playlist, and it happens that several or all of the found IPs will revive the idle IPTV playlist. It may also happen that the Advanced Port Scanner program will not find any open ports.
Finally, I want to say: “He who seeks will always find.” I wish you success in reviving your favorite iptv playlists.
The Playlist Finder application helps you quickly and easily restore a broken IPTV playlist. To restore, you need old M3U links, the Playlist Finder program itself, as well as the IPTV Checker application, which will find broken links for you.
Restoring a non-working playlist using the playlistfinder program
After the iptv playlist is loaded, we launch the “Start search” search.
And the program begins to search... Finding a working playlist can take quite a lot of time - up to half an hour. Playlistfinder can do it in 5 minutes, it all depends on the playlist that needs to be restored.
After about 20 minutes the result appeared. The result is a table.
Checking IPTV playlists for serviceability
The Playlist Finder application will help restore broken links. It is extremely simple and clear, but at the same time it has quite a lot of features that will be enough for most users.
For an initial check of the functionality of the playlist, you will need the free IPTV Checker 2.5 application - a powerful tool that helps identify m3u links that have already failed. He will help you do this in a couple of minutes. It can also sort links. Without the app, this would take more than an hour. Among the application's features:
- checking .m3u, .m3u8 files and txt playlists on PC;
- sorting working or non-working sources and saving them in an up-to-date playlist;
- renaming, deleting or playing a channel in VLC directly from IPTV Checker.
The program weight is only a few megabytes. There is only one relative drawback - it is impossible to download the program in Russian and there is no localization for it either. The interface exists exclusively in English.
- Download IPTV Checker version 2.5 from the official website - https://absidev.com/2020/06/02/iptv-checker-update-version-2-5/
- After downloading the archive, unpack it. If everything went well, a folder will appear as in the picture.
Explanation of the menu interface:
How to check?
You can check the playlist as follows:
- Add a playlist file using the “Open M3u8” button.
- After the file has been completely downloaded, start the check by clicking on the “Check” button.
- Wait until the scan is completed. With a playlist of 150-200 links, it takes about 20 seconds (the time it takes to complete the check depends on the quality of the Internet used). In this example, 5 channels out of 211 failed.
- Save non-working sources to a current playlist. To do this, change the channel sorting from All to Offline and then click “Save”.
- Save the file in the location you need.
If you want to change the extension to .m3u, change the name of the created playlist (remove the number “8” from “M3u8” and the file extension will change automatically).
There is an alternative way to find broken links. More about him in this video:
Playlist recovery process using Playlist Finder
After installing the program, you need to prepare all the necessary elements: run playlistfinder.app.exe and take the broken playlist.
To restore a playlist:
- Unpack the archive and open playlistfinder.app.exe
- In the right corner of the “Playlist (Original)” line, click on the ellipsis.
- Select a non-working playlist and click “Open”, or simply double-click on it.
- Wait for the download, it takes a few seconds. This is what Playlist Finder looks like with a non-functional playlist loaded.
- Select the “Start search” button, after which the search will begin.
- Wait for it to finish. The search may take from 5 minutes to 30 minutes. This depends on the playlist you want to resurrect.
Playlist Finder 1.18: where to download and how to use
The Playlist Finder application will help us restore failed broadcasts. It is simple and easy, but in English.
You can download Playlist Finder version 1.18 from our server. There are no viruses, I guarantee. ?
1. Unzip the archive and open playlistfinder.app.exe
2. Click on the 3 dot button as shown in the picture. In the window that opens, select the desired playlist.
3. Increase Connections to 1000-1400 to speed up the search for new links. Leave it at 400 - nothing bad will happen, it will just be slower. Then click on the Start search button.
The search time depends on the Internet speed and the number of sources.
4. Select any line with the inscription udpxy in the Info section (the larger the number in brackets, the better). Save the file by clicking Save as.
- HOW TO: M3U File (What is it and How to Open It) - 2021
5. Now we have a new playlist! Compare the addresses with those that were at the beginning - they have automatically changed.
6. Check the channels in the player. If it doesn't work, go back to step 4 and use a different result.
Be careful! The program works correctly only with UDP links. M3U is not currently supported.
Articles about creating your own IPTV playlist:
1. How to find m3u8 links?
2. How to fill out an m3u file correctly?
3. How to add a TV guide to IPTV?
4. How to check if a playlist is working?
Processing the results of the Playlist Finder application
The final result of the application is presented in the form of a table. For data processing:
- Select the line where “udpxy” is listed in the “Info” column.
- Save the playlist by clicking on “Save as...”.
- After saving, check the playlist for serviceability by opening it in VLC media player. Open and turn on randomly 2-3 channels for testing. If they play fine, then all other channels in the playlist should work as well.
- If the channels are still faulty, then return to step 1. Select the line with “udpxy” again, save and check.
It often happens that the program finds several working playlists at once, and in order not to manually save each of them, there is a “Multiple actions” function. At this point, select “Selected Ips” and click “Save...”:
There is also a video instruction on how to use Playlist Finder:
Installing a playlist for IPTV on TV
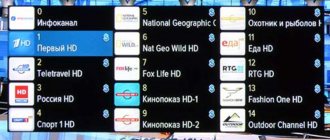
For those who like to watch TV channels traditionally, using a TV for this purpose, there are also special applications that allow you to install channel collections and enjoy the benefits of interactive television. Thus, if you have a device that supports Smart TV and you have entered into an agreement with the operator to connect to the service, all that remains is to install the necessary utility, where you then download the selection. All models of smart TVs have their own nuances in this regard, for example, you can download the software directly to the device or download it first to your computer, and then transfer it using a flash drive; the TV menu for different devices can also differ and sometimes dramatically, but the principle of operation is still similar .
https://www.youtube.com/watch?v=LCdS4NnUZMM
In addition to downloading and installing the program on your device, in order to watch IPTV on your TV, you also need to install a playlist. We will analyze this point in more detail using the example of the Simple Smart IPTV application, which offers the ability to install internal playlists from the software developer’s website, and external ones from other sources. At the same time, external IPTV lists can be edited, sent to other users and disposed of at your own discretion. Custom playlists will be saved in the “Settings” section (gear icon) and presented in the form of tiles, when you click on them you will be able to see a selection of TV channels.
So, the TV is connected to the network using a LAN connection or via Wi-fi, the SS IPTV software has been downloaded from the application store (in the smart menu of the TV receiver) and installed on the device. Now you can start integrating the collection into the program:
- Open SS IPTV and go to the “Content” menu section to download external playlists, open the “External” subsection, click “Add”, assign a name to the collection and indicate its address, and save.
- To download the internal playlist, go to “Settings”, open the “General” subsection and click the “Get code” button, after which a one-time password will be generated, you will need to enter it when downloading (the code is valid for a day from the moment of receipt, then a repeated request is possible). Next, you need to go to the SS IPTV website in the “Playlist Editor” section, enter the code in the appropriate form and click “Add device. Then we open and save the document, as a result of which a tile called “My Playlist” will appear in the “Settings” section.
In addition to the software discussed, there are other applications for watching interactive TV on a TV, for example Peers.TV, Vintera.TV or ForkPlayer. The settings for these programs are similar, although they differ in some respects.
Downloading an IPTV playlist for TV
Possible problems with Playlist Finder and their solutions
One of the common problems is an error message when opening a broken playlist. In order for everything to work, you need to delete EPGs and categories in the playlist. The problem may also be in the page addresses - you need to check whether they are written in the correct format.
There is a problem starting the program. The error appears: “The entry point for the nextafterf procedure was not found in the DLL.” Solution: you need to download the file requested by the system from the Internet and place it in the C:\Windows\System32 folder.
Playlist Finder is intuitive to use, free, and helps you quickly recover a broken IPTV playlist. Follow the instructions carefully and use this app to revive your broken playlists.
Step-by-step instructions for restoring a non-working iptv playlist using the Advanced Port Scanner program
Playlists, their types
In total, there are two types of channel playlists:
- Those that require periodic updates and new downloads.
- Those that can update themselves.
Either of the two types works reliably and can be used by you to watch television. All channels are working, and you don’t have to worry about the fact that m3u playlist player will be able to see and play them without problems. The versions of playlists that are posted on the site usually have all the latest data, and you do not need to worry about their performance.
However, by being in constant contact with us, you will learn that these playlists usually change when the attributes or channel list changes. In such a situation, you need to download a new version and run it in the same way as the previous one.
This format of work has existed for a long time, and everyone is accustomed to it. For many people, the address of the playlist page is in their favorites in order to constantly monitor new versions. After they are released, they need to be downloaded, moved to a removable drive and connected to the device, or opened directly through the m3u playlist player. Of course, this is not a complicated procedure, and it is quite easy to perform by anyone with any level of training.
But it would be much more convenient if the playlist updated itself, and it was not difficult to download it again and open it with the program. This would save you time and effort. In fact, this solution is not as far from reality as it might seem.
Recovering iptv playlists
- Playlist type
- Using Ripe Net
- Scan IP
- Port scanning
- Setting up Advanced port scanner
Good day, today we will talk about restoring non-working iptv playlists using the Advanced Port Scanner program (a fast and free port scanning program) and the website www.ripe.net (a database of IP addresses).
Restoring a non-working playlist
And so about everything in order. The first thing we need is a non-working iptv playlist.
Playlist type:
#EXTM3U #EXTINF:-1, RBK https://37.192.0.182:81/udp/239.1.1.2:1234 #EXTINF:-1, WORLD https://37.192.0.182:81/udp/239.1.1.3:1234 #EXTINF:-1, Rain https://37.192.0.182:81/udp/239.1.1.6:1234 #EXTINF:-1, LifeNews https://37.192.0.182:81/udp/239.1.1.7:1234 #EXTINF :-1, Strana https://37.192.0.182:81/udp/239.1.1.9:1234 #EXTINF:-1, 2×2 https://37.192.0.182:81/udp/239.1.2.1:1234 #EXTINF :-1, WBC https://37.192.0.182:81/udp/239.1.2.2:1234 #EXTINF:-1, Your Success https://37.192.0.182:81/udp/239.1.2.3:1234
In the non-working iptv m3u playlist we find the IP address of the server that broadcasts iptv to the Internet.
This address should be after https:// In our case it is: 37.192.0.182
The complete line looks like this:
#EXTM3U #EXTINF:-1, RBK https://37.192.0.182:81/udp/239.1.1.2:1234
Using ripe.net
We take a non-working IP, in our case it is “37.192.0.182”.
You need to insert the search string on the website www.ripe.net, to do this follow the link https://apps.db.ripe.net/search/query.html#resultsAnchor.
After you have entered the IP in the search field, click the “Search” button. After a few seconds, the search result will appear. It will look something like this:
In the information received, we see all the necessary information about the IP we are interested in: provider name, registration date, technical contact, etc. but we only need the top line that starts with “inetnum:”.
From this line we copy the range of IP addresses belonging to this Internet company, in our case it is: 37.192.0.0 - 37.192.7.255
Next, we need to scan this range of IP addresses for open ports. In this we will use the advanced port scanner program
Scanning IP addresses using Advanced Port Scanner
After starting the program, the user interface appears in front of you.
The main elements that you will use are the field for entering IP addresses, the field for entering ports and the scan button. These elements are marked in the screenshot.
Setting up Advanced Port Scanner
To reduce the time it takes to search for open ports, it is recommended to select “Options...” in the “Settings” tab.
In the left column you need to select "Performance". On the right side we see the “Scanning speed” slider.
Move the slider to the maximum to the right and click the “OK” button. This means that the program will be configured for the maximum port scanning speed. To do this, you need at least a dual-core computer with two gigabytes of RAM, as well as Internet access of at least 2 Mbit/s.
Now go to the “Resources” tab. Here we configure what we will look for. Check the boxes next to: HTTP, HTTPS, FTP.
After all these steps, Advanced Port Scanner is configured and ready to work. It will look for IP addresses with open ports through which IP television is broadcast.
Scanning ports using Advanced Port Scanner
Launch Advanced Port Scanner. Paste the range of IP addresses you found 37.192.0.0 - 37.192.7.255 into the line under the “Scan” button.
And also in the line immediately following the line “Range of IP addresses” we insert the port that we will search for. In our case it is: 81
#EXTM3U #EXTINF:-1, RBK https://37.192.0.182:81/udp/239.1.1.2:1234
After entering the range of IP addresses and port number, click the “Scan” button.
If the number of scanned IPs exceeds 20,000, it is better to divide the scanning into several stages. Moreover, each stage should include up to 20 thousand IPs.
After scanning we got this result. In it we will need an IP with open port 81.
We see that the port scanner found 6 IP addresses with open port 81. Now we need to substitute the found addresses into the non-working playlist.
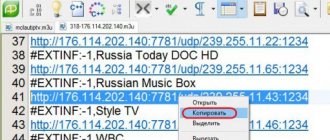
This is quite easy to do. Open a non-working playlist using standard Windows notepad. Press the key combination “Ctrl+H” to open the “Replace” window.
Insert the existing IP of the non-working sheet into the top line, and one of the found IPs into the bottom line. Then click the “Replace All” button.
Save the changes and close the IPTV playlist. We check its operation using the VLC media player program or analogues.
Not all of the found IP addresses will revive a broken IPTV playlist. It happens that not one of the IP addresses will make the playlist work. It may also happen that the Advanced Port Scanner program will not find any open ports. But as an alternative, you can buy a paid iptv playlist starting from $1.
Digital television in 2021 is not only an updated format of broadcasting through outdoor indoor antennas, but also cable, satellite and Internet broadcasts. The latter are especially popular, since the channels here are not encrypted, which means that additional equipment is not required to recognize the signal. It is enough to have a stable and high speed connection to the network to enjoy high quality television. There are several options for watching IPTV, one of them is using IPTV scanners. What it is and how it works is described below.
How to restore iptv playlist
- We take a non-working iptv playlist and select the necessary data from it
- Introduction and lesson on using the site www.ripe.net
- Downloading, installing and configuring Advanced Port Scanner
- Scanning ports with Advanced Port Scanner
- Restoring a non-working iptv playlist
Hello dear readers! In this article I will tell you: how to restore an iptv playlist using the Advanced Port Scanner program (a fast and free port scanning program) and the website www.ripe.net (a huge database of IP addresses)
What is IPTV
IPTV is digital television, which requires the Internet and a device to display images to view. These can be PCs and laptops, smart TVs or regular TVs with an Android TV set-top box, and mobile gadgets. The advantage of Internet television is that there is no need to buy an antenna and receiver. All you need to do is connect to the network, find the source of IPTV channels and install the application to watch.
The latter are divided into two types:
Important! One of the key features of IPTV is the ability to watch it for free. There are also paid options, but, as practice shows, many channels can be watched without paying for subscriptions, and the quality is no worse than that of other types of digital TV.
IPTV slows down on the set-top box
We looked at the reasons why IPTV on a computer slows down. But what if the problem also occurs on the TV? This is influenced by various factors:
- Check if all channels are slow. Maybe only certain people lag? Then the reason is hidden in the playlist itself. Change the link and check if it works.
- Make sure the problem is not with the router. Reboot it.
- Use another player, because perhaps yours has a malfunction, or it is simply incompatible with the set-top box you are using.
- The cache is clogged. Needs cleaning.
- Reboot your device.
How to update software on a Philips Smart TV via USB flash drive, Internet and Wi-Fi
Download and install IPTV player
Before you start talking about searching for channels, you should download a player that can show them. Otherwise, this whole procedure will not make sense. The application in question is located at https://borpas.info/iptvplayer. This is the official website, so there are no unnecessary advertisements, viruses and other garbage that you wouldn’t want to let near your Smart TV.
By the way, you can download it not only on your TV, but also on your computer if you have problems with the Internet and you are afraid that the TV will simply freeze during the download process. Then you can first “drop” the file onto your computer, and then use a formatted flash drive to transfer it to the TV and install it on it. It's much more convenient. Next, install the player itself. This procedure looks like this:
- After downloading the installer for the IPTV player “IpTvPlayer-setup” Ustanovshchik IPTV Player, you need to run it. It's simple, because the program gives good instructions on how to efficiently, quickly and conveniently complete the installation process/
- The user will see the so-called “IPTV Player Installation Wizard”. For it to work according to the rules, the user should check the box next to the line “Select settings and installation folder.” This will open several useful functions at once, which are:
- In choosing the immediate location where the IPTV player will be installed;
- In creating a shortcut on the screen;
- Granting permission to all users to use the device.
Watching how the playlist is installed in IPTV on the TV, you will notice that the panel has a sub-item “UDP-to-HTTP Proxy”. You should check the box next to it, which will allow you to transfer files over the local network.
- Once done, the parameters will be automatically configured. If you do not need this, then when the “Settings” menu opens, you should remove the check mark next to all items that are in doubt, and leave them opposite those that are needed;
- You will additionally be offered to download a special set of programs to improve your Internet experience. If they are not needed, then do not click confirm;
- If everything suits you, then click “Install”.
A couple of seconds and the program is already at your complete disposal. But before you act, deal with the “Completing the IPTV Player Installation Wizard” window. Now you can definitely start searching for channels.
Purpose of the scanner
It was mentioned above that there are two types of IPTV applications. The first is players. They work with ready-made m3u playlists. The second type is IPTV sheet scanners. Their difference lies in the fact that they search for IPTV addresses with channel broadcasts, save them and then play them. The scanner works with a stream of information, that is, online it finds and saves the channel. Over time, the IP address may be blocked and broadcasting will stop. The scanner allows you to delete saved non-working addresses, conduct a new search for IPTV sources and save them again.
Important! The convenience of the scanner is that the user receives only working links. If you look for ready-made playlists, they may be irrelevant, but you cannot find out about this in advance - only after loading it into the player.
IPTV playlist structure
- #EXTM3U—IPTV playlist title
- #EXTINF—extended information about the IPTV playlist media file
- https://—global or local link to the media file
Let's look at the structure of the most frequently encountered iptv playlist, it is shown in the figure below:
The IPTV playlist begins with the following symbols #EXTM3U - this is a kind of title, from which the format of the playlist becomes clear. #EXTM3U - means that the playlist format is M3U. M3U file is a text document with Latin-1 encoding. Latin-1 is an encoding designed for Western European languages. In this regard, if the Cyrillic alphabet is present in the design of the playlist, there will be the following problem: the letters will be displayed in unreadable hieroglyphs. Channels named in Latin letters such as RUTV, MUSIC BOX RU, VH1 Classic, MCM Top in the IPTV and VLC player will be displayed correctly.
Channels signed in Cyrillic: 365 days TV, NST, Amusement Park, 24 DOK will be reflected in an incomprehensible form.
How to fix strange characters in the structure of an IPTV playlist
In order to avoid the appearance of unknown characters in the playlist structure, use UTF-8 encoding. Using the UTF-8 encoding makes it possible to represent characters from almost all languages. The playlist will have readable captions.
Changing the encoding of an IPTV playlist to UTF-8
To change the encoding to UTF-8. Open an M3U playlist using standard Windows notepad. To do this, right-click on it, and then find the line “Open with”. The “Open with” line will open a submenu in which you select “Notepad”.
After this we see the already familiar IPTV playlist
Then in the top right corner, click file. In the drop-down menu, select the line “Save as...”
Next in the new window, at the bottom, in the “Encoding” section, select UTF-8. Then we change the name of the file, its location, or simply replace an existing one.
All encoding of the IPTV playlist has been changed, the playlist will have the proper appearance.
#EXTINF - extended information about the IPTV playlist media file
After the playlist title #EXTM3U there is a line #EXTINF, which contains information about the media files that will be played using this playlist.
- # is a symbol that means for the IPTV player to start reading data from this place.
- EXT - short for English. Extended which translates as “extended”.
- INF - short for English. Information which translates as “information”.
It turns out Extended information - Extended information. That is, #EXTINF means start reading information about the file being played from this place.
#EXTINF (Extended Information) must describe the two main parameters of the media file being played using the playlist.
The first parameter is the duration, in this case it is “-1” (-1 is used when the final length of the media file is unknown). The second parameter is the name of the file being played, respectively “365 days of TV”.
In addition to the duration and name of the media file, which are specified in #EXTINF, there are a number of additional parameters.
- Examples of such parameters:
- “tvg-name” - name of the channel and program
- “tvg-logo” - channel logo
“audio-track” - audio track of the channel (Russian, English, etc.)
“group-title” - name of the channel group (Children’s, Educational, etc.)
Structure of an iptv playlist with additional parameters:
https:// - global or local link to the media file
After #EXTINF comes https://5.128.252.68:81/udp/239.1.5.20:1234 which is essentially a link to the media file. This media file is played by the player for IPTV. It turns out that an IPTV playlist is a text document in M3U format, which contains information about the media file and a link to it. In an IPTV playlist, you can use links to media files, both local and global. Examples of links to media files for an IPTV playlist:
- https://5.128.252.68:81/udp/239.1.5.20:1234 link to a media file broadcast from a server to the Internet (similar to terrestrial television)
- https://www.ex.ua/get/70554998 link to a media file that is located on a hard drive on the Internet with shared access (similar to files on a personal computer, it’s just impossible to delete)
- F: 03/11/2014 from ContactDino Mc 47 - I am a citizen of P vksaved.ru.mp3 link to a media file that is located on your computer.
Decryption https://5.128.252.68:81/udp/239.1.5.20:1234
- https:// is a request to connect using the HTTP protocol from our computer to a server on the Internet.
- 5.128.252.68 — IPv4 address on the global network to which you want to connect “External “white” IP address.” External (public) IP addresses are used on the Internet. A public IP address is the IP address under which devices on the Internet see you, and it is unique throughout the Internet. A device with a public IP address can be accessed from anywhere on the global network.
- 81 - TCP port (TCP is the main transport layer protocol on the Internet)
- udp - data stream format without error checking and correction
- 239.1.5.20 —ip address of the data channel “Internal “gray” IP address.” Internal (private) IP addresses are not used on the Internet. Internal addresses include those used in local networks. Access to the internal IP address can only be obtained within the local subnet.
- 1234 - data channel port
Installing a channel list for IPTV on your computer
So, in order for interactive TV to be available on a computer or laptop, you need to download a player that supports the technology to the device. We will look at how to install a playlist using the example of popular applications - VLC Media Player and IP-TV Player (a VLC shell focused on watching IPTV). Downloading and installing the software is standard, as is the case with other programs on Windows, you just need to download the installer from the official website of the application, run it, and then the Installation Wizard will get involved. Installing a media player on a device is extremely simple and there is no point in describing the process in detail.
Installing a playlist in VLC Media Player
VLC is a multifunctional media player that supports all modern media formats, with a huge number of capabilities, including converting, video editing, creating web broadcasts, etc. You may already have it on your computer, but if not, we recommend installing the software. After installing the player, we find and download a suitable object in M3U format. Channel lists can be downloaded from an official source or open network resources; downloading is carried out as standard by clicking the corresponding button located next to the file.
Now let's look at how to connect a selection of TV channels:
- Launch VLC Media Player.
- In the “Media” menu, select “Open file” (or press Ctrl+O).
- We indicate the path to the object that should be opened, find it in the explorer that opens, select it, and click the “Open” button.
- VLC Media Player will start playing TV (provided that the links in the playlist are working). To view the list of channels, select “View” – Playlist from the menu (or press Ctrl + L), the desired option from the list can be selected by clicking on it.
An alternative way is to right-click on the playlist and select the “Open with” option from the context menu - VLC. You can also associate the program with this file type so that elements with this extension are always opened by it by checking the corresponding box.
Installing a playlist in IP-TV Player
Download the application installation file from the official website and install it in standard mode. When you launch IP-TV Player, you will be given the opportunity to choose to play TV broadcasts - using the provider or from a downloaded playlist.
To work with the built-in player lists, you need to click on the list to expand it and select the appropriate operator. On the right side of the media player you will see a list of available channels. Providers can block access to TV channels and also change the addresses of direct sources, but when you select the first option for working with IP-TV Player, the program will detect the changes that have occurred and download updates for this broadcast stream.
Adding new TV channels to the M3U playlist
To play an IPTV list in the player, perform the following steps:
- Click the settings icon on the bottom panel (in the form of a gear).
- ABOUT.
- In the “Channel list address” field, enter the current URL or, to insert an M3U playlist, look for it on the computer, to indicate the path, click the corresponding button on the right (“…”), and click the “Update” button in the form of a round arrow.
- Playback will start automatically, and a list of TV channels that you can navigate through will also be available in the player window.
The best scanners
The choice of scanners for searching for IPTV channels is not so extensive. You can find paid and free applications on the Internet, but even paid ones do not always cope with the task. Below is a list of the top best free scanners that have proven themselves positively.
PC-Player TVIP
An IPTV scanning application that can work with ready-made playlists. The application allows you to create and edit channel lists and has a time shift function. The scanner works on Windows, MacOS and Linux. Users note the light weight of the software, only 10 MB, and the clear interface.
IPTV by Hacker
Free utility for searching IPTV TV channels with additional functions. The application can scan ready-made playlists and remove irrelevant sources from them. The playlist generated in the application can be saved in different formats for use on different devices.
A cross-platform application with wide functionality, which also includes a sheet scanner. You can use VLC not only for IPTV, but also for watching videos from any source. The program understands all modern video codecs and has a huge range of functions for managing picture and sound. The unique feature of the player is its performance. It is written in such a way that it does not require hardware acceleration, which means it can work even on devices with weak technical parameters. The application works on Windows, MacOS, Android, iOS, Tyzen.
Important! The program is completely safe - there is no spyware in it, and no advertising or spam will appear on the device when installed.
Angry IP Scanner
This is an application for finding active IP addresses. The program is not initially designed to search for channels, but can perform this function - to do this, you must enter the IP address or range of addresses of a specific IPTV provider in the search bar. Inactive IPs will be filtered out - this means that broadcasting is not carried out from them, active ones will appear in the file. After this, you will need to check each active address to see if it contains a broadcast. The application is quite heavy for use by untrained users, but if the OS is old, then there are simply no other options. It makes sense to download it for versions of Windows XP, Vista.
How to use the scanner
Using the example of the popular IPTV scanner by Hacker, instructions for searching for channels are given. Before scanning and creating a playlist, you need to find at least one working IP link. To do this, you can find out the IP address of the local Internet television provider or find work playlists on the Internet and copy any work address from there.
After this, the sequence of actions for IPTV by Hacker looks like this.
- After starting the program, you should insert a working link into the “prefix” window.
In the “settings” item, you must specify the parameter “1” in the number of threads if the connection is slow. For faster networks it may be higher, but it is worth considering that some channels may be missed during the search. We save the entered adjustments.
After completing the above steps, the playlist is ready and can be inserted into any player to watch Internet channels.
The leading role in the field of digital television today is occupied by IPTV, a technology for transmitting signals over the Internet. It is gradually replacing digital, cable and satellite television, due to the growing popularity and availability of information from the network.
Using Simple TV
Using this method, you need to go through step-by-step instructions:
- Install a specific type of data transmission - Multicast Streams (if it is disabled, you need to connect this type of transmission on the router and reboot it for further use);
- Download and install the Simple TV program (for safe use, it will be better to download it from the official IPTV website);
- The first launch of the program and its step-by-step configuration (selecting the interface language, where to save changes; some versions of Simple TV provide the ability to download channels from an m3u file, in this case, click the “Cancel” button);
- We create a playlist in the form of an m3u file (you need to right-click, select “Playlist” in the window that appears, and then “Search for channels”);
- The “Search for channels” window will open, indicate the range of pre-selected channels (indicate the found TV channels with changes in the last digits from 0 to 255; it is also worth considering that this action will take a long time);
- We leave the ports in the “Channel Search” window as default (5050), set the timeout to 15-20 seconds and start the process (by clicking the “Scan” button);
- At this time, it is worth clearing the default playlist (right-click on it and select “Delete all”);
- Completing the scan (displaying four groups of channels: new, broken, present and MultiPiP channels);
- Mark the required channels, click the “Save” button;
- We upload the playlist to a separate file (right-click on the new playlist we created and select the “Upload channel list” function and the upload location, confirm the action).
After completing all these points, the user will be able to freely use his playlist of TV channels.
How to divide channels into groups in an IPTV playlist?
To create categories and lists in a playlist, do the following:
- Create a blank line between the channel name and address.
- Please indicate the category on this line. To do this, write: “#EXTGRP: subgroup name.”
- Repeat for all channels. You can copy the category line and paste it in the right places. It will be faster this way.
To create an m3u IPTV playlist, carefully following the instructions, you need no more than 15 minutes. See current playlists and take the necessary channels to your place. And thanks to the created categories and groups, browsing will become more convenient.