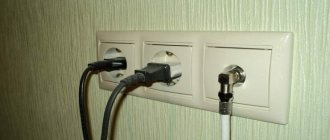
A modern family now has a couple of televisions, set-top boxes, DVD players, and computers. And not all of this abundance is ready to work without cables via Wi-Fi, and the signal strength with a bunch of devices will simply not be enough. Therefore, the good old cable and television outlet have a legal “registration” in an apartment or house.
If you are starting a renovation, then it’s time to think about hiding all the cables in the walls so that the apartment does not resemble the lair of a cybernetic spider.
Therefore, let's figure out what sockets are needed for a TV. How many of them to take, where to put them, what to pay attention to and how not to get confused in the tricky names.
Main types of TV sockets
Manufacturers divide TV antenna sockets into three types:
- single;
- terminal;
- checkpoints.
Single or simple TV socket
| TV socket single Legrand Etika | TV socket single Legrand Valena | TV socket simple Schneider Electric Glossa | TV socket simple Schneider Electric Unica |
A single or simple socket is always used independently and this is its main difference with a terminal TV socket. If salespeople in stores or a would-be repairman tell you that there is no difference, look for other specialists and a retail outlet. Because there is a difference, and it lies in the following. A single television socket provides attenuation of no more than 1.5 decibels of power, and the terminal one provides as much as 10 decibels. That is, to put it simply, if you “plug in” a terminal socket instead of a simple one when installing a single point, your TV will display poorly, with interference.
On a note! Therefore, remember, if you have 1 TV, 1 cable and 1 socket, then it is always a simple single one.
Looking ahead, let's say that in the connection diagram with a splitter (for several receivers) simple sockets are used.
Pass-through TV socket
| TV outlet Legrand Etika | TV outlet Legrand Valena | TV outlet Schneider Electric Glossa | TV outlet Schneider Electric Unica |
A pass-through television socket is essentially a tee. It has 1 input and 2 outputs, one of them is for connecting the cable from the TV, and the second is for connecting the cable to the next pass-through or terminal socket. These types of sockets are always installed together, one or more through and at the end - terminal.
Let’s say right away that we don’t recommend getting carried away with installing pass-through TV sockets. Each of them “cuts” the signal power stronger than the final one. So, with low power and without installing an amplifier, the last TVs in the chain will receive a very weak signal. Limit yourself to four pieces per bundle to avoid this situation.
Termination TV socket
| TV socket terminal Legrand Etika | TV socket terminal Legrand Valena | TV socket terminal Schneider Electric Sedna | TV socket terminal Schneider Electric Unica |
The terminal socket closes the chain of passages, this is its main function. But you can also install them on parallel assemblies.
The online store 220pro.ru offers a large selection of television sockets of all types
You can buy both products from leading European brands and Russian ones.
For connoisseurs of interesting design and for those who prefer a uniform style for all electrical installation products, TV sockets from popular series are suitable:
- Legrand: Valena, Etika, Celian, Galea Life;
- GIRA: SYSTEM 55, E 22, F100;
- Schneider Electric: Sedna, Glossa, Odace, Unica;
- IEK: Quart
Choose your series for exclusive equipment of your home TV network or a more affordable working option.
A little theory
The radio signal through which an image appears on the screen of a television receiver is of the same nature as household electricity. It is characterized by magnetic field strength, current strength and other parameters. It has a wave character to the same extent, but the frequency of changes in the direction of the current is thousands of times higher. For this reason, it cannot be transmitted through metal conductors made of aluminum or copper - the high-frequency magnetic field displaces the current onto the surface of the conductor, as a result of which its effective cross-section decreases and the electrical resistance increases. In radio engineering, this phenomenon is called the skin effect. For example: at a frequency of 50 Hz (household power supply), the thickness of the skin layer reaches 8.5 mm. And at a frequency of 50 MHz (the first television channel) it is equal to 0.001 mm.
From an antenna or other source, the radio signal is transmitted via a so-called coaxial cable. It consists of an outer metal braid, a polyethylene filler and a central copper core. The conductive layer in it is polyethylene, and the metal parts reflect the wave. The main parameter of a coaxial cable is the characteristic impedance, which characterizes the degree of signal attenuation. First of all, it depends on the diameter of the cable and the thickness of the polyethylene layer between the braid and the central core. Traditionally it is equal to 50 or 75 Ohms. However, unlike electrical resistance, a cable with a higher resistance value has less attenuation.
Both the radio signal source (antenna, router) and its receiver must be matched in impedance to the coaxial cable. If this condition is not met, then the wave will be reflected from the obstacle and go out - if you see any image on the screen, it will be with very large distortions.
Connection diagrams for TV sockets
We've sorted out the types of sockets for TV cables, now let's look at the diagrams.
There are 2 main circuits for connecting television cables and sockets - parallel, also known as “star”, and serial, also known as feed-through. Here, in fact, there are no discoveries of America, the same principles as when installing any electrical networks. Television - differs only in lower voltage and refers to a low current.
Connecting sockets for TV according to the “star” scheme
An apartment most often has one television cable input for connecting one TV receiver. But now few people have only one TV, 2-3, or even more. And they all need to be connected to the cable somehow. This can be done through a splitter or splitter.
| Splitter for 2 TVs | Splitter for 3 TV | Splitter for 4 TV |
The device has an input and several outputs. This scheme using a splitter is called “star”.
As you can see from the figure, there is also a signal amplifier in the circuit. Typically, the input TV cable supplies a set power, which is enough for 1-2 receivers. But if there are more TVs, and the neighbors are not far behind, the input value may not be enough. Alternatively, you can ask for additional power from the company that provides you with “television”. They usually have reserves for this. Or be puzzled by installing the amplifier as in the picture.
Single or terminal TV sockets are suitable for star connection. Because each TV will have its own cable going from the splitter.
One tip for choosing a type. If you plan to occupy all the sockets in a star circuit, both terminal and simple ones will do. If some remain unused, take the end ones so that there is no interference on TV screens. The point here is this. The termination socket has a "built-in" characteristic impedance of 75 ohms, like a line. And she doesn’t care if the cable is plugged into the TV. A single socket has not received “its” resistance for balance and borrows it from the TV. And when there is no connected receiver, the imbalance of the socket with the line is reflected on the screens of other TVs in the form of all sorts of image distortions.
Advantages of a “star” connection
- Convenient cable routing with fastening in the junction box. It’s good for installation and for checking, everything is collected at one point.
- A fault on one line does not destroy the entire system, because the lines are independent. If any incident with a cable or socket happens on one branch, the rest will work as if nothing had happened.
- The television signal loses a minimum of power, but with an amplifier it does not lose at all, but is supplemented with additional power.
As for the significant cable consumption with such a scheme, it depends on how the wiring is done. A good craftsman will “spread” the cable optimally and the difference from pulling one thread will be minimal.
Pass-through connection
The initial data is the same, one input and several TV installation points that need to be provided with TV signals. A pass-through serial circuit or “loop” is the laying of one cable with inserts of pass-through sockets. And installation as the last outlet - the terminal one.
Pass-through sockets are made like a tee, they have an input and 2 outputs, that is, the socket receives the signal and divides it into 2 branches. On one you can put the cable from the TV, and on the second the end of the cable to the next pass-through socket. And the cycle repeats. The last in this chain is the terminal TV socket, which closes the circuit. You don’t even have to plug a TV into it, but it should be there.
As already mentioned, it is undesirable to make such a circuit infinite; the signal power drops from point to point. And even with the installation of an amplifier, using the right cable and the right F-connectors, it can turn out that the latest TVs will show very poorly. Despite the built-in automatic signal amplification and adjustment system in the receivers.
Helpful advice! Before constructing any circuit, ask your provider how many TVs can be installed on the line for free. Because some service providers stipulate this, and exceeding the limit must be paid. And if you do it without permission, you will face a fine. There are such tricks, however. So ask away.
We've at least decided on the schemes, now let's talk about installation.
Connection using taps (TAP)
If you need to connect more than three TVs in one cable, then the diagram is below. We use terminal sockets and TAP.
Coupler (TAP) - This is a device that gives a small part of the signal to the tap, and passes the main signal minus the losses on the tap further.
You may be interested in: How to turn on the antenna power
The decision of which scheme to use is always yours. But in our opinion, star wiring is the most optimal. Of course, it has the disadvantage that it uses more cable than other schemes. But there are also advantages:
- Easy to upgrade; if desired, you can connect satellite TV;
- Lowest signal loss.
How to install a TV socket
Yes, just like any other, neatly and in its place.
Let's start with the height where to put it darling. Let’s say right away - drive away the advisers, lovers of European standards and their “15 centimeters from the floor.” Our task is to hide the tails of the power and antenna cables behind the TV so that it is beautiful and convenient. And according to the European standard, you will then have to hang the TV on the floor and watch from there.
Of course, there are also those who like to set up home cinemas, but there are far fewer of them than those whose TV hangs at a normal height.
Therefore, focus on the edges of the TV screen so that no sockets or cords stick out. And if, in addition to the TV set, other devices will be connected, install sockets in convenient accessibility. Or you will have to pretend to be a monkey, trying to reach the treasured food point.
Tips for choosing the right one
The following recommendations will tell you which GSM socket is best to choose for your needs.
To avoid mistakes, pay attention to the following:
Manufacturer. Buy a product from a better known and reputable brand. The most popular are Sapsan, Siberian Arsenal, Tantos, ORCAM and Proline.
Available functionality. There is no point in buying a fancy model to turn off a forgotten iron and boil water to make coffee.
Number of connectors. Be smart about choosing a model with a certain number of outlets. There should be, if possible, exactly as many as required.
Power. This criterion is one of the most important, especially in the case of a power strip where several pieces of electrical equipment are connected. The permissible power reserve must be at least 30% of the maximum load.
Any additional features can significantly increase the cost of the product, so try to accurately determine the need for a particular function.
How to choose a TV socket by installation type
In a good way, it is advisable to hide all cables in the walls, like ordinary power cables. Then there will be no tails anywhere and no damage to them. Hidden cabling is the best option and with the right cable, you will completely forget about its existence. If you have such wiring done or are just in the process of renovation, then take hidden TV sockets.
But if no repairs are planned, and there are suddenly more TVs, the installation will be external. It can be done using baseboards with channels and cable ducts. In this case, overhead television sockets are needed.
| TV socket wall mounting Legrand Quteo | TV socket wall mounting Legrand Quteo | Outdoor TV socket Schneider Electric ETUDE |
"Star" scheme
This method of connecting a TV outlet is used most often. Part of the system is a splitter, which is responsible for distributing the signal in several directions. This device is installed in the circuit between the antenna and the cable leading to the televisions.
This solution has a number of advantages. It allows you to place the cable in a technically protected place. This circuit allows you to obtain a highly stable signal, even if several TVs are turned on in the apartment. And there are usually no problems with image and sound quality.
How to choose a TV cable
Definitely in terms of signal transmission quality and insulation strength. The attenuation in the cable should be minimal, and the insulation should reliably protect the core from external influences. For hidden installation, only the best representatives are suitable. These are cables SAT 703, SAT 50, DG113, F1160BVM COMMSCOPE (RG-11).
| SAT 703 cable | SAT 50 cable | Cable F1160BVM COMMSCOPE (RG-11) |
These are single-core copper cables with an insulating foam layer and a durable sheath that will feel great under plaster.
An RG-6 cable is suitable for outdoor installation, but if you want to get a better signal, choose cables from the first list. An RG-6 cable can be used to connect the TVs themselves to sockets.
How to connect a TV cable to an outlet
The power antenna cable is connected to the socket in a special socket using a screw. The central core is carefully removed from the insulation and secured in the hole. For better fixation, a part of the braided cable is secured with a second screw through a special plate. This ensures that there is no movement and protects the central core from fracture.
Helpful advice! If you are far from electricians, then it is better not to lay television cables yourself. Trust the specialists with the job, they know all the tricks and subtleties. For example, they will not forget that distances must be maintained between antenna cables and power supplies. Lay at intervals of at least 3 centimeters. Otherwise there will be interference, especially on cables like RG-6 and similar.
Connecting the cable
To connect the cable, remove the insulation from the central core by 6-8mm. In this case, you need to retreat another couple of millimeters from the edge of the outer shell to the point where stripping begins.
Next, insert the TV wire into the socket and check through the viewing window that the central core goes all the way into the connector.
In the Unica series it is self-clamping, there is no need to tighten anything here. Other brands may have a clamping screw, which will need to be loosened first and then tightened with a screwdriver.
Pay special attention so that the “hairs” of the screen do not touch the central core anywhere.
All that remains is to tighten the cable itself with the central screw and put the outer cover in place.
If something is not clear and does not work out, you can always refer to the instructions.
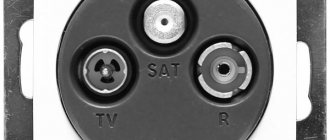
The mysterious TV RD SAT outlet and its brothers
In addition to regular TV sockets, manufacturers offer products with mysterious names tv rd sat, tv fm sat, tv sat, TV-RD, tv + rj 45. In fact, there is nothing mysterious about them and these are simply combined sockets for connecting 2- 3 different receivers.
It's no secret that providers most often offer packages of terrestrial television, radio, satellite and Internet in addition. If you don’t want to drag a bunch of cables into the apartment, then install a mixer block in the switchboard on the site. It collects signals from several antenna cables into one output cable, and it is brought into the apartment. And in order to then separate the frequencies of different broadcasts, a combined socket is installed to connect a group of receivers.
Such sockets are also useful in houses with cable networks. There, there can be one adder blocks per entrance and one cable is pulled to the consumer at once. To separate different signal frequencies you need a combined socket.
Let's understand the intricacies of names using the example of Legrand products
TV-RD-SAT sockets
TV-RD-SAT sockets can be found in the Valena and Galea Life series. They are designed to connect a television (TV), radio (RD) and satellite receiver (SAT). Suitable for cable networks, they can be either pass-through or terminal.
| Socket Legrand Galea Life TV-RD-SAT pass-through | Socket Legrand Galea Life TV-RD-SAT terminal |
TV-FM-SAT sockets
TV-FM-SAT sockets are present in the Celiane and Valena series. They are used as single cables in home TV cable installations. They are connected according to the “star” scheme, directly connecting to the splitter along one line. The outlet itself can include a TV and radio receiver, as well as a satellite receiver.
| TV-FM-SAT socket star Legrand Valena | TV-FM-SAT socket terminal Legrand Valena | Socket TV-FM-SAT pass-through Legrand Valena | TV-FM-SAT socket Legrand Celiane |
TV-RD (FM) sockets
TV-RD (FM) sockets can be found in the Seliane, Valena, Galea Life series. They are needed in cable TV networks to connect two receivers: radio and television. Moreover, television can be received both terrestrial and on the “collective satellite” principle. By type of design, feed-through, terminal and single sockets are produced
| TV-R (TV-FM) socket single Legrand Celiane | TV-R (TV-FM) socket terminal Legrand Celiane | Socket TV-R (TV-FM) pass-through Legrand Galea Life |
Attention! Sockets with the same names can also be designed with 2 cables. That is, such models have 2 inputs and 3 outputs. They are used to connect separate cables from satellite and terrestrial TV. In this way, you can add satellite channels to cable networks without an adder unit. On the radio plug, the frequency is allocated as in a single-cable combined tv rd sat or tv fm sat socket.
| TV-R-SAT socket for 2 cables Legrand Etika | TV-R-SAT socket for 2 cables Legrand Celiane | TV-R-SAT socket for 2 cables Legrand Celiane |
TV-type sockets - Internet
TV + RJ 45 sockets also have 2 inputs and 2 outputs for TV and Internet cables. This type is used to connect smart TVs.
| TV + RJ 45 socket Legrand Celiane | TV + RJ 45 socket Legrand Celiane | TV + RJ 45 socket Legrand Celiane |
What TV sockets are needed for a satellite dish?
If you have a satellite dish and need to connect TVs to it, then it is most convenient to use combined sockets with 2 inputs TV RD SAT or TV FM SAT. We recommend star wiring with simple sockets. To connect, use the SAT socket.
To summarize, we can say that there are a lot of options for TV sockets, both individually and in assemblies. See what suits you best and don't forget about regular power outlets. They will need to be installed in sufficient quantities, at least 3 pieces each, otherwise it will turn out that there is nothing to power the devices connected to the antennas. And you need to throw an extension cord from another outlet. And we tried so hard to get rid of all the tails from the wires.
Smart TV or regular
Essentially, Smart TV is a set of applications built into the TV shell for broadcasting various content from the Internet. Recently, manufacturers have been offering full-fledged Android with Google Play and their own sets of applications as a platform.
The weak point of such solutions is management. Entering queries and moving the cursor using the remote control is long and inconvenient. A solution could be to use a smartphone or tablet as a control element. Check the availability of this option when choosing a model.
However, if you buy a TV without a Smart TV and an Internet connection, you can make it smart later using an external set-top box from Apple or based on Android. Or use an intermediary like Google Chromecast to stream content from your smartphone or computer.
Which option is better? Choose according to your preferences and price. It is quite possible that a separate set-top box will cost much less than a built-in Smart TV in a TV.
The downside of an external set-top box is that it will take up one HDMI port, which could be adapted for something else.
The advantage of external attachments is that they can be changed based on needs. You can also install third-party firmware on them. The speed and frequency of software updates depends on the specific model of the set-top box.
The choice of external set-top box is also determined by your budget. The price of a device, as a rule, directly depends on its capabilities and set of functions.
The only critical criterion is whether your TV supports the resolution. Very cheap set-top boxes may not work well or will not support Full HD resolution at all.
Pay attention to this
Let's sum it up
The online store 220pro.ru offers reliable, modern and high-quality sockets for connecting a TV in a wide range. Choose them from the catalog of television sockets. As well as a television cable, connectors and other accessories.
| TV sockets | TV cable |
If you have any questions, ask, we will answer and solve all the problems for equipping your apartment with a television network.
Call and ask!
Why call a professional if you can do it yourself?
If you do not have construction skills and knowledge of electrical network diagrams, then you can, of course, call a specialist so as not to make a mistake that could lead to serious troubles in the form of a short circuit or fire.
But we will still try to explain how to install a junction box with our own efforts. And it must be said that the entire process of such work is not labor-intensive or highly complex. You just need to familiarize yourself with the rules for connecting wires, learn how to use them and have patience. Next, let's look first at the practical implementation of this work:
We choose a place to install the distribution box, taking into account the comfortable access necessary for troubleshooting, since dismantling walls, ceilings or floors does not seem to be a very pleasant undertaking.
If necessary, you can create several distribution boxes in a room, since sometimes in one room there may be several consumers requiring increased voltage. And in order to reduce the load, this option is considered a very profitable way out of the situation. You can use pass-through and end boxes.
Before installing the box on the surface of the wall, ceiling or floor, we ensure optimal access to it to create internal wiring connections. And do not forget about creating a supply of cables for input and output. Due to this, you can easily disconnect the box from its installation location if necessary.
Now you know how to create an indoor distribution box installation. We have talked about this as simply as possible so that anyone can get basic information about the process of installing a junction box. For everything to work correctly, it is necessary to connect the boxes from the input point to the rest of the wiring points for consumers.
It’s very important to do everything efficiently right away and not leave it for later - I’ll finish it later, because now it’s working well. This may lead to an unexpected ending in the near future, and believe me, you won’t like it
Why add a TV to your smart home?
If we discard all nonsense, like turning on or changing the volume using the voice, then I see approximately the following scenario for the operation of a TV in a smart home: we hang a wireless switch next to the sofa and, by pressing it, we configure the following system reaction:
- closing the curtains in the room;
- turning off or setting the minimum brightness of the lamp;
- turning on the heating (at room temperatures below the set one);
- turns on the TV to a specific channel/specific video output.
To implement it, you will need Aqara smart curtains, Yeelight light bulbs or lamps, a Xiaomi temperature sensor, a Xiaomi Gateway 3, a smart socket (to turn on the heating), an Aqara D1 wireless switch and a Xiaomi IR controller. Or you can use Yandex Station instead of a switch and launch this entire scenario with your voice, for example, by saying: “Alice, it’s movie time.”
Why do you need to install overhead sockets on the baseboard?
Nowadays, the fashion of hiding wiring in baseboards is becoming increasingly widespread. This installation option has a number of advantages:
- There is no need to disturb the finish in order to expand the electrical wiring network;
- Safety increases due to the fact that the wires do not “hang”;
- Sockets become almost invisible due to their location, which gives the room more aesthetics;
- There is significantly less work on gating, which saves effort and money;
- The socket can be placed in almost any part of the house or apartment.
Placing an outlet on the baseboard will decorate the interior of the room. Installing a surface-mounted socket with your own hands is a fairly simple process, which means you don’t need to seek help from specialists.
It is recommended to buy baseboards and sockets with socket boxes from the same manufacturer. This ensures that the dimensions of the outlet match the rest of the materials.
Practical advice
We have listed all the existing methods for installing a socket box in a wall with your own hands. Finally, I would like to give some useful tips that will allow you to install glasses in grooves faster and more correctly.
- If your walls are covered with PVC panels (for example, in the bathroom), buy a socket box for plasterboard and carry out installation in the same way as the fastening technology in gypsum plasterboard sheets. To avoid accidentally tearing out the socket from the plastic panel when pulling out the electrical plug, it is recommended to make a reinforcing frame from plywood or the same plaster behind the plastic.
- Install the products after plastering the walls. If you first install the glass in the groove and then plaster the walls, you may not be able to install the socket flush in the future. It’s better to play it safe and not carry out installation while the walls are unplastered. At the same time, installing a socket box after the wallpaper has already been hung is also not the best solution, because... you will have to disturb the decorative decoration of the walls, which can ruin the interior of the room. That is why the golden mean is to install the product immediately after plastering, because as a last resort, finishing putty and wallpaper can cover all the defects.
- Check with a building level that the markings are horizontal, especially if you decide to install a block of socket boxes (for 3-4 sockets). Otherwise, after you fix the connected glasses in the wall, you may end up with an oblique block, which will negatively appear on the interior of the room (the double socket will be crooked). The video instructions for installing glasses in a brick wall (at the very beginning of the article) show a very convenient marking and groove technology, which will make the seats for sockets and switches perfectly level.
- If you have a situation where you need to install a socket box in a through hole (for example, in an apartment) or in a hole that is too large, simply apply more alabaster and use the usual method to smear the glass into the wall. You can also use a spacer made of wooden blocks to pre-attach the plastic cup. Using polyurethane foam for fastening is a controversial issue. On the one hand, the rules of the PUE do not prohibit the use of this material, but on the other hand, foam will not satisfy fire safety conditions, so it is better to use alabaster.
- When replacing electrical wiring in the house, you can, of course, leave the old holes for the socket boxes if you are satisfied with the installation height of the built-in sockets and switches. Otherwise, you can always cover up the old holes and make new ones where it will be more in demand.
- If the wall is too thin to mount a standard glass, it is better to install a surface-mounted switch or socket. You can, of course, trim the height of the socket box a little and make it suitable, but this is only as a last resort.
That's all I wanted to tell you about how to install socket boxes in a concrete, brick, wood and plasterboard wall. We hope that the information provided, photo examples and video tutorials were useful and understandable for you!
Also read:
- How to make grooves for wiring correctly
- What types of electrical outlets are there?
- How to install electrical wiring under drywall
Detailed instructions for installing a telephone socket
Let's look at the basic diagrams for correctly connecting common sockets:
- The design has a pair of small contacts - 2 or 4. In the middle there is a hole for the power cable.
- The telephone device connects to two contacts in the center.
Installation, according to the rules, is usually carried out using a special cross-cutting knife. But if your activity is not related to the systematic repair and installation of these devices and you do not have one, you can use an ordinary sharp knife. It can be used for deepening cores to ensure contact after cutting the insulation layer.
To connect the wires to the telephone socket, use the following instructions:
- Just as during the installation of any outlet, you should turn off the power supply in the panel room. To be safe, use protective gloves because voltage is still present.
- Next, the outer layers of the contacts are cleaned; you can leave no more than 4 cm. When these manipulations are completed, straighten the wires.
- Use a tester to determine the polarity of the contacts.
- Connect the contacts to the conductors. It is convenient to distinguish them by color. The green wire is responsible for positive polarity, red for negative. It is not necessary to focus on polarity, but there is a possibility that the phone may experience slight interruptions in the future.
- After connecting the cables, secure them using the screws provided.
- In case of installation of a 2-4 contact type socket, 2 central contacts are connected.
- The socket is mounted to the wall using double-sided tape or self-tapping screws. The latter method will provide a more effective method of fixation.
- To complete the installation process, close the cover of the telephone socket.
A hidden socket is connected according to a similar principle, but there are a number of features. Select a location and mark it for further installation. You will need a recess for the socket box, so use a hammer drill and screws for fastening. The working part is fixed in the socket box with screws.
Types of models
GSM socket is available in different types. For example, there is a standard GSM module that has one connector. And there is also a surge protector, the purpose of which is to connect several devices at once.
The surge protector is represented by a standard extension cord that has several outputs. The principle of operation of the equipment is as follows: first you need to connect a SIM card, having previously disabled the function of constantly asking for a PIN code. Once the card is installed, you need to check it. To do this, you need to call her or send an SMS message. This smart system operates at temperatures down to -20 degrees.
Socket with one connector. In addition to this device, door opening sensors or gas leak indicators, fire safety sensors are sold. When included, this GSM module forms a reliable security system. For example, it can be configured so that the lights in the rooms turn on after a certain time. This will create the impression that someone is present in the house.