To gain access to the global network, you need to connect to it using a provider that provides similar services. Choosing one can sometimes be difficult, and relying on the first company you come across is not the best choice. It is important to familiarize yourself with all the options, services and conditions, consider the tariffs and find the most profitable option for yourself. This material will tell you what Skynet Internet is, what services the Skynet provider provides, and how Skynet Internet differs from other companies.
Internet provider "Skynet" - services
Here we will talk about a company that has been providing network access, IP television and telephony services for more than ten years. At the moment, it is one of the leaders among operators in St. Petersburg. This success is due to the high quality of work, its own network covering the city, and the loyalty of customers who remained with the company even in the most difficult times.
Advantages and disadvantages
Description of the tariff “Unlimited Internet for a laptop” MTS: cost
Like any provider, Skynet has positive and negative sides. In this case, it is the advantages that outweigh, including:
- relatively low prices for all tariff plans with high-speed Internet;
- presence of its own network in the city. This means that it is not rented and provides guarantees of reliability against unforeseen circumstances;
- the ability to pay for services in a variety of ways: by bank card, electronic money, and so on;
- elimination of all faults (including those that arose not through the operator’s fault) - free of charge;
- free provision of an email address ( [email protected] ).
Important! There are also disadvantages. Users noticed that the set of channels provided as a separate service is uninteresting and scarce. There are also reviews from people about the incompetence and rude attitude of technical support towards customers.
Offers for
Proposals for providing the network at the moment are as follows:
- “I want Skynet.” Available for new subscribers. Speed – 100 Mbit/s for 250 rubles per month;
- "Water". Standard rate. Has the same speed characteristics for 450 rubles per month;
- "Good year". Available only for the city of Pushkin. Speed – 100 Mbit/s for 41 rubles per month;
- "Fire". The second tariff is the standard plan. Speed – 200 Mbit/s for 650 rubles per month;
- "Earth". Speed – 100 Mbit/s for 400 rubles per month.
Important! All tariffs, except for “Earth”, are provided with a set of 75 television channels. “Fire” is the only tariff with the ability to allocate a domain name and change the IP address.
SkyNet Wi-Fi service
The revolutionary service allows us to solve the problems of customers who are constantly faced with a drop in speed or unstable Wi-Fi. When connected, the system uses two frequencies for operation at once - 2.4 GHz and 5 GHz. It automatically switches between them and provides the Internet to those places in the apartment or house where the Wi-Fi signal from a regular router cannot reach. Switching also helps to use the frequency that is least congested at the moment due to neighbors using similar routers on the same frequency.
Digital TV packages
There are currently several packages available for digital television:
- "T-400". 128 channels are available for new clients for 400 rubles;
- "Water". All subscribers also have access to 128 channels and a change of IP address for 650 rubles;
- "Fire". Everything is the same, but with a speed of 200 Mbit/s for 800 rubles.
In addition to these options, there are also cheaper ones: for 80, 150, 200 and more rubles.
Two telephony tariffs
It is also possible to connect your home phone to one of two tariffs: “City” or “Time-based”. For the second, the payment will be 54 kopecks per minute for calls to the same numbers and 2.56 rubles for calls to a cell phone. The “city” tariff includes 1,000 free minutes for home phones and the same price for cell phones. Despite this fee, you will also have to pay for the service: 250 and 500 rubles, respectively.
What else does the provider provide?
The following additional services are available:
- Installing an antivirus with a license (Dr.Web, ESET or Panda).
- Installation of a bot for Telegram, which will report balance changes, promotions and offers, and technical work.
- Access to a mobile application that allows you to manage your balance from your phone.
- Parental control to record the child's time online.
Company work regions and connectivity checks
SkyNet's coverage area is limited only to certain areas in St. Petersburg: Kirovsky, Krasnogvardeisky, Nevsky and others.
SkyNet coverage areas are indicated in green
Before submitting an application on its website, the provider invites potential clients to make sure that the connection is possible in their home:
- Click on this link to go to the desired page of the operator’s official resource. Or click on the “Connect” icon on the top panel of the site.
Click on the Connect icon at the top
On the panel on the left we begin to print the name of the street on which we live.
You have entered the menu to check the address
A menu will appear - click on the desired item.
Enter the name of the street - suggested options will appear in the menu
On the right will appear a list of houses in which the company already has clients (green squares), and houses in which connection is only expected (orange squares). If you find your building in the list, click on it to proceed to filling out the connection application.
Select your home from the list
If the house is not in the menu, click on the gray link below and study the reason. In short, the heads of your HOA have not yet entered into any agreements with the SkyNet provider. In this case, you can write an application to the HOA with a request for assistance in connecting this operator. It is also advisable to enlist the support of your neighbors. The company will remain grateful and will provide Internet for free for a year.
You need to contact the HOA if you want the organization that services your home to enter into an agreement with SkyNet
How to connect or disconnect
To activate services, you must first create an application on the official website or call the company’s office. Only after this will workers who will install the network be able to go to the site.
Connection via the official website
How to change the Tele2 tariff on your phone: via the Internet, operator or USSD command
After checking the physical possibility of connecting the Internet to a specific house, you can click on the house number and proceed to create an application. Here the data is entered: Full name, apartment, phone number and email. You can even leave a comment on the application. It is sent by clicking on the appropriate button.
Disabling and activating services in your personal account for existing clients
All actions after signing the contract can be performed in your personal account on the official website. Including, you can disable or connect the Internet, select a tariff and top up your balance using electronic means. You can log in to the site using the data from the contract.
Important! After logging into your account, you need to find the “Services” section and select the “Internet” tab. Here you can cancel the tariff, disable access, change the tariff and change the MAC address.
Contact the office or call
You can do the same thing over a phone call. The operator’s line operates without interruption around the clock and is accessible by phone number. You can personally consult in the office, which is located at st. Repisheva, 20. You can also contact support using the online chat window.
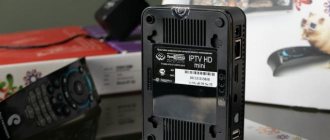
How to set up Skynet on TV
Setting:Loading the set-top box
After you connect the set-top box to the power supply, the Internet and your TV, its operating system will begin loading, during which it will search for updates. If a new update is found, the set-top box will automatically download and install it. The power indicator will blink orange during the update. Be sure to wait until it turns green.
Video/Audio
If your TV does not have an HDMI input and you connected it to the set-top box using an RCA jack, then you need to use the “left” or “right” buttons to find the “Settings” menu item and press the “OK” button. Next, press the “right” or “OK” button on the “Video/Audio” category. Press the "down" button to go to the "Video mode" item. And change it from "HD" to "SD". Then you should resize the image to fit the screen size. By pressing the “Volume” button, make sure that the green frame is not visible, and it should not extend far beyond the edges of the screen. If you know exactly the resolution and frame rate of your TV, then you can set them for the interface and player. In the “Frame Format” item you can set the default for how to stretch the image in the player. The “Interlace” item determines the method for removing interlacing.
System
In the “System” category you can change the interface language, time zone, and NTP server address for time synchronization. Reset the settings to those that were originally received from the provider. Update the software by selecting the update source. You can also allow the use of the Android remote control. For this:
— select “Yes” in the “Android Remote” item;
— connect your Android device to the home network in which the set-top boxes are located;
— download the application “Remote for Eltex media centers”;
— open it, press the “” key and select “List of consoles”;
— now select the one you want to control (you can select the one you need by IP address, which you can find in the “Network” category of the set-top box settings);
— you should see a message indicating that you need to go to the “Media Player” application of the set-top box;
— by going to it, you will see a message about a connection request. Allow access by pressing the “OK” button on the remote control;
- now the control keys for the set-top box are displayed on your screen, and your control device has been added to the “Android” list of the “Media Player” application.
Net
Let's move on to the "Network" category. Here you can change the name of your set-top box that will be displayed online. Set the IP address manually or set it to “Auto” to receive it automatically from the DHCP server. If you are using a connection via a network cable, then you need to leave “Wired” in the “Type” item. If you want to connect the set-top box via a Wi-Fi network, then select “Wireless” and connect the Wi-Fi adapter. Select Search for WiFi Networks, then select the name of your wireless network and enter the password. To save and apply the settings, you need to exit to the main menu by pressing the “Home” button. Now the Wi-Fi signal level is displayed in the upper right corner of the main menu.
List of compatible and recommended USB adapters
To find out if the adapter is compatible with the set-top box, you need to find its VID (Vendor ID) and PID (ProductID). To do this, type its name in the search bar on the website wikidevi.wi-cat.ru and click “”. On the right under “ID” you will find VID and PID. If the adapter is compatible with the set-top box, then its VID and PID can be found in this file.
IPTV player (Watch TV):
Watching TV
To start television you need to select the “IPTV Player” application. A list of TV channels is displayed on the left; to remove it, press the “left” button to display “right”. To move through the list, use the up and down buttons. If you want to switch the TV channel, find it in the list and click the “OK” button. To call a TV program, select a TV channel and press “right” on it; if you press “right” again, you can watch the TV program for the next days. You can also switch TV channels in order by pressing the “Chanel” button or using the numeric keypad. To change the volume, use the "Volume" button.
Image scaling
Most TV channels in Russia are broadcast in a four to three format, so the image does not completely fill the screen of widescreen TVs; to stretch it, use the “Zoom” button, which has a magnifying glass on it. By clicking once, you will get the original image, which you can move and scale using the “up”, “right”, “down”, “left” buttons and the volume button. By pressing “Zoom” again, the image will be enlarged to the edges on the right and left, without being distorted. The next time you press the “Zoom” button, the image will completely fill the screen, but its proportions will change.
Switching audio track and subtitles
If a TV channel has two or more audio tracks, they can be switched with the “Audio” button. If subtitles are available, you can turn them on by clicking the “Subtitles” button.
IPTV player settings
To change the settings of the IPTV player, you must press the "" button. Here you can:
— change the source of the list of TV channels by selecting “Download” from an address on the network or “Locally” from a storage device;
— change the address of the list of TV channels on the network;
— disable downloading of the program guide;
— change the program guide address;
— enable animation;
— select animation speed;
— enable display of TV channel categories (to expand or hide a category, you need to select it and click “OK”);
— select the state of categories when starting the IPTV player;
— enable the use of UDP proxy. This will allow you to automatically change the multicast addresses of streams in the list of TV channels to unicast, indicating the IP address and source port, which can be set below.
— reset the IPTV player settings to those received from the provider.
Add to favorites
To add a TV channel to your favorites list, you need to find it in the list and, by clicking the “” button, select “Add to favorites”. It is now at the top of the list. In the “Favorites” category, you can change the order of TV channels; to do this, click the “” button on the desired one and select “Move”.
Smotryoshka
Watching Pay TV
The Smotryoshka application is designed for viewing paid Internet television packages, which you can subscribe to in your personal account. After receiving your login and password, you need to enter them using the remote control. To call up the list of TV channels, you need to press the button or the blue button on the remote control. To move through the list of TV channels and the TV program, use the up down, left and right buttons. To select the desired TV channel or the desired TV show, which you can always watch in the recording, press OK. To rewind or rewind the recording, use the rewind buttons. To change the audio track, if available on the TV channel, use the AUDIO button. To change the video scale, use the ZOOM button. To change the profile, press the blue button on the remote control and select the desired profile.
Video portal:
Watching films
The Video Portal application allows you to watch movies, cartoons, TV series and other video content in DVD, HD and even 3D quality absolutely free. On the left is a list of categories, on the right are films sorted alphabetically. You can use the search or select a movie from the list. Select the play key, then quality, where:
- “Medium quality” has a bitrate of about 1700 kilobits per second, which is approximately equal to DVD quality;
- “1080p” or “720p” has a bitrate of about 12,000 kilobits per second, which is approximately equal to Blu-Ray quality;
— “Vertical” or “Horizontal anamorphic stereo pair” have a bitrate of about 12,000 kilobits per second and were added specifically for 3D TVs, in the settings of which you need to select the desired 3D option and put on glasses.
Online cinema IVI.RU:
Watching films
Let's move on to the "IVI.RU" application. This is an application from the largest online cinema in Russia. Here you can watch movies, cartoons, TV series and other video content absolutely free. On the left is a list of categories, on the right is a list of films sorted by popularity. After selecting the desired category, you can filter the content by genre, country and year range in which the film was released. After that, select the desired movie and press the “OK” button, then “OK” again on the “Watch” screen key or select the “All episodes” button if this is a multi-part film and you need to find a specific series. You will be shown an advertisement once before each movie. To enable pause, press the “OK” button. To rewind, hold down the "right" or "left" button, and then press "OK" at the desired time point. If you know the name of the movie you want, then press the “Search” button located at the very bottom of the list of categories and enter the name.
Media player (View files from external media or local network):
View files
The Media Player application allows you to view video and audio files from storage devices and your home network. Insert the drive into one of the USB ports. Expand the Local list by clicking the “OK” button or the “right” button. Expand the drive, the desired folder and select the file you want to play. If you want to view video and audio files from your home computer, then you need to open access to the folder in which they are stored and fix the IP address, either on the computer in the network connection settings or in the router’s DHCP server settings. Next, move the cursor to the “Network” item and click the “” button. Select "Network Resources". A list of network resources will open in front of you. To add a new one, you need to press the green button on the control panel. Select the protocol you use to share files on your computer (in the case of Windows, the default is SAMBA). Enter the name that will be given to your shared folder in the list of network resources. Specify the IP address of the computer on which access to the shared folder is available. Enter a name for the shared folder. If the network resource is password protected, you must enter a username and password. Also, the media player allows you to view network streams, the addresses of which you can find on the Internet.
Supported video formats: MPEG-2 TS, MPEG-2 PS, AVI, FLV, MOV, MP4, MKV, OGG, M2TS, MTS and others (including Blu-ray, HD DVD formats).
Supported image formats: BMP, JPEG, GIF, PNG.
Supported audio formats: MP3, WAV.
In the VKontakte application you can listen to music, watch videos and photos of you and your friends.
Internet radio
Internet radio
In the Internet radio application you can listen to the audio streams we have added, links to which we add upon request in our VKontakte group.