Receiver selection
Some consumers believe that the more a satellite receiver costs, the better it is.
This statement is not entirely true. The price of the device is determined by several factors - the number of installed options, the ability to play HDTV, and, by the way, the “promotion” of the manufacturer’s brand. It often happens that a user purchases an expensive receiver with many functions, but in reality he does not need them at all, he just overpays for them. Therefore, the choice of receiver must be approached individually, based on your capabilities and needs. Also, when purchasing a device, pay attention to the encoding system of the channels (Seca, Irdeto, Viaccess, etc.) that you want to watch. Receiver models are conventionally divided into several groups, depending on the presence of certain functions or connectors, based on which they belong to one or another price category. Note that receivers from well-known brands will always cost an order of magnitude more.
1. Receivers that pick up only FTA channels (free to air), that is, free channels that are freely available. Such channels are present on almost all satellites. If you don’t want to deal with satellite television operators, pay them a subscription fee and FTA channels are enough for you, then this is the choice for you. You can buy a receiver of this group at the lowest price (50 – 100 USD). The manufacturer, image and sound quality, additional options and other technical characteristics distinguish these devices from each other.
2. Satellite receivers working with the popular Viaccess encoding. TV channels of the NTV Plus operator and some channels broadcast from European satellites are encoded in Viaccess. You can purchase such a receiver for 100 – 250 USD.
3. Satellite receivers that work with encodings other than Viaccess. Such devices are less popular, and their price is slightly higher - from 120 USD. Such receivers are needed for those who are going to watch foreign satellite television.
4. Receivers with a CI or CAM port. In addition to the usual slot for an access card, there is a CAM port through which an additional access module is connected, allowing you to open certain encodings. There are universal modules that provide the ability to work with several encodings simultaneously, their cost starts from 40 USD. A receiver with a CAM port can be purchased for 70 USD.
5. Receivers with a built-in module that opens 5 or more encodings (Viaccess, Seca, Irdeto, BetaCrypt, Nagravision, etc.). Manufacturers are creating more and more similar models, as this is a convenient option for those who have purchased a set of satellite equipment with a rotating satellite dish. The price of these receivers is not very high, from 80 USD.
6. Receivers with a built-in decoder (or encoding emulator). Card readers are not installed in such receivers, and encrypted TV channels can be watched after entering the key from the remote control. The advantage here is that there is no need to flash new keys onto the access card. The demand for these devices has recently increased significantly, so manufacturers began to produce them in large quantities, as a result of which the price for them has dropped. You can buy a receiver with a built-in decoder for 50 USD.
7. Receivers with a built-in hard drive. They have a built-in hard drive, the size of which will determine the price of the device. You can record programs or movies onto such a receiver and save them for a while. The larger the hard drive capacity, the more videos you can record. But you need to remember that not all films or programs are allowed to be recorded, as they are protected by copyright. Most manufacturers leave the opportunity for users to independently change the hard drive to a larger one (40 GB, 60 GB, 80 GB, 120 GB, etc.). Satellite receivers are produced without a built-in hard drive, but allowing you to connect it via a USB port. Also, receivers with two tuners are becoming popular. Here you can simultaneously watch one TV channel and record another. There are models that have both a card reader and CI, or only CI. Their cost starts from 300 USD.
8. Digital-analog receivers. In truth, the device is useless, since analogue television has long been giving way to digital satellite TV. All channels that continue to be broadcast in analog format have long been transferred to digital format.
- Digital dual-tuner satellite receiver GS B532M
9. Receivers with built-in subscription. They already have a built-in subscription to a certain package of channels from some satellite television operator, for example NTV Plus. There are devices with an additional card reader or CI slot, and some without them. Such receivers are becoming quite popular. Price – from 100 USD Conditional access modules with this function are also in demand.
10. Satellite receivers with advanced capabilities. This includes two or more format receivers: satellite receiver + cable receiver, satellite receiver + DVD player, combined devices: satellite receiver + multimedia center, etc. Perhaps cable receivers are not yet in demand in Russia, but universal devices will definitely find their buyer. But do not forget that the more complex the device, the higher its price, the more expensive the maintenance and the greater the likelihood of it breaking.
11. Receivers with the ability to receive HDTV. These are the most expensive terminals, but they provide the user with such opportunities that you don’t mind paying for them. The HDTV receiver plays video in DVB-S2 stream and supports MPEG-4 format. To watch satellite TV in high-definition HD format, in addition to the receiver, you will also need a TV that supports HD format.
Let's summarize all of the above.
Before you buy a set of satellite equipment, thoroughly familiarize yourself with the TV channels broadcast by different satellites. It is likely that free FTA channels, of which there are many on each satellite, will be enough for you. This will allow you to save on the purchase of a receiver, which can be purchased for 60 - 100 USD. If you have the financial opportunity, or you want to soon expand the functionality of your satellite system, then it makes sense to purchase a receiver with a module for 5 encodings or with a built-in emulator. To receive a signal from the Hot Bird satellite, you cannot do without such a device. A satellite receiver with a built-in hard drive is expensive. Its price is significantly higher than that of similar devices, but without it. Therefore, if there is no need for a hard drive, then you should not overpay the extra money.
Also, before purchasing a receiver, it would be a good idea to find out what additional features it provides. Many options are very convenient:
1. The presence of a modulator that allows you to distribute the signal from one receiver to several TVs. That is, on different TVs you can only watch the same channel at the same time.
2. Availability of outputs for digital audio/video (S/PDIF), for connecting the receiver to a stereo system or home theater.
3. The presence of an HDMI output, which gives access to watching TV channels in high definition HD format.
4. Ability to update the receiver software via satellite.
5. The presence of a built-in positioner that allows you to remotely rotate a satellite dish with a polar suspension, or support for the DiSEqC protocol version 1.0, 1.2, etc. An external positioner can be connected via DiSEqC.
6. The presence of such useful options as teletext, subtitles, games, EPG (electronic program guide).
7. Availability of a USB port through which you can connect to a computer or connect external media for recording programs. Also, a good feature is the presence of an Ethernet interface for accessing the Internet.
8. The presence of two tuners for receivers with a built-in hard drive.
1,2,3,4,5,6,7,8,9,10,11,12,13,14,15,16,17,18,19,20,21
To set up over-the-air television, you don’t need to call a technician. If you have step-by-step instructions, you can easily cope with this task yourself. How to set up Otau TV on your TV without wasting time and nerves? Read on.
What you need to know before reconfiguring your equipment
The scope of work depends on many factors. The location where the satellite dish is located is taken into account. The length of the cable and the location where the subscriber receiver is located are taken into account. If the equipment is placed according to the operator's recommendations, then most of the action will focus on reconfiguring the antenna. If you did not follow the recommendations when installing the antenna, it is possible that you will need to move the “dish” to another location. First, you need to reconfigure your satellite receiver or TV (when using a CAM module).
For reference. KazSat-3 is the national satellite of Kazakhstan. It was manufactured by specialists from JSC Information Satellite Systems named after Academician M.F. Reshetnev". The government of Kazakhstan decided to create it back in 2010. The spacecraft has 28 Ku-band transponders. On March 1, the media received information that testing was completed successfully. And subscribers began the transition to the new satellite.
Receiver reconfiguration guide
If you managed to update the receiver software to the latest version, then you need to reset the settings to factory settings. Enter the menu and select the KazSat-3 satellite. Data about the signal level and quality will appear at the bottom of the TV screen. If you have not updated the software to the latest version, you will have to do so first. Otherwise, you will not find KazSat-3 in the list of available satellites.
Guide to reconfiguring the CAM module
Owners of CAM modules must complete the following steps. Enter the TV settings and change the Intelsat 904 spacecraft (60°E) to the KazSat-3 spacecraft (58.5°E). If you do not find this satellite in the list, you can enter its name manually as “Custom”. After selecting a satellite, we proceed to changing the frequency. Change LNB to “9750”. Next, add 6 transponders, use the settings specified in Appendix 1 below. To do this, go to the menu for setting/changing transponder parameters. We select the added transponders and check whether the signal corresponds to the required level. This can only be done with a pre-tuned antenna.
For reference. A CAM module is an electronic device that is used as an adapter for an encoding system. They provide subscribers with access to media content on digital television. CAM modules are an excellent alternative to satellite receivers, as they do not take up extra space and perform all the necessary functions.
pp/p
Note: By angle we mean the angle by which the line of sight on the spacecraft deviates horizontally. By azimuth we mean the angle between the direction that points to the spacecraft and north.
Guide to reconfiguring a satellite dish:
1. Determine the coordinates of the optimal placement of the “plate”. Using a special device (GPS module), determine the appropriate latitude and longitude.
2. Calculate the optimal values of azimuth and elevation. Then determine the “LNB tilt angle” value. Adjust the antenna only after all values are known. The calculation can be made over the Internet, using special programs, or using applications for mobile devices running on Android and MacOS.
NOTE! THERE WILL BE DIFFERENT PARAMETERS IN DIFFERENT REGIONS OF KAZAKHSTAN. THERE IS NO SINGLE STANDARD.
3. Next, we try to rotate the antenna in azimuth, focusing on the parameters of the KazSat-3 satellite (58.5°E). To determine the correct position, we use the Satfinder device or one of its analogues. The antenna can be tuned manually, without the use of special instruments. But it will be a little difficult. In this case, we focus on the level and quality of the signal. It is necessary to ensure that the receiver displays the highest quality picture on the TV screen. To do this, we try to change the elevation angle.
4. Next, you need to adjust the polarization of the LNB.
NOTE! IF YOU HAVE ONLY USED A SINGLE WAY LOAN MUCH PREVIOUSLY, YOU WILL NEED TO REPLACE IT. ITS TECHNICAL PARAMETERS DO NOT ALLOW YOU TO RECEIVE THE SIGNAL OF A NEW CAPACITY.
After setting up the antenna, we proceed to setting up TV channels.
For reference. Satfinder is a special device that is used in setting up satellite dishes. It is presented in the form of a small receiver. It is connected to the satellite convector using a short cable. The scale of the device allows you to determine the accuracy of pointing the antenna at the desired satellite.
How to retune TV channels
Go to MENU and select “Search for channels”. We confirm our choice by clicking the “OK” button. You must wait until the search for a complete list of TV channels is completed.
What to do next
When all the necessary settings have been completed, you should make sure that the kit is working correctly. The subscriber must inform Kazteleradio representatives about the transition to the KazSat-3 satellite. To do this, you need to contact the support service by phone 193,+7(727)2 581 500.
The operator warns that all work must be carried out by specialists who have undergone appropriate training.
Source
Promotion. Connect OTAU TV T2 at a super price from 12,999 tenge and OTAU TV S2 from 27,999 tenge. Hurry, promotions are limited. Inquiries by phone: office, mobile/w hatsApp +7 707 250-55-75
How to set up Otau TV on your TV yourself
First, let's look at the necessary equipment. To catch the maximum number of national terrestrial television channels in good quality, it is important to use a decimeter antenna in combination with a special receiver.
OTAU TV recommends the Strong SRT-8520 receiver. It is capable of processing the T2 signal and decoding the IRDETO cipher. In addition, for better reception it is better to use an outdoor antenna. The internal device also copes well with this job, but only if the subscriber is not too far from the radio and television station.
So, step-by-step instructions for setting up OTAU TV look like this:
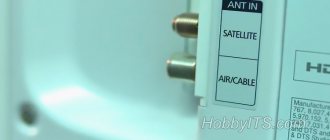
Step #1 . Receiver connection:
- Turn the receiver back towards you and familiarize yourself with the connectors. We are interested in: ANT input, RSI or HDMI set.
- Connect the antenna cable to the ANT input.
- Connect the RSI cable (“tulip”) to the corresponding sockets by color. The yellow cable is intended for transmitting a video signal (video-in), red and white - for audio: red - audio-in stereo; white - audio-in mono+stereo.
- HDMI is a more advanced analogue of the “tulip”, thanks to it there is no need to understand the matching of colors and connectors.
Note: An HDMI cable must be purchased separately as it is not included in the package.
How to reconfigure equipment for OTAU TV subscribers
OTAU TV transfers broadcasting to a new satellite. In this regard, subscribers must reconfigure their equipment.
For reference. OTAU TV is a satellite operator in Kazakhstan. It offers over 100 television and radio channels, 57 of which are available free of charge, without paying a subscription fee. Operator services are available in any region of Kazakhstan. One of the company's advantages is a convenient menu. Users can select 1 of 3 languages and enjoy additional features such as parental controls, program guide, etc.
To begin, make sure that:
1. There are no types of interference in the form of trees, high-rise buildings, etc. in the antenna’s field of view, and a direct line of sight to the satellite is created.
2. You can securely attach the “plate” to the building.
3. If service work is necessary, you will be able to easily access the antenna.
4. Storm water or ice floes from the roof will not get onto the “plate”.
5. The antenna is located at a minimum distance from the satellite receiver.
The subscription kit consists of the following elements:
1.
Offset “plate” assembled with a reflector, rods, support, positioner, fasteners, and irradiator holder. Depending on the region of installation, the antenna diameter can range from 90 to 120 cm.
2. Low noise amplifier unit.
3. F-type crimp connectors.
5. Subscriber receiver or CAM module. The first option is compatible with all types of TVs. The second - only with those equipped with a CI connector.
Diagnostics of technical devices
The lack of a signal is most often a consequence of technical problems. The list of possible faults is extensive. Damage may occur in the receiver, cable, antenna or dish, or TV.
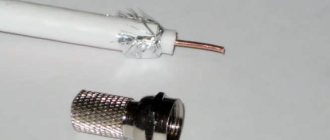
First of all, check the integrity of the connecting cable.
If it is damaged, the signal may be weak or non-existent. Make sure that the insulating shell is intact and there are no breaks. The damaged wire will have to be replaced. You can make repairs for small defects, solder broken wires, if you have experience and skills. Check the antenna cable
Before purchasing a cable, consult with specialists. The quality of transmission directly depends on the correct choice. If replacing the cable does not completely solve the problem, check the condition of the connectors. They may be damaged during operation.
The accumulation of dirt, dust, icing of the antenna and dish can cause deterioration and lack of television signal.
Inspect the structure, if necessary, carefully clean its elements. Make sure the receiving equipment is intact. Strong storm winds can damage dish elements and TV antennas. If there are any breakdowns, the device will have to be repaired or replaced.
Bad weather may be the reason
The cause of the problem may be a malfunction of the receiver.
This device regulates the incoming digital signal. Repairs to the converter should only be carried out by a qualified specialist. In most cases, a faulty device must be replaced.
There may be no signal due to a faulty receiver
No equipment is insured against breakdown. If the TV does not show, there is no signal from the antenna, perhaps the contacts in the cable connection socket are oxidized. Damaged areas need to be re-soldered. It is better to entrust this work to a master.
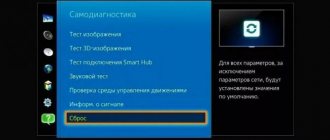
Software updates in Smart TV
A specific problem may arise for owners of Sony, Philips, Samsung, LG models with the Smart TV function. The integrity of the cable has been checked, the antenna and receiver are functioning normally, but the TV says “no signal”. The question arises what to do in this case. Most likely the cause is a software update. Samsung regularly installs new versions. They are developed to optimize the operation of equipment and eliminate errors.
Installing an updated program is a prerequisite; without this, the television will not work. Typically this process is performed automatically. But if this does not happen, install the new version manually. For this:
- connect your TV to the Internet;
- Using the remote control, enter “settings” in the “menu”;
- go to the “support” section, “software update”.
A software update may solve the problem
The further algorithm of actions differs for different models. After checking for updates, the system will prompt you to install them. The process takes place automatically, after which the TV will reboot. If the signal does not appear, re-tune the channels.
«
No signal due to external factors
Satellite signals are influenced by external factors. You should not look for reasons why there is no high-quality, stable signal on the TV when there is heavy rain or thunderstorm outside. These climate conditions disrupt transmission. Tree crowns and buildings interfere with waves. Because of them, there may be weak sound and poor quality picture.
A strong wind can change the position of the antenna or dish, which leads to a decrease in the quality of reception. You can easily install the device in the optimal position yourself. The initial position of the antenna can be determined by focusing on the direction of devices in neighboring houses and apartments. Then:
- slowly turn the antenna in one direction or the other;
- determine the direction in which quality is improving;
- find the point with the best picture, secure the device.
The angle calculator will help you make the most precise adjustments. It is available on the operator’s official website. Use the automatic program in your smartphone's GPS. It will calculate the exact angle based on the location data.
Adjusting and installing the plate
If it is difficult to determine where to install the plate on your own, contact a specialist. They will ensure the receiving device is in the correct position and provide reliable fixation.
Carrying out technical work at the provider
Each operator periodically carries out preventive maintenance; emergency repairs may be necessary. During this period there is no signal. There are several ways to check if your provider is working as usual. If you need to find out why there is no digital television signal today, you can:
- call the operator on the support line;
- find information on the Internet on the official website of the provider;
- check the alerts in the receiver.
If you cannot turn on channels to check alerts, use the remote control to enter the system menu of the receiver. In the system menu, when carrying out repair or maintenance work, the provider receives a “no signal” notification.
A call to your provider's support line may resolve the issue.
Cable network subscribers have to deal with problems with their set-top boxes. These devices often freeze. Fixing the problem is easy. Unplug the plug from the socket, turn off the set-top box, turn it on, give it time to reboot. If this technique does not solve the problem, call the managers on the hotline. Perhaps you need the help of a specialist to solve it.
LIST OF TV CHANNELS
By choosing the services of our company, you receive: