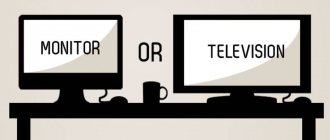
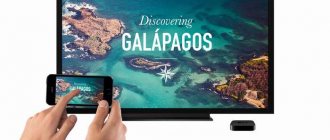
There are situations when we need another TV, but we cannot buy it for many reasons. Then the question arises: can the monitor be used as a TV? Or is it possible to connect a TV set-top box to the monitor?
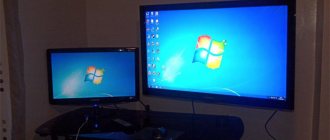
If you have an old computer monitor, then it is quite possible to use it as a TV. This transformation is achieved in several ways. The simplest of them, as you may have guessed, is connecting a monitor to a TV set-top box. You don't need a system unit, keyboard, mouse or various cords for them. You need nothing more than to connect the monitor to the digital TV box directly and use it only as a TV screen.
Connecting the set-top box to the monitor
Purchasing and connecting a DVB-T2 set-top box to a monitor is a reliable way to miraculously transform a computer display into a television receiver. Modern displays, like televisions, are equipped with built-in speakers and are practically self-contained devices. But if you have a regular monitor (perhaps even a lamp one), then you will need separate speakers - you will connect them to the corresponding connector on the DVB-T2 decoder. It would be great if they had stereo sound. If desired, you can purchase speakers with a remote control.
An external digital set-top box is an independent device that connects to the electrical network, television antenna and monitor. It is controlled using a remote control, just like a regular TV.
The situation with DVB-T2 receivers is such that the manufacturer did not intend to connect them to computer monitors, but only to televisions. At the same time, new monitors, like modern television receivers, are equipped with an HDMI connector, which is present on set-top boxes, while older ones can only be found with VGA and DVI-D.
The options for connecting it to a digital television set-top box will depend on what connectors you find on the display. The following combinations are possible (see table).
| Monitor | Console | Connection method |
| VGA | HDMI | HDMI to VGA converter |
| VGA | VGA to VGA cable | |
| DVI | DVI to VGA adapter | |
| HDMI | HDMI | regular HDMI to HDMI cable |
| VGA | VGA – HDMI converter | |
| DVI | passive adapter or cable DVI – HDMI |
How to check compatibility
Before connecting your monitor to a digital set-top box, check the equipment for compatibility. This work comes down to studying the available connectors on the tuner and display. As noted above, if there are identical connectors, connection difficulties are eliminated. If the connectors on the digital receiver and monitor are different, they can be connected using one of the available connectors. At the same time, consider the possibility of supplying sound if this task cannot be achieved using an adapter.
How to connect a TV set-top box to a monitor
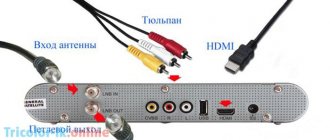
If you already have a free display, and you want to purchase a set-top box for watching TV, then pay attention to a hybrid digital TV tuner, equipped with both VGA and HDMI slots. If the design additionally includes “tulip” sockets where you can connect speakers, then you are simply lucky: you are the owner of a universal device that is compatible with various models of television equipment.
Another way to connect an old monitor to a digital set-top box is to use YPbPr or SCART sockets that work with an analog signal. To do this, you will need a signal converter from AV to VGA format.
Pay attention to such a characteristic as the length of the connecting cable. Surely you know how the length of the antenna coaxial wire affects signal attenuation. So, the cables connecting the displays to the T2 decoder have their own requirements:
- VGA – no longer than three meters;
- HDMI – no longer than five meters;
- DVI – not exceeding ten meters.
If, after connecting all the cables (don't forget about the antenna) and connecting the devices to the network, the screen is blank or an error message appears, then this indicates problems with one of the devices or cable incompatibility.
Connectors and ports of TV set-top box
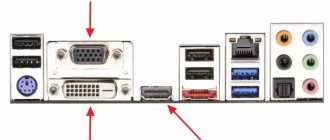
To understand which sockets are used to connect a DVB set-top box to a computer monitor, you need to become familiar with the types of connectors that this type of gadget is equipped with. It is noteworthy that depending on the class of the monitor and the year of manufacture of the console, the set of connectors may differ. So take a close look at the back of your devices.
Antenna connector
Previously, it was the most important thing in our television receivers: an analogue television antenna, video player or satellite television tuner was connected to it. Today it is used to receive digital terrestrial television using a classic external antenna.
The HDMI multimedia interface is the most significant functional connector. It is responsible for simultaneous transmission of digital video and audio. Sharing media does not result in loss of picture or sound quality. It is good, regardless of the connected devices, such as a monitor, camera, camera or player.
Euro/Scart
Thanks to it, outdated devices are compatible with more modern equipment. This is especially true if there is no HDMI connector. This connector has been in use for many years, but will soon become a thing of the past.
USB is a connector that allows you to connect equipment such as a camera, webcam, flash drive, MP3 player, and even a smartphone. The USB input is determined by the version standard: the higher it is, the faster the transfer of multimedia from devices to the TV screen. Later receivers have a USB 3.0 version. Today, the USB connector is the main parameter of any TV.
VGA provides video transmission from external devices to the TV, such as images from a monitor to the TV screen. The connector is useful for older equipment that does not have an HDMI input (laptop or computer). VGA then ensures device compatibility, allowing images to be transferred.
Other connectors and ports of the set-top box
To understand exactly which ports will be used to connect the tuner to a PC monitor, you need to study all the interfaces that devices of this type are equipped with. The fact is, depending on the year of manufacture of the digital TV set-top box and the class of the computer screen, the set of connectors can vary significantly. In this regard, you need to carefully examine the rear panels of the devices for the presence of additional interfaces.
Antenna input
Until a certain time, this connector was given priority attention, so receivers of various price categories were equipped with it. As a result, the user could connect an analog TV antenna, satellite receiver or video player. Today, to receive digital signals, a classic external antenna, mainly of decimeter power, is used.
This is perhaps the most significant and feature-rich multimedia interface. The connector allows you to simultaneously transmit audio and video signals through one cable. Shared transmission does not in any way affect the quality of the content, and there is no data loss. As a result, the user can play files, hear clear sound and see pictures in Full HD format.
SCART
Thanks to the presence of this interface, older models are connected to more modern equipment. This is especially true for devices that are not equipped with HDMI. It has been used for quite a long time, so it will soon cease to be used.
Another multifunctional connector, since it is equipped with a wide variety of equipment: cameras, web cameras, flash drives, MP3 players and smartphones. The speed of information transfer directly depends on the interface version (2.0; 3.0), naturally, the higher it is, the better. Almost all modern receivers are equipped with USB 3.0, just like TVs. True, it will be useless for connecting a monitor, although it is possible to connect speakers through this interface.
The input provides image transmission to the monitor from external devices. Basically, it was previously used to connect a monitor to a computer, until it was replaced by more modern DVI and HDMI connectors. The interface will be useful to owners of equipment that is quite outdated. Compatibility with older equipment models is the main advantage of VGA.
DVI technology is an attempt by developers to upgrade VGA, but the interface only allows for video transmission, therefore, audio will require an additional cable and connector. DVI and HDMI ports are considered mutually compatible, since the user can combine them. Of course, this will require special adapters.
Pros of satellite TV on your computer
Before you connect the receiver to your computer, you first need to decide whether you need it? Watching satellite channels on a PC monitor has a number of advantages over standard TV use:
- You don't need to download special applications to watch TV channels on your computer screen. No need to spend large traffic packages.
- Watching satellite television becomes possible even in remote areas.
- Relatively easy system setup. Even a beginner in this matter can figure out how to connect the receiver to a computer.
- Excellent signal level, good image quality.
Common problems
Now you know whether it is possible to connect a digital set-top box to the monitor, including a CRT display. This is possible if you think through the connection diagram in advance and buy an adapter (if you cannot do without it). The downside is that after connecting the equipment, difficulties may arise. Let's highlight the main ones:
- There is no TV image on the monitor. Make sure the circuit is assembled correctly, use a different video output.
- Not all channels were found. Try running the automatic search again, set TV channels manually.
- No sound. Check that the connection is correct. Perhaps you were able to connect video to a digital tuner, but forgot about audio.
- Channels freeze or disappear. Press the INFO button on the remote control and check the signal level. If it is less than 50%, you need to adjust the antenna or call your provider.
Most of the problems are related to circuit assembly errors, so be careful when choosing a connector. If you were unable to connect digital television on your own, use the help of a specialist.
Disadvantages of satellite TV on a computer
However, such viewing of TV programs also has a number of significant disadvantages:
- You need to do the connection and setup yourself. Or by attracting craftsmen for an additional fee.
- The cost of tariffs for activating such services from providers is still high.
How to connect the receiver to a computer? Maybe it's worth turning to an alternative solution? They are sharing packages, which are offered by almost any operator of such services.
Connecting a tuner
How to connect the Tricolor receiver to a computer? The first thing you need to do is purchase a switch type device. This is the name of a signal switch that provides exchange between several network components.
Accordingly, connecting any TV tuner to a PC is possible only through this device. The initial step will be to connect the switch to a personal computer.
How to connect the receiver to a computer? Twisted pair cable is required for your device. Experts recommend paying attention to the compatibility of the cable and equipment. Only after this can it be connected to the switch and tuner connectors.
Connecting a tuner is possible when using Total Commander. An FTP server is added for it. Next, in the windows that appear, you must enter all the required information to create an account. It is necessary to save the data for the tuner. The next step is to connect to an operator to organize your viewing.
Tuner: options
We continue to look at how to connect the receiver to a computer monitor. Watching satellite TV on your PC is possible through several types of devices. Tuners differ from each other in terms of the dvb standard and the ability to receive digital channels in a certain format. Today, the user has the opportunity to choose a dvb tuner that is not only capable of reproducing digital television on standard computers, but also operates in analog mode. And this already provides greater viewing convenience.
Basically, dvb devices come in two variations:
- A special module for subsequent installation in a PC.
- Separate receiver.
What's the difference? An internal standard TV tuner for your personal computer is the most compact solution. Externally, such a device looks like a small card. The internal receiver here must be inserted into a special PCI connector located on the motherboard. As a result, such a satellite TV tuner is a fairly simple device to operate and configure, which provides the user with the opportunity to watch many channels. But at the same time, its capabilities, in comparison with a standard tuner with dvb technology for computers, remain very limited.
Now it is important to note the key difference between dvb t2 and dvb c technologies for PC. The first is used on computers to organize viewing of television programs using terrestrial networks. You may need to download certain software for your device to function properly. The second technology involves connecting via satellite. The external tuner here will be connected directly to the antenna and switch for a direct signal. You can also highlight a number of devices that are connected via USB.
Installation and connection of a satellite dish
When considering connecting a satellite dish, it is reasonable to focus on the basic rules for placing the deflector unit and organizing electrical connections. The step-by-step assembly of the node looks like this:
- the antenna mounting block is placed strictly on the southern wall of the building;
- It is recommended to move the mount with a rotating unit so that it is convenient to direct the antenna and at the same time signal reception is not interfered with by the balcony structure or other interference;
- installation of the antenna unit without a convector is completed by fixing the dish by clamping the bolts on the rotary unit.
At the second stage of installation, you will need to correctly assemble the cable line and connect to the convector. F-connectors are used to connect the wire and the corresponding connectors of the receiver and antenna head. The line assembly process algorithm looks like this:
- a layer of top insulation 10-15 mm long is removed from the coaxial cable;
- the wire braid is moved to the side, and the same is done with the screen foil;
- the thick internal insulation around the central core is removed;
- The F-connector is twisted with force onto the foil and wire lowered onto the cable insulation, while the central core is pushed into the corresponding hole in the connector;
- the excess conductor protruding beyond the end of the connector is trimmed off.
Carrying out settings
How to connect the receiver to a computer monitor? Let us immediately note that it is impossible to download satellite TV to a regular computer. After all, the signal here is transmitted and received via satellite. Therefore, simply downloading and installing the program will not be enough. A receiver is required that will receive the signal.
If you want to watch TV on your computer for free, you will need to download sharing files on the website of any operator. Next, you just need to sign up for a relatively inexpensive subscription.
Antenna setup
After the basic installation of the south-oriented deflector, you need to fine-tune the Tricolor TV. This will make it possible to receive a stable and strong broadcast signal and to a large extent neutralize the effect of bad weather conditions. There are several ways to independently set up the Tricolor TV satellite dish.
Using the device
A simple SatFinder device will allow you to configure the Tricolor TV dish to the satellite as accurately as possible . Using the device is quite simple.
- The cable from the antenna convector is connected to the LNB input of the device.
- The wire from the REC output of the device is connected to the input of the receiver.
Detailed instructions for using the device are as follows:
- the initial adjustment is made with the gain control to a reading of 5 scale divisions;
- turning the antenna left and right, achieve maximum readings on the measurement scale;
- If the satellite dish tuning device goes off scale and beeps, you need to reduce the gain by rotating the corresponding knob.
Work algorithm
Can the receiver be connected to a computer? Yes, and we will tell you exactly how best to do this.
Use the following step-by-step instructions:
- Connect the receiver to the PC as a second computer on the local network. To do this, the main PC connects to the Internet. Then a local network is installed using a switching device of the “switch” variety.
- Now a twisted pair cable will come in handy. With its help, the receiver is connected to the switch, and the latter, in turn, to the computer.
- Turn on the TV and go to the “Settings” section. In the “Network setup” section, the DHCP line will be important for you. This is where you will get the IP address. It is definitely worth photographing or recording.
- Perform all network settings on the satellite receiver itself.
- Now it's time to launch Total Commander on your computer.
- Go to "Network". Next, click on “Connect to FTP server” in the pop-up menu.
- After these steps, a corresponding window with settings will open on the monitor, which will help you establish a connection to the FTP server.
- Click the “Add” button to subsequently connect your satellite receiver to your computer.
- Next, you need to fill out the standard input fields in the window that appears.
- "Connection name". You can specify a custom name. For example, "Receiver".
- "Server/Port". The saved address from the third paragraph of the instructions is written here.
- In the “Account” line, enter the login to access the server of your receiver. You need to come up with it yourself.
- The “Password” field specifies the code to access your account. You also come up with this combination of symbols yourself.
- How to connect a satellite receiver to a computer? Next, all you have to do is click “Ok” and save all the entered settings.
Start using the service
How to connect the Tricolor receiver to a computer? We recommend using the instructions above. Now let's look at how to start using the account you just created:
- Highlight the saved “Receiver” entry.
- Click on "Connect". After this, the device should begin connecting to the server.
- Next, Total Commander will display a set of receiver files in the window if the connection was successful. It is worth noting that you can work with the documents and folders that appear in the same way as with the structural components of the Windows system. To change anything, you should select a folder or file, and then select “Files” from the top menu. Next - “Change attributes”. After this you can start editing.
- In the “Change Attributes” window that opens, specify the required value for the attribute. For example, 755. Next, you just have to click on “Ok”.
- That's it, the connection is complete.
How to connect a receiver to a computer? The connection can be made directly. In some cases, a switch or router is required. In this example (we have analyzed it), the receiver must have settings similar to those applicable on the computer’s network adapter.
How to connect “Multiscreen” Tricolor TV and configure
Television is now an integral part of our leisure time. Users of a major satellite company can now watch TV programs not only through TV, but also through mobile phones and tablets. To do this you need to use a special service. Before connecting “Multiscreen” Tricolor TV, carefully read the terms of cooperation.
Description of service
How does this application differ from analogues offered by satellite TV channels? This is a unique opportunity to watch TV shows and movies simultaneously on multiple devices. This improves the quality of service. The only negative is the inability to watch channels while being away from the TV.
The convenience lies in the fact that if family members have different preferences for the TV shows and films they watch, then this application can be used to resolve this issue.
Using it, you can not only select, but also duplicate television on your phone and other gadgets. You can also select TV channels regardless of what exactly is broadcast on TV. Users can simultaneously watch programs and record a movie, which in no way interferes with the broadcast.
The application provides the ability to select one of the presented modes, which can be changed at your own discretion:
- "Mirrored". The broadcast is carried out from the TV screen to a tablet or phone
- "Independent". With one receiver you can watch several different TV channels simultaneously. In this case, you can switch channels yourself.
Who can use the service
Not every subscriber has access to the Multiscreen service. The application will only be active if the user has a transmitter that meets certain requirements. Otherwise, you won’t be able to set up a signal to transmit data to the gadget.
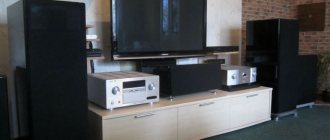
Types of AV receivers
How to connect an AV receiver to a computer? This question is asked by people who want to watch movies or play games on a computer, accompanied by high-quality, comprehensive sound that only an audio system can provide. Buying a receiver that would connect it to a PC is half the battle. It is equally important to connect it correctly.
Today, receivers sold on the audiovisual equipment market are equipped with several universal interfaces that make connection with other devices available. The most popular interfaces are the following:
- "Tulip". This is the name of the composite connection method to transmit stereo and video signals.
- Component method. This method is well suited for working with video files.
- HDMI connection. It transmits not only a video signal, but also multi-channel and surround sound.
- Digital way.
Functionality of AV receivers
Let's look at the key features of these devices:
- A rich set of different tuner settings.
- Possibility of automatic tuning of spatial sound. Using a microphone, the system itself determines the following parameters: speaker sizes, distances to them, volume for each speaker, etc.
- A wide variety of surround sound programs.
- Digital decoders that help decompose stereo into a multi-channel sound circuit, where all speakers are fully used.
- Supports various application modes: cinema, music, video games.
- A built-in converter that, when connecting various devices (computers, various players, video cameras, game consoles, etc.), allows you to use a universal HDMI cable to output images.
- Possibility of analog connection of an external decoder.
- Support for a second zone (additional stereo acoustic system).
- Trainable remote control point.
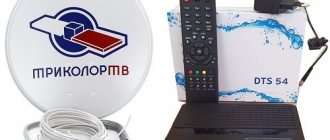
What is included in the standard set of Tricolor equipment
The standard Tricolor equipment set for one TV includes the following components:
- satellite TV subscriber smart card;
- antenna unit deflector plate;
- deflector mounting block with rotating block;
- antenna convector;
- Tricolor receiver, also known as a receiver or TV set-top box;
- operating instructions for the devices used and brief instructions for installing the kit.
The Tricolor connection diagram is not complicated. The convector of the antenna unit is connected by a coaxial cable to the input port (connector) of the receiver. The receiver and the TV are connected to each other by a set of wires, the composition of which depends on the capabilities of the picture-forming device. For older TVs, analog wires with RCA tulip-type connectors are used. Modern TVs can be connected to the receiver using an HDMI cable.
Satellite TV Tricolor can be offered in the equipment version for two TVs . In this case, the receiver connected to the antenna convector acts as a server. The second TV set-top box is connected to it using a twisted pair digital cable. It can be purchased at any computer store if the length of the wire included in the kit is not enough.
Methods for connecting AV receivers
We already know how to connect the Tricolor receiver to a computer monitor. Now let's look at connecting the audio system.
There are several ways to connect an AV receiver to a PC:
- Using the Internet.
- Through the use of a sound and video card.
- Through a mixed type of connection.
The first type of connection presented is considered the most popular and simplest among users. Accordingly, your PC must have an established Internet connection. In addition, you must be armed with a switch. It’s great if the latter supports communication, say, via Wi-Fi. In this case, you can comfortably control the device using your smartphone.
Connecting the AV receiver via the Internet, making settings
Here is an action algorithm suitable for connecting Yamaha receivers:
- If you are connecting to the network for the first time, you will need to allow additional time to enter the settings that are presented by your Internet service provider.
- At this stage, a network cable will come in handy. With its help, a computer, switch, and receiver are connected to each other.
- Now the user should access the network settings menu on their PC. It is recommended to select the automatic network detection method.
- Next, the computer is assigned the status of a signal source. This is easy to do using the NET button.
- The next step is to make sure that you have a music player program installed on your computer. The standard Windows audio player is also great. If there is no such application, then you can download and install any free or paid program from the many options that the Internet offers.
- Now allow the audio device to work with audio files remotely.
- On your computer, you need to select the receiver as the priority, main source of data. How to do it? Open Control Panel on your PC, then click Choose data sharing options. Here you should limit the number of signal sources by the first setting.
- After all the correct actions have been performed, the computer is able to see the receiver. Now you can use these devices in tandem.
Let us note once again that the instructions are adapted for the most common Yamaha receivers. The settings of other devices may differ from the standard shown. Often the manufacturer himself provides an algorithm for the correct actions in the instructions.
Connecting AV receivers via HDMI
Finally, let’s look at another pressing question: how to connect the receiver to a computer via HDMI? There are two possible solutions to the problem:
- Scheme: computer video card (HDMI/DVI with HDMI adapter) – HDMI cable – HDMI IN receiver. Accordingly, both sound and image will be output through this interface. How to connect an HDMI receiver to a computer? First of all, a codec package is downloaded to the PC. When installing it, you should select the SPDIF device (that is, the receiver) as the priority for audio output. Don't forget to set the receiver as the default one in Windows playback devices. In this case, all audio decoders supported by your PC's video card should work. You can find a list of them in the user manual for the component. If you have an old video card with a digital interface, then it must be connected to the computer's sound card using a special conductor. In addition, some video adapter models require a DVI to HDMI adapter, which allows audio output.
- Scheme: computer video card (HDMI/DVI with HDMI adapter) – HDMI cable – HDMI IN receiver + coaxial or optical digital audio output on the motherboard + coaxial or optical cable + special optical connector on the receiver itself. In this case, the image will be output via HDMI, and the sound will be output from the motherboard to the receiver via an optical cable. How to connect the receiver to a computer via HDMI? In some cases, you may need a separate sound card, a special optical cable with a “spout” at the end for subsequent connection to the optical output connector (its name is Optical OUT).
We hope that the above instructions will help you understand how to connect receivers to a computer: both for watching satellite television on a PC and for creating a “home theater” system with surround sound and high-quality image output.
Checking connection compatibility
The essence of testing is that you need to check the availability of accessible connectors for the screen and set-top box. The main problem is that if you have an old monitor and a new tuner or vice versa. The devices will have completely different ports, making it difficult to configure the connection.
However, difficult does not mean impossible. Today you can purchase adapters without any problems. Mostly they are used to connect the DVB T2 set-top box to the monitor. For example, the adapter allows you to connect VGA and SCART or any other connectors.
It is clear that there will be no problems if you have a monitor and a receiver manufactured at approximately the same time. With a high degree of probability we can say that they will be equipped with approximately the same ports.
Therefore, before connecting a set-top box to the monitor, first be sure to think about what interfaces you will use to implement this idea. Keep in mind that not all inputs simultaneously transmit video and audio. Of course, the best option is HDMI. The easiest way is to buy an adapter to connect to a computer monitor.