What does the term LCN mean?
The term in question is an abbreviation for the combination Logical Channel Number, which means the logical channel number.
The enabled LCN option on the TV means that all found content in the list will be ordered according to the logic of the digital service provider. Therefore, subscribers of one DTV provider with activated LCN sorting have an identical list of channels. Logical Channel Number sorting technology builds the list in ascending order of 4-digit numbers assigned by the provider. It is almost impossible to regulate the numbering of channels in full, of which there are more than 300 regional and local ones.
Providers distribute TV content by number based on their vision of popularity ratings.
Introducing Golden Media Mania 3 HD DVB-T2 super price-530 lei
For this purpose, I decided to write a brief instruction on the channel editor on the World Vision T39 set-top box - T To get to the editor, press MENU - select the second icon to get to the “TV Channel Editor” section, in the same section there will also be “Radio Channel Editor” .
As a recommendation, before scanning channels, I advise you to disable the LCN function located in this section, for the simple reason that after updating the channel list by the broadcaster, your channel list will again be out of order and will be displayed as determined by the digital TV provider. More details about what LCN is - LCN - “logical channel number” when LCN logical channel number is turned on, then in the search mode by the receiver, the channels are placed in the order in which they are “numbered” by a certain logical parameter “hardwired” in the accompanying channel signal, clock It is advisable to install the belt, otherwise your EPG TV program will show the wrong time, and in the Info modes the time will also be incorrect. And so, the receiver itself receives the date and time from the received signal. And so, if we have met the conditions above, then open the “TV Channel Editor”, the functions are immediately available initially: - Edit. This button is also “Down” to return to the channel list. LCN - “logical channel number” when LCN (logical channel number) is turned on, then in the search mode of the receiver, the channels are placed in that order.
Setting up and sorting channels on the receiver TLS3001C HDM signal
Channel settings:
1. To start setting, press the button on the remote control.
2. In the window that appears on the TV, select the SEARCH CHANNELS tab, press the OK button.
3. To access the CHANNEL SEARCH menu items, enter the password (default 0000).
4. Select the AUTO SEARCH menu item. Click OK.
5. The process of searching for digital channels.
Sorting channels
1. To start sorting digital channels, press the button on the remote control.
2. Select the CHANNEL EDITOR menu item in the CHANNELS tab. Press the OK button on the remote control.
3. In the list of channels that appears, find the channel that needs to be moved.
4. To change the channel position, press the OK button and enter the new channel serial number using the remote control.
5. Example of a moved channel.
In addition to the above method, the list of channels can be sorted by changing the sorting type. To do this, press the button on the remote control, open the SEARCH CHANNELS subsection. Change the SORT TYPE to the required one.
-Ascending/descending LCN - sorting by logical channel number.
-Ascending/descending numbers—sorting by channel number.
-Ascending/descending TS ID - sorting by Service ID (SID) of the channel, which we specify for each channel.
-Alphabetically a-z/z-a—sorting by channel name.
Recording broadcasts
Broadcast recording can only be done if there is a connected USB drive with sufficient free space. External USB 2.0 media with FAT16/32, NTFS file system up to 1 TB are supported.
1. To start recording the broadcast, press the button on the remote control. Go to the SETTINGS subsection and by pressing the OK button open the TIMERS item.
2. A list of timers will open. Having selected the required line, press the OK button.
3. Set up a timer to record the program of interest. Set the start date and time of recording. Change the TYPE to RECORDING and set the required recording duration. After changing the recording duration, click OK.
4. After setting the timer, a LIST OF TIMERS will appear with the timer configured for recording. You can exit this menu by pressing the EXIT/LAST button on the remote control.
5. At the appointed time, a message indicating that the recording will be initialized will appear.
6. In the first seconds, an information window will appear notifying you that recording has started successfully.
7. The information window about the current entry is replaced by a small red round icon with the Latin letter R.
Watching a Recorded Broadcast
1. To start viewing the recording, press the SOURCE button on the remote control. Go to VIDEO, press the OK button on the remote control.
2. Open the directory of the connected USB storage device by pressing the OK button on the remote control.
3. In this directory there will be a PVR directory, also open it by clicking OK.
4. In the directory that opens there will be a folder with the name of the recorded broadcast. Open by pressing the OK button.
5. To start playing the recording, select it and press the OK button.
6. Example of starting to playback a recording.
Shift function (pause)
The SHIFT function allows you to pause the current broadcast and continue watching from where you stopped. This option, like recording broadcasts, can only be performed if there is a connected USB drive with sufficient free space. External USB 2.0 media with FAT16/32, NTFS file system up to 1 TB are supported.
1. To activate this function, press the SHIFT button on the remote control; a message about recording initialization will appear.
2. The broadcast image will freeze. In the first seconds, an information window will appear notifying you that recording has started successfully.
3. An example of a paused broadcast.
4. To start playing the broadcast, press the PLAY/PAUSE button on the remote control
5. To continue watching the live broadcast and stop the SHIFT function, press the STOP button on the remote control. In the confirmation dialog box that appears, select YES and press the OK button on the remote control.
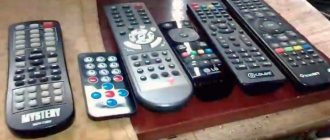
The remote control and buttons that will need to be used.
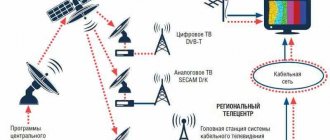
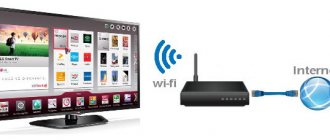
Setting up Cable TV
To set up drip network TV channels, you need to connect to the provider’s network by concluding an appropriate contract for communication services. After your apartment is connected to the common line, we set up the TV.
- We connect the coaxial cable to the TV socket.
- On the remote control, press the MENU button.
- Go to the Channel section, which is responsible for broadcast settings.
- Be sure to select the channel type Cable.
- We select the country Russia; on older models it is recommended to select Germany or Finland
- Click on Autosearch.
- The next step is to set the parameters of your network.
- We set the setting type to Full, Network or Quick. It’s worth choosing when you know the provider’s parameters.
- Next, check the box for DTV only; if you have analog programs on your network, you can also select analog, then you will have two lists of channels.
- We all start the search and wait for the end of the process, which may take several minutes.
How the function is used in television receivers
To make LCN active the channel list display mode, you need to find the corresponding item in the TV Settings Menu.
In addition to the sorting in question, on some models you can disable LCN and activate other ordering options: By Service Name (by name in alphabetical order), By ONID (by source network identifier), By Service ID (by transmitting station). Custom settings for the order in which channels are placed in the list may also be available.
How to use the function in question on a Dexp or any other brand TV, as well as rearrange channels at your discretion, should be found in the technical documentation for the device. Please note that not all models provide for enabling/disabling LCN in the TV settings. The sorting type is changed in the setup mode by simply moving through the menu items using the CH+ and CH- buttons.
source
Everything you didn't know about HDMI CEC yet
HDMI You are reading an article
Since its introduction into the consumer electronics industry, HDMI cable has been at the center of controversy and various discussions. Some manufacturers viewed it as a “valuable tool” in their arsenal of functionality. Others pin their hopes on it because it can protect information from copying, while others express dissatisfaction with HDMI due to its incompatibility with some interfaces and shortcomings.
The website 1fleshka.ru has already posted several articles on HDMI, but not everything has been said about this technology. So we'll go ahead and look at one small aspect here that may make your understanding of CEC easier.
CEC (Consumer Electronics Control) - which in English means: control of consumer electronics. This is a control protocol that is found in HDMI. The main feature is that not all manufacturers call this protocol the same in their “devices”. LG, for example, calls it SimpLink, Samsung - Anynet, and Sony even calls it BRAVIA Sync. To make it easier for you to perceive this information, we provide a table.
| LG | SimpLink |
| Samsung | Anynet+ |
| Onkyo | RIHD |
| Sony | BRAVIA Sync |
| Hitachi | HDMI-CEC |
| Pioneer | Kuro Link |
| Toshiba | Regza Link and CE-Link |
| Sharp | Aquos Link |
| Panasonic | VIERA Link, HDAVI Control and EZ-Sync |
| Philips | EasyLink |
| Mitsubishi | NetCommand for HDMI |
Modern multimedia systems such as MythTV and XBMC have HDMI-CEC in their arsenal. All this is done thanks to the libCEC interface. This makes it possible to control all devices with image broadcasting using one remote control.
What is HDMI CEC?
CEC is a built-in feature of HDMI and is designed to allow the user to control up to 10 devices with just one remote control (such as a TV). CEC also allows some devices to configure each other without user intervention. HDMI-CEC is a single-wire, bidirectional serial bus that functions as a remote control.
List of available commands in CEC
- Touch playback: The device will become the active source when playback starts;
- System in standby mode: switches all connected devices to standby mode;
- Preset transfer: transfers channel tuner settings to another TV;
- One touch recording: recording starts immediately;
- Timer setting: one device (for example, a TV) sets the timer settings for another (for example, a DVD recorder);
- Information system: checks all components for addresses and configuration;
- Control pack: playback controls;
- Tuner control: control the tuner of another device;
- On Screen Display: Uses the TV screen to display text;
- Device control menu: using the menu of another device;
- Routing control: control of switching signal sources;
- Remote Control PassThrough: Pass through remote control commands;
- OSD Device Name Transfer: Transfers your preferred device names to the TV.
Technical implementation of the interface
CEC is implemented as a backbone wire in the HDMI connector (pin No. 13). This allows devices that support this interface to communicate with each other. The idea of the “product” is to control multiple devices with one remote control.
demonstration of interface capabilities:
In any installation with HDMI, the display is considered the default device and receives two dedicated labels: physical address (0.0.0.0) and logical address (0). At any point in a given system, all CEC devices have both physical and logical addresses. At the same time, devices that do not support CEC have only physical addresses. Physical addresses are processed based on the default location to the device. For example:
- If the A/V output of the receiver is connected to the HDM1 connector of the TV, it receives a physical address of 1.1.0.0;
- When you connect to the second port, you get 2.0.0.
Logical addresses are assigned to devices based on their functionality (as provided in the CEC specification document). When the HDMI device menu is displayed on the display (On the Sony KDL46EX720 this is achieved by pressing the Synk button) – the screen sends a signal through the CEC wire to all connected devices. After this, responses are collected and the user is provided with a list of CEC-compatible devices. Selecting one of them will ensure that future remote keystrokes on the remote control will be immediately transmitted to the TV.
Connecting a digital set-top box
The choice of set-top box, as well as its connection, very much depends on the year of manufacture of the television receiver, and, consequently, the presence of input ports of a certain standard on it.
To a modern TV
When connecting a modern television receiver to a DVB-T2 device, of all the input connectors it has, it is best to use HDMI, since this interface is designed for high-definition multimedia, and using one cable you can immediately transmit digital video and stereo audio signals.
Reference. An HDMI-to-HDMI cable is usually not included as standard and must be purchased separately.
Connect the receiver to the TV in the following sequence:
- a central, external or indoor antenna is connected to the set-top box via the RF IN jack;
- The output of the HD OUT set-top box and the HDMI input are connected with a cable;
- both devices are connected to the electrical network (receiver via adapter);
- on the remote control of the television receiver, use the “SOURCE” button to select the desired signal source (in this case, HDMI);
- Using the menu that appears on the screen, the DVB-T2 device configures television channels.
To the old TV
Old TVs mean models that already have 3 RCA input connectors, but do not have an HDMI port.
The connection is made in the same way as the previous one, but using a cable with “tulips” included in most receivers, and the colors of the sockets on both devices and on the cable plugs must match each other.
If the TV has one speaker, and therefore one audio input, a white plug is connected to it, and a yellow plug is connected to the video input.
After turning on the set-top box and the TV, use the “SOURCE” button on the remote control of the TV receiver to select the AV signal source.
Attention. You can also connect modern TVs with a 3RCA-3RCA cable, but the image quality will be worse due to the transition of the digital signal to analog.
Owners of television receivers that have only SCART, D-SUB, DVA or S-VIDEO connectors at the input will face an even greater problem. To connect them, DVB-T2 devices must have similar outputs. You will also need to purchase connecting cables.
After connecting both devices to the network, depending on the selected connector, on the TV using the “SOURCE” button on the control panel, select the desired signal source SCART, PC or AV.
A TV that only has an antenna input cannot receive a digital signal directly from the set-top box. When connecting the HD OUT output to it with a piece of coaxial cable, only an analog signal will be received, which is equivalent to connecting an ordinary antenna. This problem can be solved by using an additional device - an RF modulator.
CI comparison with CI+
CI - Common Interface is an interface designed for connecting various devices to a TV, it is most widely used for connecting CAM modules, this allows you to view encoded television signals (from satellite or cable television, broadcast television can also be encoded, but this is practically not done), that is TV programs provided for viewing to users on a paid basis. Currently, the CI interface is a thing of the past and has been replaced by an improved CI+ interface.
ci and ci+ what is the difference
The difference between the two is that CI Plus or Common Interface Plus implements a form of copy protection between the Conditional Access Module (CAM) and the television receiver. The CI+ standard is compatible with the CI of older television receivers that have CI.
Together with a CI slot, it can be used with CI + CAM, and vice versa, but only those television programs that are not marked as CI + will be available for viewing.
Features of using LCN on a TV
The menus on TVs of different brands are different, so to work with LCN you need to find the appropriate item. In many models, manual shutdown is not required; the order is changed simply by “moving” in the setting mode with the CH+ and CH- buttons. Sometimes you need to disable it manually to set a custom order, or, conversely, set it to the default.
For clarity, we will show what the desired menu item might look like:
ATTENTION! By enabling LCN again, the user loses the previously established order.
Note that in this section of the menu you can set other types of sorting, for example, alphabetically.
So, we see that LCN is just a recommended official order of channels, and adjusting the TV to suit itself is available to any TV viewer - you just need to explore the menu options or read the instructions.
source
Purpose of the device
Thanks to a digital set-top box for your TV, you can not only watch broadcasts in the new standard, but also significantly expand the capabilities of your TV receiver. There are a large number of models on sale, differing in cost and functionality. Among the main functions performed by the set-top box are:
- Play multimedia files from a flash drive connected to a USB port.
- Recording a TV broadcast in ts format to an external drive.
- Possibility to stop viewing in real time.
- Thanks to the TimeShift function, the broadcast of a TV program can be delayed.
Some budget modern TV models have significantly less functionality, although they are equipped with a DVB-T2 tuner. In such a situation, the console will be able to significantly expand its capabilities.
These devices can work in one of two ways:
- All files are stored on built-in media; to run the necessary software, you must first install it.
- Cloud services are used to store work information, and the device can only function when connected to the Internet.
Such tuners can be equipped with several slots for connecting memory cards and support a large number of multimedia formats.
What is LCN nail sealing system with wax
LCN (Light Concept Nails) is a well-known German brand owned by Wilde Cosmetics GmbH, which has representative offices in 85 countries. Innovation and many years of experience have allowed it to take a leading position. LCN specializes in the production of unique nail products.
The LCN nail sealing procedure involves the use of wax produced by this company to strengthen and heal the nail plate. A thin film, invisible to the eye, forms on the nails, which protects against negative external influences. Application of the composition is carried out quite quickly, and the results are worth attention.
- The strength of the nails is restored.
- A healthy and natural shine and smoothness appears.
- Delamination of the nail plate decreases or stops altogether. By sealing the free edge of the nail, you can grow your own manicure to a considerable length.
- Nails are saturated with vitamins and minerals, their growth accelerates.
- The unpleasant yellowish tint disappears.
For the procedure of wax sealing nails, only high-quality and natural compounds are used. After visiting the salon, you can lead your usual lifestyle without worrying about the condition of your nails and coating.
(2 ratings, average 4.5 out of 5)
Basic Broadcasting Standards
Television standards are labeled differently for different countries/regions, here are some of them:
- DVB – European.
- ISDB - Japanese.
- ATSC - American.
In turn, the DVB standard is divided into several categories and subcategories.
- DVB-S;
- DVB-S2;
- DVB-T;
- DVB-T2;
- DVB-C;
- DVB-C2.
The last letters have their own meaning, where:
- T – digital terrestrial TV;
- C – digital cable TV;
- S – digital satellite TV.
The number 2 after these letters means an updated version of the previous standard, which allows increasing the channel capacity.
Basic television broadcasting standards
DVB-C
DVB-C stands for Digital Video Broadcasting – Cable, “digital video broadcasting – cable”. This is a European television standard that transmits high-quality video streams in MPEG-2 or MPEG-4 format via cable.
DVB-C2
DVB-C2 is a second generation standard that has a number of advantages. It is economical, but allows you to upgrade your network while receiving a clear and interference-resistant signal. The data transfer speed has increased noticeably and is 83 Mbit/s, which allows you to watch TV shows with virtually no interference.
DVB-S
DVB-S stands for Digital Video Broadcasting – Satellite, “digital video broadcasting – satellite”. This is the transmission of video and audio via satellite. To connect and configure, you will need a satellite dish.
A very popular and still in demand in all corners of the country way to connect and watch channels.
DVB-S2
The DVB-S2 standard improves signal reception strength several times, prevents interference, and produces high-quality images. The S2 standard was developed in parallel with HDTV, which significantly improved the quality of the transmitted image. The performance of DVB-S2 exceeds DVB-S by 30%.
DVB-T
DVB-T stands for Digital Video Broadcasting – Terrestrial, “digital video broadcasting – terrestrial”. This is the transmission of video and audio using terrestrial broadcast television networks. In the house, such a signal is received using a regular indoor antenna which is connected to a decoder (tuner).
DVB-T2
The second generation of the DVB-T standard which significantly increases throughput. It also makes it possible to transmit video in UHD and 3D formats.
There are several ways to receive a DVB-T2 signal on your TV.
- The TV already has built-in support for T2, and to decode the signal you will need to insert a CI module into the TV.
- Digital television receiver. You can buy it yourself, or from the digital television operator whose digital television you have chosen.
You also need to buy an antenna separately (preferably with an amplifier) and connect it to the receiver.
Or if you have a CI module, then directly to the TV. How digital television works
QLED, ULED, Nano Cell and Triluminos - another scam by marketers?
In fact, quantum dots not only sound cool, but also work cool. TVs with the prefix QLED, ULED, Nano Cell and Triluminos are not just an overpayment for another marketing name, as one might think, but a truly new color improvement technology, albeit developed on the basis of the good old LED. Quantum dot matrices provide a much brighter and richer image. For a bright room or studio with large windows, the choice in favor of such models is obvious.
A quantum dot TV will also help out if a huge black rectangle does not fit into the brand new interior and goes against your design taste. It is this technology that underlies most interior models.
You won’t find such TVs in the budget segment, because they are considered competitors to OLED itself. In black they are, of course, inferior to it, but in brightness they are many times greater.
User reviews and questions about using a TCL TV
Setting up TV channels
4.29.2019 TCL LED32D2900S CBD. Elbrus district. Doesn't pick up any channels. We tried everything. Outdoor antenna. The old TV showed one channel. This one doesn't show that either. 5.5.2019 TCL LCD 20B66 Shymkent How to connect an antenna with a characteristic impedance of 75 Ohms, frequency range 470-790 MHz, vertical polarization, F-connector? Will not find channels in auto search 3.22.2020 TCL L50P65US Grozny I bought a TV in April of this year, they told me that it has a built-in tuner, but it doesn’t show the channels no matter how I configure it? 7.30.2019 TCL L43 S6FS Mytishchi I caught only 10 digital channels and that’s it! How to set up 13/6/2019 TCL LED28D2900S Crimea, Chernomorskoye how to set up T2 on the built-in receiver on a TCL LED 28D2900S6 TV
Issues related to setting up TV channels, such as the absence of some of them, or all of them (even though the old TV was showing something) are solved by increasing the efficiency of the antenna signal. The TV antenna must be efficient, located in the optimal place from the point of view of receiving television waves, and be correctly oriented. During the initial setup, you need to check that the country of residence is set correctly, and when viewing programs from an individual antenna, set the tuner settings options "DVB-T terrestrial"
Sorting, list of TV channels
3.3.2019 TCL 32DD420 Pinsk, Belarus How to set up a list of channels and assign these channels in accordance with the buttons on the remote control (numbers from 1 onwards). Channels are configured, for example, 3, then 25, from 30 to 36, etc. 6.3.2019 TCL 32DD422 Vileika, Minsk region. When initially setting up the TV, we performed an automatic search for channels, and now we want to arrange them in an order convenient for us. We tried to do this through Settings-Channel-Channel Organizer. Using the “change” button, the serial number of the channel was changed. But the channel numbering we set is not saved, how can we do it so that, for example, by pressing the number 1 on the numeric keypad of the remote control, ONT, 2-Belarus1, 3-RTR, etc. appear. in the order they were used to on the old TV. 19/7/2019 TCL LED43D2930 Bryansk Hello, TCL LED43D2930 TV, after setting up and auto-searching for channels, I edit the channels (I arrange them in a convenient order), and then constantly (happens 5-6 times a day) the message NETWORK CHANGED pops up and the auto search begins, if Do not interrupt all channels are updated naturally scattered! If you interrupt - for example, press the menu or turn off the TV - it will still be random and even with some channels doubled/overlaid! Does this model have an AUTO UPDATE function and how to disable it?? Moreover, I received advice from familiar specialists: (Reset the settings, find the channels again, turn off lcn when auto searching, and then arrange the channels) BUT I CAN’T FIND IT IN THE MENU (or anywhere else) CONTROL OF THE LCN FUNCTION 3.26.2019 TLC 28DD400 Minsk when setting up channels they are configured with 9001
In order to arrange channels at your own discretion, it is indeed necessary to disable the LCN option. This can be done in the "Options" section of the menu.
How to unlock your TV
29/12/2019 TCL 50EP680 Minsk The country of residence is Russia, and when you try to change it to Belarus, it requires a four-digit password. How to change the region to Belarus (I don’t understand what password)? 5.6.2019 TCL L43P65US Perm I bought a new one. Channels are not configurable. You must enter a password.
The default password is 0000. If you have forgotten the password, enter 0812 to override any set code.
YouTube doesn't work
08/04/2020 TCL500DB600 Kyiv When you turn on YouTube it says: errorCode=-201, below the line: error Description=net::ERR_CERT__INVALID, below: failURL=https://www.yotube. TV TCL 150P6US, connected to the Internet, some applications open normally, but we can’t open youtube or ivi - it says error 201. 02/23/2018, Kursk.
Due to a change in Google's policy, many of its applications (including YouTube) stop working normally on Smart TVs. You can get out of this situation by downloading one of the third-party programs on your computer, for example Smart YouTub TV. The program is recorded on a flash drive and installed as an application on the TV.
When to contact a service center
3.21.2019 Tcl 50p62us Moscow TV tcl 50P62US, when disconnected from the network for a while, the TV turns on with difficulty, the LED lights up brightly (in operating mode it lights up brightly then dims) and the TV does not respond to the remote control and buttons on the TV itself, connected by an HDD to the TV at this time it unwinds. Until you turn the power plug on and off several times, only after that the TV works. I tried new firmware, it doesn’t help 7.18.2019 TCL U43p6046 Gomel The indicator does not work when the TV is turned off, it does not light up when you take the plug out of the socket and put it back in, it lights up for a couple of seconds and goes out again I can’t figure out if it’s out of order or turns off somewhere in the settings before updating the android it worked properly when the TV was turned off, it was lit when it was on no. 10.10.2019 TCL 32DS520X1 Ivano-Frankivsk The remote control is broken, how can you use the TV without it, there is nothing else on the TV except the on and off button? 23/8/2019 TCL L32S6FS SMART TV Smolensk district The TPD.NT72563.PB773 motherboard exploded due to a thunderstorm. Bought new from Poland, replaced, but does not turn on. When turned on, the white LED lights up for 2 seconds, and that’s it. Do you need to program the board before launching?
Setting up satellite TV
13/5/2019 TCL L50P6US Staroshcherbinovskaya How to set up tricolor TV? 8.30.2019 TCL L55P65US Zelenogorsk Krasnoyarsk how to properly install the K module and configure satellite TV 10.27.2019 TCL 40ES560 Moldova how to add satellite ABS
Digital TV connection
21/5/2019 TCL DT-21276SG Kaliningrad When connecting the set-top box for digital television, the color disappeared, the image was black and white. I checked the connection according to the instructions for the set-top box. Connection cable""tulip""yellow to yellow, red to red, white to white. It is possible that the TV is configured incorrectly. The color system was set to 433PAL. There is a problem - the remote control is lost. 9.1.2019 Tcl L50p6us Votkinsk I can’t set up digital TV. Which country should I choose? 11/9/2019 TCL L32S6400 Tambov Help set up cable TV, MTS provider. In the settings I indicate “Cable”, it finds everything, but does not want to show it, it says “Insert CI card” 10.2.2019 TCL LED40D2900AS Evpatoria “I can’t set up digital TV, it doesn’t receive a single channel. I set it up over the phone from the Tsifra ru hotline. Manual tuning DTV Channels 21,23,29,32 Power 90……..Channels are not tuning. 23/10/2019 TCL LED32D3000 Ingushetia The initial installation of channels fails, we have a worid vislon terrestrial receiver, after an automatic search the TV displays the message no channels 12/11/2019 TCL 26E92Nh20 Volgograd region Can I connect this TV model to a Rostelecom cable line via a WI-FI router via cable. 24/12/2019 TCL L43P6US + 4K Minsk Works very poorly with cable TV. Channels 15 go well. The rest are all in squares. I installed Samsung and everything is fine. Possibly old firmware. TV is 3 months old. 17/3/2019 TCL Led24d2900sa Murzitsy Search for digital channels 6/8/2019 TCL LED40D3000 Kazan What could be the reason for poor image quality. The television is cable, analog channels are set up, but the image is not clear, as if a little blurry. Could the picture get better when switching to digital television? In the image settings, brightness, contrast, sharpness were adjusted, but the image did not improve. Is this related to signal quality?
Connecting audio speakers
06/08/2020 TCL L55P8MUS Tula region. Mr. Aleksin Hello! Tell me how to connect this TV to an LG soundbar via an HDMI cable. I seem to connect it correctly, but the sound comes through the TV speakers. Maybe there are other TV settings that I don’t know about yet?
According to the instruction manual, the HDMI port is the input to the TV. The SPDIF output is intended for connecting audio devices.
How to set the TV turn on time
18/6/2019 TCL 50DB600 Minsk Does this TV have a turn-on timer? 07/09/2020 tcl l43p8us Bratsk, Irkutsk region How to set the TV turn on time
There is no information in your TV's instruction manual about setting the on time.
How to change the image format
Please tell me where to find on the remote control or in the TCL 32D4026 menu how to switch the screen resolution? (for example, it’s 16:9, how can I change it?) Connected to cable television. Digital channels available. 09/26/2018, Belarus. The Grodno region. Novogrudok
In the “Image” menu section, select the “Aspect Ratio” line
What equipment is needed?
To decrypt the signal and reproduce the picture, you need a DVB-C decoder. It doesn't matter where it is:
- On a TV that has a dvb c connector and a decoder;
- In TV tuner;
- In a Cam module installed as a board in a TV.
You need to connect to the ANT IN/RF IN connector - a standard output (also used for antenna connection) for a coaxial television cable.