- home
- How to install a connector on a coaxial cable: preparation, wrapping and crimping
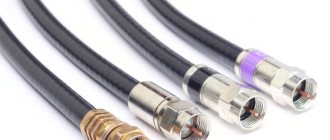
Coaxial cables are used to transmit cable television signals. Most of their connection options (cable splicing, as well as connecting the cable to a splitter) involve the use of so-called F-connectors. In these threaded connectors, the role of one of the contacts is performed by the central core of the coaxial cable. The outer shielding shell is attached to another contact of the connector (which is also a threaded connection) without the use of soldering, by crimping or twisting.
What you need to connect a coaxial cable
First, find out what kind of coaxial cable you are using.
This is usually indicated on the insulation. Standard sizes are RG-6 and RG-59. Then you should look at which connector is used on your device. So-called F-connectors are common, but there are also N-connectors. Make sure you select the correct size when purchasing. There are also screw plugs and crimp plugs. Bolt-on plugs are easier to secure, while crimp plugs often provide better signal quality.
How to connect a coaxial cable using a screw plug
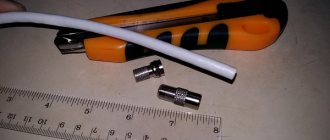
First, strip the insulation from the ends of the coaxial cable. To do this, trim the insulating layer about 1.5 cm to the end, and then remove the insulation from the cable. Perform all actions carefully so as not to damage the fibers in the cable. Alternatively, you can use insulation pliers or another stripping tool.
- Now pull back the metal mesh. Make sure the outer fibers and the wire in the middle are not touching each other.
- Now cut off the plastic cable core cover. Carry out all actions carefully so as not to damage the wire in the middle.
- Then cut the thin shielding film and pull the connector back so that the coaxial cable core protrudes through the connector.
- Now you only need to connect the screw plug to the cable. The winding cuts into the cable sheath and is thus firmly held there.
Principle of operation
Before use, it is advisable to familiarize yourself with the operating principle. Thanks to the presence of wire and protective layers that quickly absorb various interference and noise, the incoming information is not distorted. Electrical signals are used to encode data. They flow along the surface of the veins.
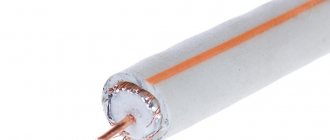
These are the main components of a coaxial cable. Buyers can find a solid design or a single copper wire design. More reinforced options are also available on the market, when the core is additionally protected by insulation. This prevents contact with the metal braid. Its main purpose is grounding.
Coaxial cable is needed to eliminate electrical noise and crosstalk. Scientists conducted research and found that these are electrical noises that arise as a result of contact between two wires. They are located nearby and should be well protected with additional insulation, which prevents their contact with each other.
If the metal braid comes into contact with the main core, a short circuit will occur and interference will begin to actively penetrate into the core. Such a process will lead to the destruction of the transmitted data. Thanks to high-quality and reliable protection against interference, you can use the equipment correctly, because the outer shell, made using Teflon, plastic and rubber, does not conduct current.
What you need to connect a coaxial cable
First, find out what kind of coaxial cable you are using.
This is usually indicated on the insulation. Standard sizes are RG-6 and RG-59. Then you should look at which connector is used on your device. So-called F-connectors are common, but there are also N-connectors. Make sure you select the correct size when purchasing. There are also screw plugs and crimp plugs. Bolt-on plugs are easier to secure, while crimp plugs often provide better signal quality.
How to connect a coaxial cable using a screw plug
First, strip the insulation from the ends of the coaxial cable. To do this, trim the insulating layer about 1.5 cm to the end, and then remove the insulation from the cable. Perform all actions carefully so as not to damage the fibers in the cable. Alternatively, you can use insulation pliers or another stripping tool.
- Now pull back the metal mesh. Make sure the outer fibers and the wire in the middle are not touching each other.
- Now cut off the plastic cable core cover. Carry out all actions carefully so as not to damage the wire in the middle.
- Then cut the thin shielding film and pull the connector back so that the coaxial cable core protrudes through the connector.
- Now you only need to connect the screw plug to the cable. The winding cuts into the cable sheath and is thus firmly held there.
Installation rules
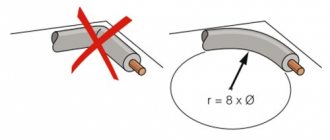
The presented wires are quite flexible, so the installation process will not be difficult. It is important to remember that the turning radius during installation cannot exceed 12 times the bending value of the cable sheath.
If the master does not follow the recommendations, then the bend will gradually destroy the integrity of the shell. The central core will push through the dielectric layer, so a short circuit will occur on the screen. It is important not to hang the cable on a nail , otherwise it will stretch under its own weight and lead to a break in the central core.
It is necessary to properly cut the ends in order to attach the connectors; the accuracy of the operation of electrical devices depends on this. You should do it this way:
- Cut the cable at right angles to the sheath.
- Insert the stripped end of the wire into a special tool to remove the insulating layer.
- Squeeze the tool, as a result the insulation will be removed and the copper core will be exposed.
- Clamp the cable well and turn it several times.
- Make a few more turns using the ring without releasing the tool.
You might be interested in this Characteristics of flexible metal hose for cable
After this procedure, the master receives a completely stripped cable, which is ready for further connection.
The sheath protects against moisture penetration into the copper wire and prevents various external damages during the entire period of operation. The cable should never be laid underground or in damp places. Water seeps into the protective shell, causing its gradual destruction, oxidation and short circuit of the central rod. But it can be used on the surface with low humidity levels, as well as in rainy weather.
To prevent moisture from penetrating inside, you need to carefully treat the joints. Silicone sealants are used for this. Electrical tape and plasticine are not proven methods of protection. You can also buy connectors that are resistant to the negative effects of moisture. Connections made by soldering can change the level of characteristic impedance.
Cable selection
To connect the antenna to a TV or digital set-top box, a coaxial cable with a resistance of 75 Ohms is required. There are many brands from different manufacturers on the market. Which to choose?
Start with the core type.
To transmit a TV signal from an antenna to a TV receiver, cables are used in which the central core is made:
- Made from pure copper. Used for satellite television systems: the signal transmitted from space has extremely low power, and any losses are inappropriate here. Copper has very low resistance.
- With copper plating. The central core is steel, but covered on top with a thin layer of copper. Such cables are used for terrestrial television systems: signal loss is greater, but not critical, and copper-plated steel costs almost 2 times less.
When choosing a cable, it is important to consider:
- Type of signal being transmitted. “Brand” brands of cables are best used for satellite TV antennas. For broadcasting or cable wiring, simple domestic ones are sufficient.
- Length of the route. Even “premium” brands have internal resistance, and the longer the signal path, the greater the loss. At distances up to 5 m, this can be neglected, but when connecting an external antenna on a high mast, the distance will affect it.
- The thickness of the central core. Standard cables have a core 1 mm thick. There are also thinner cords with a half-millimeter core. They are more convenient to install, but they are more difficult to connect to devices, and resistance losses are often higher.
- Possible obstacles on the installation path. If there are sources of interference nearby (alarm lines, electrical wiring, etc.), it is better to buy an option with maximum shielding.
- Outer shell material. The cable is insulated from the outside using black PVC or white polyethylene. The difference indoors is small, but for outdoor work craftsmen recommend more reliable PVC.
Among the brands of cables used for television antennas, the most popular are the following:
- RG 6. Product of joint Russian-Chinese production. Inexpensive, but high-quality, shielded, with a 1 mm central core made of steel or copper, aluminum braid and PVC sheath.
- RK 75. A purely Russian analogue of RG 6, produced since Soviet times. It has a copper central core with a diameter of 1 mm, a copper braid or a double screen made of tinned copper and aluminum lavsan. Can be used both for broadcasting terrestrial or cable TV, and for connecting satellite antennas (with a double screen).
- RG 59. Thin and light cable with a 0.5 mm core. It is universal, but due to the high resistance of the wires it is unsuitable for transmitting a signal over a distance of more than 200 m.
- SAT 50. Italian, with a millimeter core and a two-layer reinforced braid of copper and tin. It has a high shielding coefficient - up to 60 dB.
Noise and electromagnetic interference
How well a coaxial cable's shield protects the core from noise and EMI depends on the percentage of shielding. As a rule, manufacturers indicate figures from 90 to 99% in specifications. But keep in mind that even if 100% shielding is promised, it is impossible to achieve 100% protection from external interference. The penetration of EMF into a coaxial cable depends on the frequency used.
How well a coaxial cable's shield protects the core from noise and EMI depends on the percentage of shielding.
Theoretically, only frequencies above 50 kHz are successfully suppressed - mainly due to the weakening of the skin effect. All frequencies below this induce an electric current in the screen to a lesser or greater extent. How strong the electric current is depends on the strength of the magnetic field. It is clear that we are primarily interested in the radiation of industrial frequency current (50 or 60 Hz), which surrounds almost all technical devices.
On the monitor screen, interference from the electrical network appears as several thick horizontal stripes, slowly sliding up or down. The creep frequency is determined by the difference between the frequency of the video signal fields and the industrial frequency and can range from 0 to 1 Hz. As a result, stationary or very slowly moving stripes appear on the screen.
This is why problems arise when coaxial cable is run parallel to electrical wires and cables. The magnitude of the induced voltage in the central core of a coaxial cable depends, firstly, on the current strength on a given power line. Secondly, it depends on how far the coaxial cable runs from the power cable. And finally, it depends on the length of these cables running together. Sometimes proximity within 100 m has no effect, but if a large current flows through the power cable, then even 50 m can affect the quality of the signal. When installing, try (whenever possible) to ensure that the power and coaxial cables do not run very close to each other. To significantly reduce EMF, it is necessary that the distance between them be at least 30 cm.
On the monitor screen, interference from the electrical network appears as several thick horizontal stripes, slowly sliding up or down. The creep frequency is determined by the difference between the frequency of the video signal fields and the industrial frequency and can range from 0 to 1 Hz. As a result, stationary or very slowly moving stripes appear on the screen.
Antenna plug selection
When you have selected the desired option, connect the antenna cable correctly. You can do this in the following ways:
- Soldering. Only suitable for installing homemade TV antennas. We don't recommend it.
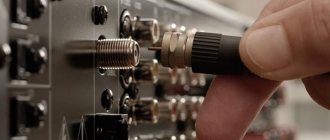
- F-plug. Suitable for connecting antennas for both digital and analogue television. Structurally, it is a washer that is screwed onto the end of the cable, where the outer insulation has been stripped and the braid and screen have been bent. The plug crimps the bent shielding elements, and the exposed central core is connected to the signal slot. We recommend!
- Old style plug. They were produced back in Soviet times. It differs from the F-plug in that it requires complete disassembly for installation. It has greater rigidity, and when assembled correctly, the strength is higher than modern ones. It is permissible to use.
FAQ
Question No. 1. Is the F-plug suitable for digital TV signal transmission, or only for analogue?
Despite the fact that this type of plug has been used for quite a long time, both its connector and characteristics allow you to fully enjoy not only analog (by the way, broadcasting will cease forever in the near future) television, but also digital and satellite television signals.
Question No. 2. What to do and what to do if the diameter of the cable is slightly smaller than the diameter of the internal thread of the plug? After all, in this case, reliable compression will not work.
In this case, it is recommended to screw the required number of layers of electrical tape onto the cable in order to adjust the diameter of the cable close to the inner diameter of the plug.
Question No. 3. When installing the plug into the corresponding socket, the TV cannot be placed close to the wall. What is the way out of this situation?
In this case, you should use an angled plug, which can be purchased at almost any store that sells electrical household appliances.
Question No. 4. In old Soviet-made TVs, the cable was connected to the plug by soldering. How to connect a modern type of cable to it?
If the signal quality deteriorates or the cable needs to be replaced due to poor contact, the plug and cable can be connected, as before, by soldering.
Question No. 5. How can you connect several TVs to an antenna or cable television network at once?
To connect several television receivers, you can use a special device - a splitter, also called a “divider” or “splitter”.
Using splitters to connect several TVs to one TV cable
Antenna cable assembly
The F-plug is mounted on the cable as follows:
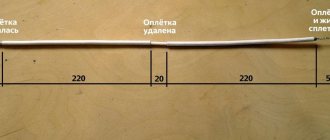
- Take the connecting end and carefully remove it from the outer insulation at a distance of about 1 cm from the edge.
- Carefully wrap the exposed braid and foil screen back onto the part of the cable where the outer sheath is still intact.
- Cut and remove the freed portion of the inner insulation to expose the center core.
- Screw the F-plug onto the wrapped braid.
- Cut the central core with wire cutters so that about 2–3 mm of wire remains sticking out.
- Screw the second part, the adapter, onto the half of the plug that has already been put on the cable until it stops. This is not a required component, but using a “dual-layer” plug improves contact between the wire and the equipment.
If you need to connect an old-style plug to a cable, the process depends on its design.
But most often it looks like this:
- Disassemble the plug by unscrewing the metal contact from the plastic housing.
- Immediately put the unscrewed housing on the cable - this makes it easier to continue working.
- Cut off about 1 cm of the outer sheath of the wire, remove the insulation.
- Carefully trim the shielding braid by 4–5 mm.
- At the place where the braid was cut, carefully strip off the inner insulation so that the central core is exposed.
- Insert the central core into the socket of the metal part of the plug. Using pliers, gently but firmly squeeze the petals around the exposed shielding shell. Here you need to make sure that the braid does not touch the central core.
- Screw in the center core fixing screw.
- Screw the plastic shell onto the metal part. The plug is ready.
Another option is soldering. The process is shown in the photographs.
The described procedures relate to preparing the cable for the antenna socket of the TV receiver. However, if the TV is connected via a set-top box, the procedure for installing the plug will be identical.
Connecting the antenna to the TV
Typically, the antenna jack is located on the back of the TV and is labeled “ANT”, “ANT IN” or similar. But the easiest way to identify this nest is visually. It is characterized by the following symptoms:
- ring-shaped metal edging;
- the central groove is a convexity with a hole into which either the central core itself or a protrusion inside the plug fits.
The antenna jack differs from other connectors in shape. It is physically impossible to connect anything other than the plug itself.
If the TV can receive both terrestrial and satellite signals of the DVB-S standard, it has two antenna connectors. The one intended for the satellite signal is marked as “ANT SAT”, “ANT 2 IN SATELLITE”, etc. The satellite antenna socket also has a notch in the center, but usually has an external thread for screwing the plug onto it.
Detachable connections
Heating self-regulating cable for heating pipes
You should be especially careful about the quality of the connection, since just one poorly installed connector can lead to image deterioration. The main methods of connecting connectors are as follows:
- soldering (SR-50-74-PV);
- crimp;
- screw-on installation.
Soldering is cheaper to do than crimping a cable. But it requires highly qualified performers.
The crimping is reliable, but the main disadvantage is disposability.
Screw-on connectors make installation easy, but the method has the lowest reliability.
Connecting the cable to an individual antenna
Depending on the connection method, individual antennas are of two types:
- The cable and plug are attached by the manufacturer. As a rule, these are indoor antennas with a short wire length;
- You must connect the cable yourself.
In the latter case, the procedure looks like this:
- The top insulation is removed from the cable, the braid is wrapped back;
- the insulation is removed from the central core. Dimensions depend on the connection socket on the antenna;
- the core is inserted into the screw connection and clamped there using a screwdriver;
- the braid together with the cable is pressed against the second terminal.
Installing the connector using the crimp method
The connector provided for this installation method has a soft metal sleeve into which the stripped braided cable is inserted. The sleeve is compressed using a device called a crimper. The result is a strong and reliable connection.
Greenlee 45516 F-Type Coax Installation Tool
The advantages of crimping are the speed of the operation, as well as good repeatability of the result. The disadvantage is that the connector cannot be reused without degrading its properties. Installation of connectors by crimping is used mainly by professional craftsmen. Crimping is of great benefit when implementing large projects, for example, laying cable television throughout an apartment building.
After crimping or wrapping is completed, braided strands may protrude from the connector. It is recommended to cut them carefully without damaging the outer insulation of the cable.
How to connect several TVs to 1 antenna
If you need to connect several TV receivers to one antenna, you will need cable routing devices - splitters or splitters. In the simplest case, the connection will look like this:
- The coaxial cable coming from the antenna is stripped, an F-plug is put on it, and it is connected to the input jack of the splitter.
- Wires for TVs are prepared and inserted into the output sockets using connectors.
If the signal is taken from an active antenna, you need a splitter with a power pass or connecting an external power supply antenna amplifier in front of the splitter.
Depending on the model, splitters can have from 2 to 8 outputs. If more TVs are connected, you need to calculate and build a chain of new splitters and signal amplifiers.
Antenna amplifier: in what cases is it needed?
In order for the digital tuner of a TV or receiver to extract information from the signal received from the antenna, it must have sufficient power.
To correct this situation, you just need an amplifier. The device is connected in the area between the antenna and the TV and increases the signal strength.
An amplifier is needed in the following situations:
- reception is carried out using a passive antenna;
- it is not possible to use power from an active antenna (for example, the signal to TVs goes through a regular splitter);
- The reception conditions are such that the signal received from the antenna is too weak. This happens due to distance, interference, obstacles in the signal path, etc.